 When Fawnda and Jeannine at Fireflies and Jellybeans announced that the very first secret ingredient for the very first Iron Crafter was going to be recycled cans, my brain was full of ideas - impractical and time-consuming ideas. At the same time, my wandering eye for jewelry reared its ugly head. You see, I go through these phases of jewelry lust - not diamond-precious stone-expensive jewelry lust . . . just cheap, mass-produced, poorly made jewelry lust. There is no warning. Nothing to prepare me against these urges. I go to bed one night completely normal. I wake up the next day desiring a bangle, a ring, an anklet - something fun to spice up an old wardrobe.
So . . . I decided to pair the Iron Crafter competition with my sudden jewelry lust. And this pairing could not be cheaper, easier or cuter.
Go to your recycle bin, your scrap pile and your button bin and grab:
-a soda can
-coordinating or contrasting scraps
-a button (for bangle and anklet)
-a 3 or 4 inch piece of thin elastic (use 3 inches for bangle and 4 inches for anklet)
-1/4 inch double bias tape (for bangle and anklet)
First, let's work on a bangle or anklet . . . oh . . . just do both.
1) Cut a strip from the soda can to desired width. (To cut a soda can, create a slit with a knife. Then use wiggle scissors in and cut like paper. This is fairly easy.)
2) Cut strips of fabric scraps long enough to wrap around the soda can and overlap on the inside. I used various widths of fabric scraps.
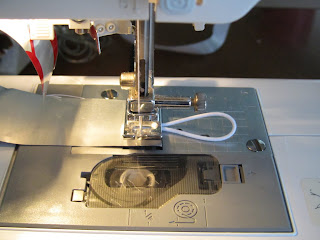
3) Loop elastic strip and sew it (yes, with a sewing machine) to one end of the soda can. I went back a forth three or four times to make the elastic loop very secure. I know it looks super ugly, but we're going to cover that up so don't worry about it.
4) Take one strip of fabric. Place it on the other end and sew on the button going through both the can and the fabric strip. Put the button far enough away from the end of the can so that a piece of double piece tape will fit over the end. (Make sure the needle is solid. Flimsy needles may bend during this process.)
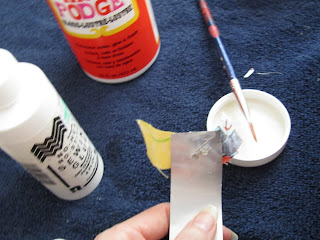
5) Use Modge Podge and paint brush affix fabric to can. With each strip added, paint the Modge Podge directly on the can first, wrap fabric strip around can so that fabric overlaps on the inside/underside the fabric first, and cover strip in Modge Podge. Keep adding strips this way all the way to the other end of the can. Try to line up the inside overlap seam. Don't worry about the white, gluey Modge Podge look. It will dry clear.
6) The last strip added should cover up the elastic ends. Make sure it's wide enough to line up almost exactly with the end of the can.
8) Line the inside of the double bias tape with fabric glue. Place over each end. Cover liberally with Modge Podge.
9) Let dry.
Well, I was planning on showing off the ring tutorial as well, but I'm tired and there's always more blogging to be done tomorrow . . . so that will have to wait. For now, enjoy your new,
 It's not too late to join the Iron Crafter. Look at the tins cans you have in your recycle bin, be inspired and . . .


what a clever idea!
ReplyDeletea soda can is made from plastic, right? but is thinner than plastic water bottles? Either way, I had no idea that you could sew it!! :)
ReplyDeleteA Marketing Monday follower. Although not quite as crafty as this.
ReplyDeleteCool - I tried a few things with soda cans while working on this challenge but nothing I was satisfied with - these are really cute!!
ReplyDeletegreat tutorial! thank you :) come on over and link up to making monday marvelous!
ReplyDeletethis is so clever
ReplyDeleteNow I've heard everything and plus what a terrific idea!! I love the bracelets - who would ever guess! Amazing job. Thanks for the toot and clear pictures.
ReplyDeleteHaupi
http://hauplight.blogspot.com/
You made some neat bracelets! I should learn to do some coke can recycled crafts, since I'm so addicted to them...and I love them better straight from the can! Thanks for sharing.
ReplyDeleteThese are SO COOL! I am LOVING it! :)
ReplyDeleteThanks for entering The Iron Crafter! : )
Cute idea! And sooooo "green"...love it!
ReplyDeleteLove this idea!!
ReplyDeleteNow this is just tooo cute. My DGD would love one of these. Thanks for the great tutorial. I want to try these.
ReplyDeleteI came here via Met Monday. Glad I did. Drop by and visit me at Pittypat Paperie sometimes.
Those are pretty neat. I wouldn't have thought to use my sewing machine. Good luck!
ReplyDeleteWOW!! Awesome idea!
ReplyDeleteWOW! LOVE the recycling and the fact you made something practical AND beautiful out of it!!
ReplyDeletePlus it was very affordable too!! :)
Would make great party favors...
LOVE
I love how they turned out! I have a weekly blog party especially for people to share the things they've made to be worn. Stop by on Thursday if you'd like!
ReplyDeleteThis is pure genius. I've sewn through chipboard before, but never metal. I must try this. I love how they turned out!
ReplyDeleteI'm linking!
ReplyDeletehttp://mypassionsforfashions.blogspot.com/2010/06/terrific-thrifty-thursday-8.html
It's two for one in recycling -- fabric scraps and cans! Way to go green, and very cute too! Thanks for sharing ... I've posted a link.
ReplyDeleteVery cute idea to wrap it with fabric! I've made them with just the cans before, but I like the fabric scrap addition!
ReplyDeleteOnce again cute and crafty! Thanks for linking up @PonyTails&FishScales!
ReplyDeleteterelauritsen.blogspot.com
adorable. love finding new ideas like this!
ReplyDeletevery cool! ooh how i wish i had a sewing machine! thanks for linking up to "AP Tuesdays!"
ReplyDeleteOh how I love recycled crafts! Genius idea - super cute! I'll be featuring this today Elizabeth! Stop by and grab a featured button if you like. Thanks so much for joining the Sunday Showcase Party! I greatly appreciate it! Hope you are enjoying your weekend! ~ Stephanie Lynn
ReplyDeleteYou made it in the top 10 for the Iron Crafter Competiton! :)
ReplyDeleteCheck it out here:
http://firefliesandjellybeans.blogspot.com/2009/02/iron-crafterrecycled-cans-top-10-come.html
clever! an you are very funny too :) You go girl
ReplyDeleteDid you have one of these on Sunday? Your braclet caught my eye. Interesting idea and fun way to make coordinating jewelry!! It has my vote. I did NOT know you could sew pop cans. I don't think I would even dare try!!
ReplyDeleteThanks for linking up to the Mad Skills party!
ReplyDeleteHI! I would like to invite you to join my new Pajama Party which starts Wednesday! (The link goes up tonight)
ReplyDeletehttp://lifeinmypjs.blogspot.com/p/pajama-party.html
Thanks!
~Ela
Very Cute and Clever!!
ReplyDeleteI didn't know the iron crafter started. These are fabulous and creative. I love using unexpected materials.
ReplyDeleteI think it looks great! Who would have thought it to be a soda can :0)
ReplyDeleteAnother great idea!! Thanks for linking it up at Fine Craft Guild DIY Linky Party.
ReplyDeleteDo join again with an equally great tutorial next party Wednesday.
Your crafts are so great and amazing! like this one, I think it cheap and economical but it's beautiful, I would definitely try this one. Thanks for sharing!
ReplyDelete--
San Francisco SEO|Seattle SEO|Seattle Real Estate