Pages

Thursday, April 29, 2010

felt food again: a children's lunch classic

One more day of my ninth craft till Christmas, and I suddenly went into a panic attack when I read this comment made by Polly from Helping Little Hands, "Wow! Your bread turned out fantastic! Felt food is so addicting! What's your May craft going to be?"  At first, I was just plain excited for getting a compliment on my bread from someone who I consider a felt-food genius.  After I got over myself, I noticed her question, "What's your May craft going to be?" 

Aaack!  What IS my May craft going to be?  For some reason, I spent so much time marveling over how fast April went, that it didn't occur to me that I needed to figure out what my eighth craft till Christmas is going to be.  So . . . I have one day to narrow down all the projects on my "someday list" to one for May.  

In the meantime, I'm still showing off my felt foods . . . which brings me to my Monkey's favorite food.  For her, a set of play felt food would not be complete without a children's classic - PB & J.  Yes, that's right . . . if I ask her what she wants to eat - whether it be breakfast, snack time, lunch or dinner - her instant reply is, "peeent bahtar and jally".  (Her sister, on the other hand, groans every time a PB & J sandwich finds itself on a plate in front of her.)


This was so easy.  The result wasn't pretty, (I'm much happier with the peanut butter) but I think it will work for a two year old . . . her standards for felt peanut butter and jelly are probably pretty low.  

1)  I cut 1 bread shaped piece out in purple (for grape jelly).  I used a brownish orange color for peanut butter.  

2)  Next I cut out a few blob-like shapes and arranged them on the purple bread shape to make a "spreadable" effect.

3)  Then I used my sewing machine to attach these blob-like shapes to the bread shape.  I didn't really have a rhyme or reason for the sewing.  I just did swirls and flowy shapes until the blob pieces were securely attached to the bread shaped piece.  I used a contrasting thread, but I may try it again with matching thread to see if I like that effect better.  

4)  Repeat with brownish orange for peanut butter. 

Craft on!

Wednesday, April 28, 2010

my foray into felt foods

My foray into felt foods has been frustrated by a fantastically frantic April.  (Ahhh . . . alliteration . . . the overkill of one poor unsuspecting letter.) 

But seriously, I feel like this month has gone super fast.  Wasn't it just March?  Now it's almost May!  And my hopes and dreams of a humongous pile of felt food for my ninth craft till Christmas hasn't been completely realized.  Sadly, my once-hoped-for humongous mountain has become a more realistic barely-there hill.  While I've concentrated on felt foods this month, I will probably keep dabbling in them here and there in the coming months till Christmas.  I want to be able to give my girls an assortment of goodies. 

If you've been reading along, you have seen my "frozen" felt treats and you have heard the inside scoop on my struggle with making bread . . . the felt kind.  Tonight, I want to unveil the result of this struggle . . . ta da . . . delicious, nutritious 100% whole wheat bread.  

Now, there are a plethora (gosh, I love using that word) of tutorials out there on making bread of the felt kind.  As I mentioned when I started this month's foray into felt foods, I wanted to find my own way and only rely on these fabulous tutorials if absolutely necessary.  That's how I do things . . . I rarely go by a recipe, I hardly ever read the directions when putting together a new toy, and my sewing/crafting journey has been decidedly similar.  

So, here's my recipe for felt bread:

1)  Take out a piece of bread (yes, a real piece of bread) and trace it onto your felt or a piece of paper for a pattern.  Then tweak it a little bit as you cut it out if you want to exaggerate the bread shape.  I wanted a little bit of an indent on the top of the loaf, so I added that in the cutting process.  Obviously, you need two of these shapes for every piece of bread.  (Thank you Captain Obvious!)

2)  Measure around the outside edges of the felt bread shape and cut a 1/2 inch strip from the felt you've chosen for the crust. 

3)  Now, begin to hand sew one bread-shaped piece to one edge of the crust strip using embroidery thread to match the crust.  (I used a blanket stitch because it seems to really seal up the edges.)  Sew the crust strip all the way around the bread piece.  Make sure you leave a tale of the felt strip at the beginning and the end because you will need to sew the two together. When the end of the long strip meets up with the beginning, fold ends up into body of the bread and sew these two ends together.

4)  Cut four or five layers of quilt batting in the same shape as the bread pieces.  (The number of batting layers you use depends on how puffy you want the bread.  Batting is super easy to cut in multiple layers, so just layer up your batting and cutaway.)  Place into crust and bread piece.
5)  Take second bread piece and place it on top of batting.  Sew this piece to the crust sandwiching the batting in between.   

I started out thinking I was going to make enough bread to fill a bread bag.  I figured out that was a lofty goal after it took me three hours just to do the first piece of bread.  Thankfully, I got into a bread-making rhythm, and it ended up taking less and less time with each piece.  However, I also have a short attention span, so after six pieces of bread, I transitioned my bag of bread to a loaf pan of bread with about a third of the loaf yet to be cut.

Making a "loaf" of bread is pretty similar to making a piece.

1)  Cut two bread-shaped pieces. 

2)  Cut a crust strip about three or four inches in width to fit around the perimeter of the bread pieces. 

3)  Sew bread piece to crust strip using same directions above. 

4)  Cut eight bread shapes out of quilt batting.  Insert first four pushing them all the way into the bread.  Fill the rest of the inside up with felt scraps or other soft scraps.  Lay the final four bread-shaped batting pieces on the top of filling.

5)  Sew second bread piece over top of filling to crust strip. 

Enjoy your delicious loaf of bread.  You could make the ends of the bread by using the same felt you used for the crust as one bread piece.  However, my girls protest wildly when I make them eat the ends of the bread, so I decided to spare them the ends for playtime.

Here's my loaf baking . . .


Let it cool on the counter, slice, enjoy and . . .
craft on!

Sunday, April 25, 2010

sunday kids' craft: taking it outdoors

I credit crafting with getting me through the winter with my sanity intact . . . although some who know me best may have questioned my level of sanity even before winter.  Regardless of your opinion on my sanity, our Sunday kids' crafts were a much needed diversion on those long winter nights.  There was excitement and anticipation every Sunday as we figured out what we could make with random supplies in the craft cupboard.  Coffee filters, paper rolls, noodles, wax paper, foam shapes, etc. all took on new life at the whim of our imaginations.  

Now that we are enjoying spring weather, our Sunday crafts are taking a new turn . . . specifically, a turn out the door and into the yard.  We've been inspired by nature.  You can be to.

First step:
Find an old bucket and repurpose it.  My girls quickly repurposed these buckets they found in our garage into nature buckets.  We talked about decorating them and personalizing them (and we may still do that), but that will wait for a rainy day when we are stuck inside.  

Second step:
Explore . . . the yard, the neighborhood, a local park, and pick up all the treasures that can be found.  My girls take great delight in rocks.  They can spend hours just looking at rocks and giving commentary on each unique one.  Their buckets were filled with many rocks in various shapes and sizes.  They also found pine cones, empty ears of corn, a feather, a few sticks, a variety of field flowers.  And I can't forget the squirrel tail they found at the park - which they were NOT allowed to pick up and put in their buckets.  (Look at that unusual rock that almost looks exactly like a Handy Mandy ball.  What an interesting find.)  


Third step:
Create shapes, pictures, words with various items in the nature bucket.  Here are a few of our nature creations.  (The first two pics are of my two year old hard at work.  She spent about 15 minutes on this one picture.  I asked her what she was creating, and she told me it was a sun.  I'll take her word for it.)


I'm a huge fan of this type of crafting because . . . 
it's active enough to entertain little ones with the shortest of attention spans
it requires no prep work
it gives us an excuse to get outside
clean up is minimal
possibilities are endless 
there is nothing to hang on our already over-crowded refrigerator
IT IS SO SIMPLE
   
The lesson I learned . . . don't limit kids' creativity to the craft supplies that can be found within the four walls of a house and behind the doors of a craft cupboard.  

Get outside and . . .
craft on!

Saturday, April 24, 2010

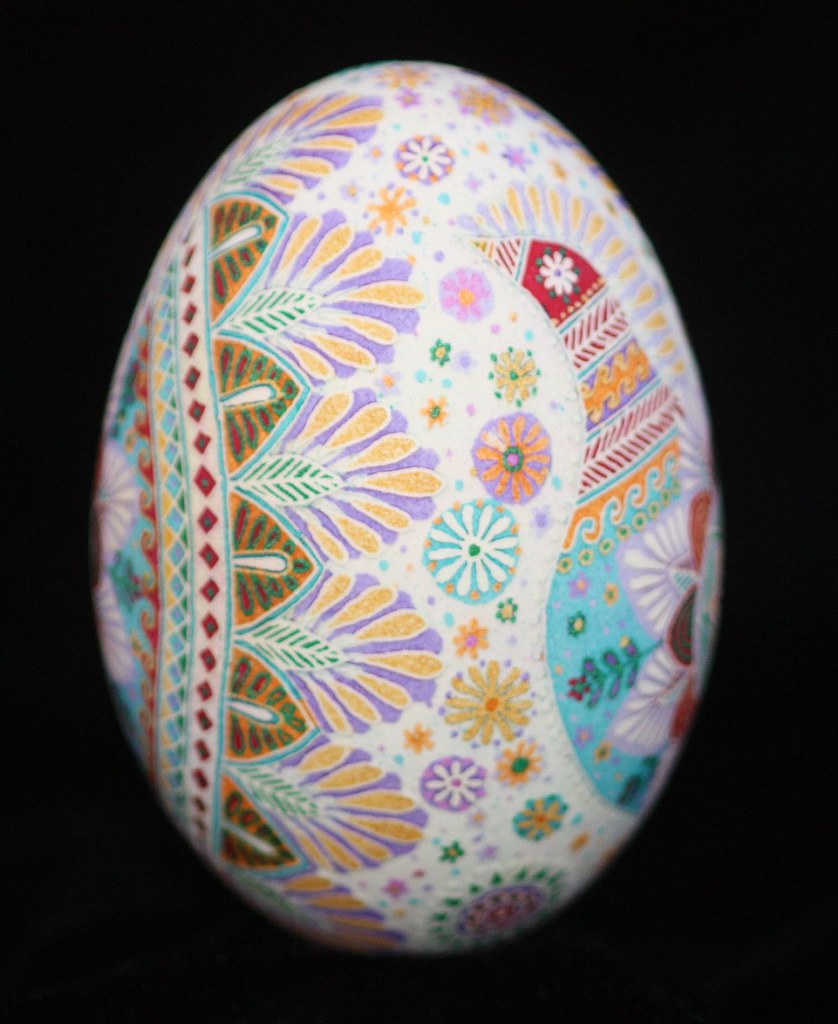
saturday spotlight - an "egg"celent artist

Originally, I started this blog to enable my friends and family to hold me accountable in attaining my goal of making all my kids' Christmas presents for Christmas 2010.  However, I've been pleasantly surprised to discover that other people have stumbled upon this little blog . . . people I'm not related to, friends with or vaguely acquainted with on Facebook.  Whenever new people sign up to follow Twelve Crafts or random people leave comments, I typically head on over to their blogs to check out what they are working on.  I'm always inspired and amazed at the creativity of others . . . people who have more creativity in their front right tooth than I have in my entire being. 

So . . . this week I'm shining my spotlight on Katy of Katy Egg Design.  She is an amazing artist.  This week she posted a subtle and beautiful egg on her blog that I really liked.  I've also included a few of my other favorites.

Check out her blog and website, be inspired and . . .
craft on!

Thursday, April 22, 2010

calling all felt foodies: felt "frozen" treats

I've decided that I love felt . . . not like I love my kids, but felt comes in fun colors, it's easy to work with, and it's possibilities seem endless when it comes to making fake food.  The other great thing about felt is that is doesn't whine, complain or pout when you say "no".  (It was one of those nights at our house.)  

 
I feel like I don't have much to show for three weeks of felt food crafting, but I blame that on the bread.  Oh bread . . . how you almost beat me!  But I persevered.  And while it took me a while to get the hang of those silly slices of bread, tonight I managed to make these sweet treats . . . two frozen fruit popsicles, complete with actual popsicle sticks.  Hopefully, my girls think they are just as delicious looking when they open them next Christmas in the dead of winter.  Hmmm . . . maybe I should have made felt hot chocolate instead!

 
If you are a felt foodie, these are so easy to make that you can definitely figure it out for yourself, but here's my process:

 
1) Grab the following stuff
  • 2 felt pieces in preferred popsicle size - We usually eat Edy's Fruit Bars with giant-sized chunks of fruit in every bar . . . delicious!  So, I took one out of the freezer and traced it for the perfect shape. 
  • long strip of felt about 1/2 inch wide in same color long enough to fit around perimeter of the popsicle pieces plus an extra inch
  • embroidery thread in similar or contrasting color
  • quilt batting - 4 layers cut in similar shape and size of felt popsicle pieces 
  • craft clue
  • popsicle stick
 
2) Using embroidery thread, sew the long strip all the way around one of the popsicle pieces.  Make sure you leave a tale of the felt strip at the beginning and the end because you will need to sew the two together.  I used the blanket stitch . . . frankly, because I used this stitch on the bread and I think it's all my hand knows how to do at this point.  When the end of the long strip meets up with the beginning, fold ends up into body of popsicle and sew these two ends together.


3) Snip a very tiny slit in the bottom of the long strip about right where a popsicle stick would be on a real popsicle. 

 
4) Put craft glue on both sides of the top third of popsicle stick.  Sandwich the stick between batting with two layers of batting on top of stick and two on bottom.

 
5) Gently wiggle popsicle stick through tiny slit.  The slit should be small enough that the stick doesn't slid in too easily.  The bottom two-thirds of stick will jut out of the bottom, and the batting should fit into the felt popsicle piece.  

 
6) Sew second popsicle shape to the 1/2 inch strip using the blanket stitch.  Adding this final piece will cover up the batting.


Just try to resist licking this tasty-looking frozen treat and . . .

 
craft on!

Wednesday, April 21, 2010

website wednesday: always the last to know

In kindergarten, I was supposed to be a tightrope walker in our school circus.  (Don't worry, the tightrope walkers only walked on the black lines on the gym floor.  I didn't go to an elementary school that actually makes five year olds risk their lives as circus performers.)  I didn't know until the afternoon of the circus that I had to be a dancing peanut instead.  (I'm still unclear as to why there were dancing peanuts in our school circus.)  In third grade, I was supposed to run the 50 meter dash in our class track and field day.  About ten minutes before the race, I found out that I was going to be running the 400 meter race instead.  Ugh!  In seventh grade, I didn't know I was "going out" (an odd term used to describe a relationship that mostly consisted of notes exchanged back and forth between classes) with an eighth grader until my best friend told me she heard about it in the bathroom.  (To be fair, he didn't know we broke up until his best friend told him about it in gym class.)

Anyway, the point is that I was always the last to know, and that hasn't changed.  I had never heard of the website craftgossip.com until my little pen holder/book mark was featured on there last week.  (Thanks Anne!)  Apparently, this is a site that everyone knows about. (By everyone, I mean people who are interested in crafts . . . I'm pretty sure my dad doesn't know about it.)  I've been spending evening free time that I should be using to work on my ninth craft till Christmas looking through this site.  I'm hooked . . . big time!  

So . . . if you like me are always the last one to know and have yet to find this site, head on over there.  But block off a few hours of your schedule/calendar for this because you'll be there a while.  

Craft on!

Saturday, April 17, 2010

make it: an aromatherapy heat pack

It seems like I'm always rubbing or rolling my shoulders lately.  I think crafting/sewing is taking its toll on my neck, shoulders and back.  So, I took a brief break from my ninth craft till Christmas - a delicious array of felt foods - to whip up this little aromatherapy heat pack.  I can tie it around my shoulders or neck and keep working on those little felt foods that seem to have me in all the wrong positions when it comes to proper posture.

I love lavender.  The smell is so calming.  And heat is so soothing, so what better pair than lavender and heat to make me feel like I'm getting a spa treatment while poking my fingers with needles as I'm sewing felt bread.  (Maybe I can think of the needle pokes as acupuncture!)  You too can go to the spa right in your own home.  If you are like me "going to the spa right in your own home" is the closest you'll ever get to going to the spa.     

Grab the following materials:
2 - 21 1/2 x 5 1/2 rectangles of flour sack or other very breathable material
1 - 22 x 6 rectangle**
1 - 22 x 6 rectangle of matching or contrasting color**
1 - 2 inch strip of a heat fused velcro (both sides)
2 - 10 inch strips of ribbon
1 1/3 cups of rice
1/2 cup of dried lavender - This makes a great heat pack without the lavender too.  You can also use essential oils found in a health food store or hobby store.  Simply add a couple drops to the rice depending on strength of aroma you want.  

**The super easy way to make this is to just use 2 rectangles that measure 22 x 6 for the outside cover.  Unfortunately for me, I did not go the super easy route because I wanted to use up some fabric scraps on this project.  So I pieced together two panels measuring 22 x 6 with fabric scraps and old jeans before I began this project.  

Let's get started:

1)  Sew three sides (2 long sides and 1 short side) of the flour sack rectangles together leaving a short side open for filling.

2)  Trim excess off edges, cut corners at a diagonal and turn. 

3)  Pour 1/3 cup of rice and 2 tablespoons of dried lavender into flour sack.  Sew off this compartment and repeat until you have four compartments of rice and lavender spread out through the length of the flour sack.  This helps keep the rice and lavender evenly distributed throughout the aromatherapy heat pack.

4) Turn in end, pin and sew shut.  Done with the inner bag.  Put aside.

5) Take one 22 x 6 panel and one ribbon.  Double fold the end that you want to be the opening (this end won't be sewn shut) - folding the ribbon into the fold about 1 inch in from the side edge and iron.  Then sew. 

6) Take other 22 x 6 panel and double fold the end that you want to be the opening (no ribbon this time), iron and sew.

7) Take velcro and place one piece directly below the double-folded edge on each panel. Adhere velcro with iron using package instructions.  (You may sew around this is you want extra secure velcro strips) 

8) Pin panels right sides together with the other ribbon pinned to the opposite end of the other panel 1 inch in from the side edge.  (This ribbon is sandwiched in between the two pieces.  See ribbon end sticking out below.) Sew around three sides, leaving top where velcro is open.  Trim excess off edges, cut corners off and turn.

9) You may want to trim edges of ribbon with pinking shears and/or use Fray Check to prevent fraying. 

10) Insert flour sack bag into cover, heat for 30 - 60 seconds, and enjoy while cooking, sewing, crafting, reading or playing a board game with the kids. Tie down around shoulders for shoulder pain.  Tie up around neck for neck pain.  Take outside cover off and throw in wash for easy cleaning.   

These make great gifts in various sizes.  Below I've included a picture of a smaller one with the starting fabric measurements of 9 x 6 that I made for a friend's birthday.  I made a flap and button closure for that one.  It was meant to cover eyes or forehead. 

Make it and . . .

craft on!