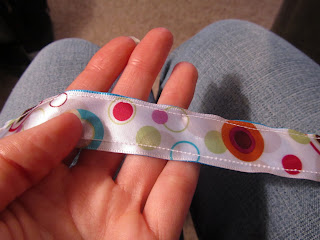
Tomorrow is June 25 . . . exactly six months until Christmas. That means I've been sticking to my goal of making all my girls' Christmas gifts for almost six whole months, and I have six months left to go to complete my goal. This is a big deal because I have a short attention span and typically can't stick to anything for too long. So yay for me! (I'm patting myself on the back right now.) It's also a big deal because in six months of sewing and crafting, I've gone from saying, "Oh, I could never make that," to "Hey, I think I can make that!"
To celebrate I made myself something tonight - well, two somethings. One something in preparation for July 4 and one something for everyday.
On my recent fabric-searching excursion for my stuffed animal/pillow hybrid, I also stopped at Target to get some basic necessities. As I was trying to find some bobby pins, my eye instantly wandered to some cute headbands (aidbanes - as my youngest calls them) from Goody. I looked all over online but could not find a picture to show you. I stood there in the store looking at these headbands and headwraps for about five minutes debating whether or not to buy one. Six dollars seemed like A LOT to spend on one headwrap, so I put it back on the display. (I know I'm a cheapskate!) As I was driving home, I thought, "Hey, I think I can make that." So I did. The best part is that all the supplies are things I already had on hand. And remember this tutorial is only for your personal wear and gift-giving . . . not for selling . . . I'm going to be doing that. ;)
I think you can make them too. Here's what you need:
-2 ribbons 40 inches in length
-1 elastic headband
Yep, that's it! Sweet! This is sort of my festive 4th of July wrap - love the bright blue, red and white mixed with the other colors. It reminds me a bit of fireworks. You could simply use blue and red ribbon or white and red or . . . well, you get the point.
1) Pin the ribbons wrong sides together.
2) Sew as close as you can all the way down one edge of the ribbons. Then sew all the way down the other side.
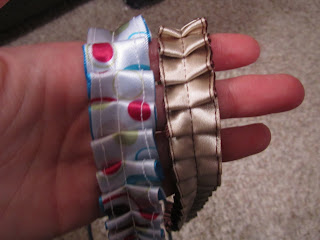
3) Starting about 1 inch up from one end fold over a small bit of the ribbon. Pin. Continue this all the way to the opposite end - leaving another inch on this end.
5) Put the elastic on one end of the ruffled ribbon and fold the ribbon over the elastic two times. Sew at the top of the fold. Sew back and forth a couple of times to secure. Repeat on the other end.
6) Done and cute! The black elastic part is at the bottom and back of my head (near my neck). The ribbon is really all that shows.
I have to say that I've been wearing one of these all night and it is so comfortable. Usually I can only wear something like this for an hour before I start to get really annoyed with it and start itching my head like a crazy woman. Out in public people avoid me. Thankfully, I will be able to wear these out in public without scaring passersby.
So this is my little half-way gift to myself! Way to go self! And I guess this tutorial is a little gift to those of you who actually care about my little goal. Thanks for coming along for the ride!
Craft on!


Hi Elizabeth..
ReplyDeleteI'm CC and came to visit for New Friend Friday...
and I've stayed for quite awhile. I've been reading through and admiring your work..and I've now become a follower. I really like your blog and the way you write..I'm so very proud I found your site. Come visit when you can..and have a lovely weekend.
Aww, how cute! I would totally rock that little headband!
ReplyDeleteFound you over at Frugal Friday. Very nice to "meet" you, Elizabeth : ). Hope you have a wonderful weekend.
Love,
Laura
very cool!! I know 3 little girls getting these as stocking stuffers this year! But I don't think my ribbon stash has anything appropriate in it at the moment... might have to add ribbon to my shopping list!
ReplyDeleteSouper a.DOR.able!
ReplyDeleteYour double-sided ribbon is so festive! I'm ashamed to admit that I just bought pre-sewed pleated ribbon - but I suppose I'll have to make my own next time!! the headbands are a great idea - thanks!
ReplyDeleteCute cute - my first time to your blog and I think it's darling!
ReplyDeleteOh how I love Christmas!! I love that your blog is about Christmas stuff!!! These headbands are so cute. I may have to try and make a few!!
ReplyDeleteI am your newest follower!!
http://www.justtryingtosavemoney.com/
Congrats!!! I too have vowed to make all of the gifts we give this year. I have had so much fun planning what to make and then actually making it. I have been busy with birthday presents up to this point and I need to start on my Christmas gifts. Keep up the good work! I love your new headbands. I love being able to make something cheaper than buying something at the store!
ReplyDeleteSuper cute! What a great idea! (I found you through Be Different.. Act Normal) I have a question though.. is the elastic under the ribbon on your head when you wear it? I'm just not seeing it in my head (you did a great tutorial, I guess I am just being slow :)
ReplyDeleteThat's so cute. You are adorable! Lisa~
ReplyDeleteVery cute! I have been making headbands lately and need to try your method. I really like the ruffle.
ReplyDeleteSo cute! Thanks for the idea!
ReplyDeletelove it! i totally want to make one!! thanks for the great tutorial:)
ReplyDeletei am your newest follower!
Cute head wrap and soooo easy. Thanks for the inst.
ReplyDeleteOh my goodness, this is seriously Fabulous!! I would love it so much if you would add this to post to this week's Sharing Time Link Up!
ReplyDeletehttp://heathernow.blogspot.com/2010/06/sharing-time_27.html
Hope you have a wonderful week!
~Heather
NICE! Great project!
ReplyDeleteSO cute. I will be making some of these!
ReplyDeleteomg how cute and adorable is this! :)
ReplyDeleteThat is super cute! I love the ruffles in the middle!
ReplyDeleteThat looks great! I love headbands. Thank you for sharing your project on The Girl Creative's linky party. I am always looking for new craft blogs. I am your newest follower; please consider following me! You can find me at itsmerelyauthentic.blogspot.com
ReplyDeleteElizabeth I love this! I hate those tight crimpy headbands. And I have tons of ribbon - perfect! :)
ReplyDeleteThese are absolutely darling! Terrific tutorial, too.
ReplyDeleteSuper cute! Love the ruffles! {thanks for the Christmas reminder...!!!) You are on the ball! I wish I could think about that but I'm still stuck on red white and blue right now =) Thanks so much for joining the Sunday Showcase. I greatly apprecite it! Hope you have a wonderful week! ~ Stephanie Lynn
ReplyDeleteI love this! So cute, but it seems pretty easy to make . . . thanks for sharing! :]
ReplyDeleteOkay, okay, okay - I've been promising to make something like this for myself for the longest time...must get my act together and find time!!
ReplyDeleteThis is completely awesome!!! Thanks for sharing!!
ReplyDeleteSo excited that I saw this. Adorable. I am making some tomorrow. You did make this woman! And thank you for sharing how. And congrats on making it half way to your goal. Is it really 6 months away already. Wow! Thanks for always linking up at TT. I always love seeing your projects.
ReplyDeleteAdorable! Thanks for sharing!
ReplyDeleteI love how your headbands turned out! Pleats are my new favorite thing!
ReplyDeleteNow that is too cute! :) Great job! : )
ReplyDeleteI love it!
ReplyDeleteThanks for joining us @ Anything Related!!
Very cute! Great work!
ReplyDeleteVery Cute!
ReplyDeleteThanks for joining me for Friday Favorites!
Very cute and creative! Thanks for linking up to this week's It's Party Time Thursday @PonyTails&FishScales!
ReplyDeleteSuper cute! My daughter loves headbands. Going to have to try this one!
ReplyDeleteThanks for sharing at My Backyard Eden!
adorable!! I would love this for myself...oh and my daughter!
ReplyDeleteWhat a great idea. I've definitely got to try this. I'm always making hair bows, slides and wanted to make a simple headband for my granddaughter who has Way too much hair. {See for yourself ;)
ReplyDeleteThanks for sharing!
Diana
http://little--treasures.blogspot.com
Thanks for sharing this tutorial Elizabeth - I initially found you via a link in the Craft Gossip newsletter for your guest spot on Fireflies and Jellybeans.
ReplyDeleteWith 3 daughters and an excess of ribbons, I am going to attempt to create some of these gorgeous headbands as stocking stuffers (and to keep in our gift box for parties!).
I now have another crafty use for my many ribbons, and an excuse to buy more!!
Thanks again
Karen
so cute - I have to try and make one for my daughter
ReplyDeleteThis is the CUTEST.. I love!!
ReplyDeleteWell, Christmas may be over, but I've bookmarked you to help me with my goal of handmaking all gifts that our family gives away this year! I just finished making a few of your headbands for my daughter to take to a birthday party tomorrow night - they're adorable, and now both of my girls want some of their own! Thanks for sharing all of your wonderful talents with us!
ReplyDelete