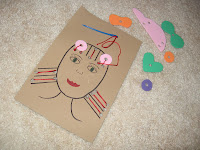
A friend of mine asked me how I made those sewing/lacing cards that I included in the kit. To be honest, it's so easy that I probably don't need to put these instructions together. However, in the chance that there is someone reading this who is as craft-clumsy as I am, I will describe how I did it . . . a little lacing card tutorial, if you will. Before I begin, I would like to take my metaphorical hat off to my oldest daughter who helped me with this tutorial. We actually did this together. She made her own cards alongside me as I made mine (which were for her too, so she really won on this deal). This is a great activity to do with your kids . . . or go borrow somebody else's children for this particular project - make sure you get permission first though!
Supplies - Only three? How easy can you get.
- craft foam sheets - 5 1/2 by 8/12
- an extra long reach hole punch - They make these in a variety of hole shapes. I just used the circle, but it would be fun to try different shapes in your design as well.
- permanent markers
Steps - Again, only three? This keeps getting better and better.
- Pick color and design.
- Draw carefully onto foam sheet. Keep in mind that even though you are using permanent markers the marker will come off onto your hand, clothes, other foam sheets, etc. for a minute or so until it dries. Trust me . . . I know this from personal experience and enjoyed some colorful blue and purple marks on my hand for a few days.
Use 2 inch reach one-hole punch to punch a design in your drawing. A young child may need help applying the extra force necessary to punch the hole.
We are using these at our house to teach my oldest daughter to sew using a (plastic) needle and craft thread. However, the holes are big enough to use shoelaces or even ribbon. In fact, I would recommend using shoelaces until your little one masters that skill first.
I have made these cards with shapes, a kite, a house, a birthday cake and my daughters favorite - a girl's face with a variety of hair-sew-ons. (As much as I am not an experienced crafter, I am even more so not an accomplished artist, so don't laugh at my drawings. Okay . . . do laugh, but don't tell me about it.)
I made a small pouch for the hair accessories and a larger pouch to fit everything in. I guess I was feeling especially ambitious that day, but you could just buy one of those fabric/tulle gift bags or keep everything in a gallon-sized ziplock bag. This is a great gift to include in a kid's sewing kit, and I highly recommend this as a quiet toy for eating out, church, rest time when your child outgrows nap time, etc.
Enjoy this easy craft, and let me know if you make these cards. I would love to see pictures. You can post them on my flicker link to the left or e-mail to lizbeth694@aol.com.
Craft on!


