Friday, February 11, 2011

feed me friday: spinach artichoke rolls

WARNING!  Mouth may water and appetite may increase after reading this post.  Good food ahead thanks to Krystal from Recipes Of A Cheapskate!
~~~~~~~~~~~~~~~~~~~~~~~~~~~~~~~~~~~~~~~~~~~~~~~~~~~~~~~~~~~~~~~~~~~~~~~~~~~~~~~

I am SO EXCITED to be here guest posting on 12 Crafts Till Christmas.   My name is Krystal, and I write a little blog called Recipes Of A Cheapskate.  When I discovered 12 Crafts last year, it helped me so much in my desire to have homemade gifts for Christmas.  I got started right away!!


In my blogging efforts,  I have the support of my dear husband, Captain Jax, and two little kidlets--K-girl, who just turned 3, and Baby M, who is almost 11 months.  They put up with me trying new things in the kitchen, and usually eat what I make.  As long as there's no onions!!  You'll occasionally see me post things regarding Baby M, my preemie boy who was born 11 weeks early last year.


He's 100% tube-fed, and I'm finding it's very difficult being a mom who loves to cook, having a baby who doesn't know how to eat. 

On my blog, you can find all sorts of good recipes, that aren't going to break the bank.  I don't like spending an arm and a leg at the grocery store (who does?) so I often have recipes that use ingredients that I can store on my shelves, grow in my garden, or freeze.  I love being able to freeze a good meal for a busy day!!


I have some yummy appetizers you can cook up just in time for Super Bowl Sunday!


And some grilled recipes for when BBQ season kicks off!


And if you're a breakfast person, I have a lot of recipes using a Master Pancake Mix.  it's like a Bisquick mix, only better :)

As well as your every day dinners when you just need to pull stuff out of your fridge and pantry.  That's the type of recipe I'm going to share with you today, something quick and easy (and freeze-able) that you can make on a busy weekend night.


This recipe came about in my desire to have more meat-less meals.  Cutting the amount of meat you eat, cuts down on the money you spend at the grocery store.  Always a plus!  I have a chicken version, that Captain Jax loves, and he loved my spinach artichoke cups, so I thought I could combine the two of them into something wonderfully tasty!  And it was!!


The ingredients are things I keep on hand in my fridge and pantry--some shredded cheese, cream cheese, canned crescent rolls, spinach, and artichoke hearts.


The process is simple as well.  Combine the softened cream cheese, the shredded cheese, spinach, and chopped artichokes in a bowl.  Add your favorite seasonings (we like garlic, and Italian seasonings) and mix it all together.  Unroll your crescent rolls and divide them into the separate triangles.  Stretch the rolls out a little big, and add a spoon-full of the mixture.  Seal up the dough around the mixture.   Make sure you get everything sealed up good.  Even if you think you got it sealed though, it's probably NOT, and will ooze out during cooking.  Or maybe I just like to overfill everything.  :) When all your rolls are finished, dip them in some melted butter, and then roll in breadcrumbs.


Bake them up, and serve them with a nice green salad.  There ya go!  Dinner, quick as a wink.

I also wanted to share with you my weekly link-up called Saturday's Party that EVERYONE is invited to come LINK UP every week with your party ideas!!  I don't care if it's crafts, decor, gift ideas, or food, ANYTHING related to parties is welcome!!

SPINACH ARTICHOKE ROLLS
From: http://recipesofacheapskate.blogspot.com
Posted at: http://twelvecraftstillchristmas.blogspot.com
  • 1/2 pkg (about 1 1/2 cups) thawed, drained spinach
  • 3 cups shredded cheese (I used mozzarella and cheddar)
  • 1 8oz pkg cream cheese, softened
  • 1 can artichoke hearts, drained and chopped
  • 2 pkg crescent rolls
  • melted butter and breadcrumbs for coating
Preheat oven to 350degs.  Mix together everything but the rolls, butter, and breadcrumbs.  Add your favorite seasonings (like garlic, Italian are very good).  Roll out your crescent rolls, and divide into the triangles.  Take each triangle, and kind of stretch it out with your fingers. Place a spoonful of the mixture on the roll, and wrap the roll up around it, sealing everything inside.  Things will still leak out when it's cooked, it's the nature of the beast. :)  Roll each bundle in melted butter, and then breadcrumbs.  Bake about 1-2" apart on a baking sheet (these spread a little bit).  Bake for about 25-30 minutes, and serve warm!


Thanks so much for letting me be a Guest Blogger Elizabeth!!  It was lots of fun to create something special for your readers.  Come on by and visit Recipes Of A Cheapskate

~~~~~~~~~~~~~~~~~~~~~~~~~~~~~~~~~~~~~~~~~~~~~~~~~~~~~~~~~~~~~~~~~~~~~~~~~~~~~~~~~
No, thank you Krystal for this fabulous addition to my recipe box! 

Cook on!

Wednesday, February 9, 2011

make your own vanilla: a gift idea from Kathleen at AlwaysSewLove

I'm somewhere between Iowa and Texas, so I'm turning my blog over to Kathleen today!  I was looking through her blog a while ago and found this idea.  She took pity on me in my moving chaos, and wrote this up for you all.  Let's give her a warm welcome!
~~~~~~~~~~~~~~~~~~~~~~~~~~~~~~~~~~~~~~~~~~~~~~~~~~~~~~~~~~~~~~~~~~~~~~~~~~~~~~~~~

Hi! This is Kathleen from AlwaysSewLove.  I am so excited to be a guest here today!  Here is an awesome tutorial for making....  
Vanilla!


I saw this idea on the Heavenly Homemakers blog and knew I had to try it. I can't believe how expensive vanilla extract is at the local food store.

Here is what you need.
1. Vanilla Beans. I ordered Madagascar Vanilla Beans from Amazon. $23.75 for 1/2 pound.
2. Vodka. Buy the cheap stuff. Did you know they come in plastic bottles these days? Mine were $8.99 a half gallon.
3. Gallon glass jar. I found mine at Walmart for $4.98.

 
First step is to cut the vanilla beans in half length wise leaving about an inch so it stays together.


This takes a little while. When all vanilla beans are cut place them in the jar.
Now pour the Vodka into the jar. Screw on lid. Put in a dark place and wait 6 months.


I purchased my bottles from Specialty Bottle Supply.  I bought twelve, eight ounce sized bottles.  They were .86 apiece.  They also sell plastic shrink wraps which makes for a more professional look.  Shipping costs more than the bottles so while your vanilla is 'cooking' keep an eye out for bottles you can use.  A dark glass would be best. 

FAST FORWARD. 6 MONTHS! 


My Vanilla only 'cooked' for about 5  months since I started a little late.  I found this site The Graphics Fairy in blog land that has free graphics.  I found something I liked and doctored it up in iPages. I bought sheets of labels and printed them out.

Depending on the jar or bottle you used you might have a bit of trouble pouring the vanilla into your little 8 ounce bottles.     

SUPPLIES:
  • The Vanilla :)
  • Amber bottles - my 5 gallon jar yielded 12, 8 ounce bottles.
  • A large measuring cup.
  • A strainer
  • A coffee filter
  • A funnel
  • Labels


(I used a plastic tub to catch any spills.)


1.  Put the coffee filter into the strainer and then place in measuring cup.

2.  Pour the Vanilla into the coffee filter.  

3.  Pour into the bottles.  Dry the outside of the bottles.

4.  Place labels on.  Not so easy to get it perfect... but close enough.

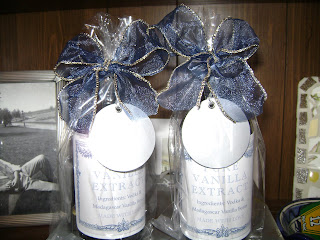
5.  I wrapped the bottles in plastic bags and added a bow.


Then give them all away!


NO WAIT!  Keep one or two for yourself and plan on making a new batch in June!  


Blessings!


~~~~~~~~~~~~~~~~~~~~~~~~~~~~~~~~~~~~~~~~~~~~~~~~~~~~~~~~~~~~~~~~~~~~~~~~~~~~~~~~~
I love this project for two reasons:
1) because it's uber cool to say that you know how to make your own vanilla
2) because I need a good lesson in patience, and this is sure to teach me that

Thanks Kathleen!

Craft on! 

Thursday, February 3, 2011

we've got winners..

YES WE DO!

Woohoo!  I love giving away goodies!  The only down side is that I don't have goodies to give to everyone!  Check out the winners for all three of the twelve crafts' giveaways below, and go to Bev's place at Flamingo Toes for the other three winners. 

A great big thanks to Bev, you all and the giveaway sponsors for making Blog Spa a fabulously fun event!

Basic Facial Care Set from Skin Journey
WINNER: Courtney Elizabeth who wrote, "I use Clinique acne line of products.  I love it but it's pretty pricey so it would be great to try something else."


Sparetime Crafts - clever and creative Etui box
 
WINNER:  Stephanie with her extra entry, "I also entered the Barefoot Bath and Body giveaway at FT!"


Amber's Lemongrass Spa shop - winner's choice of either a body polish or a foot scrub
AND
 O. C. Styles - manicure/pedicure kit
WINNER: Julie from Pickles and I scream who wrote, "I would definitely choose the body polish, this cold weather has dried my skin out something awful!"

Congrats ladies!  Send me an e-mail ASAP with the address your prizes need to be sent to. 

Craft on!

Tuesday, February 1, 2011

tuesday's true confession: quick and dirty style

I confess I can't remember the last time a looked through my blog reader.

Cue guilt!

I've been absent . . . no commenting of your amazing blogs . . . very few responses to comments left on this blog.

Guilt increasing!

I miss you, and I can't wait to be back reading, commenting and responding in a few weeks when the move and our nomad lifestyle is over. 

In the meantime . . . stay indoors and . . .

CRAFT ON . . . because I can't!
Related Posts with Thumbnails