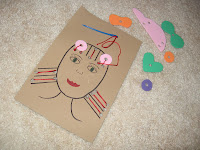
A friend of mine asked me how I made those sewing/lacing cards that I included in the kit. To be honest, it's so easy that I probably don't need to put these instructions together. However, in the chance that there is someone reading this who is as craft-clumsy as I am, I will describe how I did it . . . a little lacing card tutorial, if you will. Before I begin, I would like to take my metaphorical hat off to my oldest daughter who helped me with this tutorial. We actually did this together. She made her own cards alongside me as I made mine (which were for her too, so she really won on this deal). This is a great activity to do with your kids . . . or go borrow somebody else's children for this particular project - make sure you get permission first though!
Supplies - Only three? How easy can you get.
- craft foam sheets - 5 1/2 by 8/12
- an extra long reach hole punch - They make these in a variety of hole shapes. I just used the circle, but it would be fun to try different shapes in your design as well.
- permanent markers
Steps - Again, only three? This keeps getting better and better.
- Pick color and design.
- Draw carefully onto foam sheet. Keep in mind that even though you are using permanent markers the marker will come off onto your hand, clothes, other foam sheets, etc. for a minute or so until it dries. Trust me . . . I know this from personal experience and enjoyed some colorful blue and purple marks on my hand for a few days.
Use 2 inch reach one-hole punch to punch a design in your drawing. A young child may need help applying the extra force necessary to punch the hole.
We are using these at our house to teach my oldest daughter to sew using a (plastic) needle and craft thread. However, the holes are big enough to use shoelaces or even ribbon. In fact, I would recommend using shoelaces until your little one masters that skill first.
I have made these cards with shapes, a kite, a house, a birthday cake and my daughters favorite - a girl's face with a variety of hair-sew-ons. (As much as I am not an experienced crafter, I am even more so not an accomplished artist, so don't laugh at my drawings. Okay . . . do laugh, but don't tell me about it.)
I made a small pouch for the hair accessories and a larger pouch to fit everything in. I guess I was feeling especially ambitious that day, but you could just buy one of those fabric/tulle gift bags or keep everything in a gallon-sized ziplock bag. This is a great gift to include in a kid's sewing kit, and I highly recommend this as a quiet toy for eating out, church, rest time when your child outgrows nap time, etc.
Enjoy this easy craft, and let me know if you make these cards. I would love to see pictures. You can post them on my flicker link to the left or e-mail to lizbeth694@aol.com.
Craft on!


15 comments:
i tried to do this but the foam started to tear between the holes. did you use a pretty thik sheet of foam? Maybe mine was just too cheap.
:(
Thanks for the question. I posted a link to the type of foam sheets I used up above in the list of supplies. If you click on foam sheets it will take you to a link at Joann Fabrics that shows you. I guess they might have been thick, but they weren't too thick for the punch to go through. We haven't had any tearing issues so far, but I leave a pretty could space between each hole (pobably at least a 1/4 to 1/2 of an inch). Sorry it didn't work for you.
Love these cards! My kids spent a couple of hours today working on their own. Thank you!
I'm so happy to hear that!
What an adorable idea! Thanks for linking up to Saturday is Crafty Day!
Fun! I would love to see some with designs that the kids drew too.
Thanks for linking up to the Mad Skills party!
Great idea! I love it! :)
Great idea! And you have to love cheap and easy too!
This is wonderful. I used to teach an after school embroidery class at the village elementary school, and it was amazing how many children are taken with sewing. I went back to your sewing kit post and couldn't agree more -- every child needs his/her own sewing kit, and I used to give as Christmas gifts. They were always a big hit! I am saving this idea for my youngest niece!
Jude from Cape Cod
What a great idea. We have some lacing cards but get quickly board with them. I love how easy you can make these to change them out. Thanks so much for joining The Sunday Showcase Party. I greatly appreciate it! Hope you are enjoying your week! ~ Stephanie Lynn
Great idea! Thanks for linking up to Tot Tuesdays! I really appreciate it! ☺
Such another great idea!
Thanks for linking up to Socialize with me Monday til Sunday! :)
Keep the ideas commin' :)
Just found this from your swap today... Love it... And now I'm reminded that you and your craftiness were around for 5 whole months before I clued in. That's a lot of catching up to do... There goes my free Friday afternoon. ;)
Really cute idea! I'm going to make these for my 3 year old. I think they are a great activity for fine motor skills too. Thanks!
Nicola @ Twisty Noodle
cap digitizing
https://crystaldigitizing.com/custom-embroidery-digitizing/
Post a Comment