Have you ever done that? To be honest, I'm surprised I've only done it once . . . well, 70 times I guess, but I only count it as once. :)
As you may (or may not) know, I've been working hard on the mail - letters, envelopes, postcards (no-sew & sewing required) - for my eighth craft till Christmas, the pretend and play mail carrier kit. I finished two fabric mailboxes and an assortment of mail.
I have also begun work on two mail carrier bags - which I will have a tutorial on soon. But I could not make any more progress on my two bags until this final detail was taken care of for the mail . . . stamps.
These are easy and hardly require a tutorial, but well, I'm a little obsessed with tutorials so here is a mini tute.
Grab stuff:
-scraps that match or contrast with envelopes and postcards
-double-sided fusible interfacing-Velcro - heat fusing or regular . . . either way, we're going to sew it on
-pinking shears (Did you know these are not all pink? Did you know that there is a difference between shears and scissor? Of course you did. I didn't. And yes, I am THAT new to sewing.)
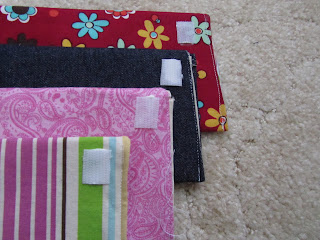
1) Take two scraps. Sandwich the fusible interfacing in between scraps and fuse using package directions. (As you can see, I didn't even take the time to square up scraps with interfacing. Yes, I am THAT lazy!)
2) Use pinking shears to cut out little squares or rectangles about the same size as a postage stamp. Don't do this until fabric is completely cool! I learned this the hard way.
3) Cut Velcro into little squares or rectangles that are smaller than the stamps and fuse one side of the pair onto each stamp. Keep the other side for envelopes and postcards.
4) After Velcro/stamp has completely cooled, sew around Velcro to secure in place. This makes the stamp part super secure. As I was playing around with the Velcro on the envelopes and stamps, I found that the Velcro seemed to pull away from the stamp as I took it on and off. It didn't pull away from the envelope though, so I only added the extra security of sewing the Velcro on the stamp. (Wow! That was a super-long explanation for something you could have figured out on your own.) I sewed them all in a row and then cut them apart. A nice tip from a sewing friend that saves time and thread.
5) Fuse other side of Velcro pair to envelopes and postcards. After these cooled, I also went around the edges with super amazing fabric glue to give it a little more security. I let it dry. It dried clear and upheld against me slapping on and ripping off the stamps over and over again.
6) Done and done!
Now I can move on to the mail carrier bags, but not right now . . . long weekend begins now. Woo hoo! I'll be back here on Sunday. Have a great weekend and . . .
craft on!














14 comments:
Oh yay...now I get to add stamps to the envelopes I just made! How cute! Thanks for sharing!
terelauritsen.blogspot.com
ponytails and fishscales
Very cute! Stopping by from New Friend Friday!
Popping in from New Friend Friday. I love the name of your blog since the 25th of every month I am constantly reminding everyone how long it is 'til Christmas!
Super cute, and wonderful photos!
Thanks for sayn' hi. I had no idea we had monkeys in common. ;)
all the best,
Sylvia
What an adorable idea!
Aw, now, that is pretty darn adorable!!
Those are so adorable!! We don't have any of that fusible stuff here anymore.
Following you from Follow Me Friday!! Hope you visit and follow me as well! Have a great weekend!
http://theartsymom.tk
The mail theme just keeps getting better and better. This is adroable (as always).
Thanks for linking up!
Laura @ along for the ride
This is so cute! I love your mail! Can't wait to see the bags!
when you mention the stamps it didn't ocurred to me that you will come with an idea of 'put and take'. I think it's pretty cool!!!
What a perfect accessory for your letters and mailbox. These are adorable - I even want to play! Thanks so much for joining The Sunday Showcase Party. I greatly appreciate it! Hope you are enjoying your week! ~ Stephanie Lynn
Cute, cute, cute! Thanks for linking up @PonyTails&FishScales!
terelauritsen.blogspot.com
That is the cutest ever!
Great idea. I'm going to make a set for my dd for Christmas. Something else fun to do with the 'stamps' would be to get some Iron on quick fuse Fabric sheets. You can print pictures directly on to it. Use your own creations or even some family pictures resized and you have your own picture stamps. I printed mine out earlier and am about to go set them up. ^_^
Post a Comment