Monday, May 31, 2010

monday's buttons: week 2

Welcome to week 2 of Monday's Buttons.  I'm so excited to show off three very different buttons this week.  But first, I have to address a question about my own button that a few readers have asked me, "What in the world is that yellow thing on your button?"  Wow!  That question put a little chink in that initial feeling of success I first felt by actually figuring out how to make a button all by myself.  But I'm tough, and I can take a little helpful criticism. :)  So . . . for those who are wondering, that yellow thing on my blog button is supposed to be a star on top of a Christmas tree.  Keep in mind: I'm not a blog designer and I've never ever used GIMP before.  (Using GIMP, by the way, was more difficult than child-birth.  And I've endured 18 hours of labor, emergency surgery and a blood transfusion, so that's saying something.  Too much information?)

Okay, on to some buttons I've admired this past week.

I have to be honest, when I spotted this first button, I was just interested in the button.  I e-mailed Kristi, the blog's creator.  Then after I read her reply, I actually went back to her blog and read it.  I'm hooked.  Check out The Speckled Dog and you will be too.  Here's what Kristi had to say about her button:

"My husband made my blog buttons for me. I told him basically what I wanted and he created them. I wanted something simple that tied in to my blog name (the dots) and I wanted it to stand out. Most other buttons for this type of blog are pastels and sometimes seem to have a lot going on in such a small space. The black and white not only stands out among all of those pastel colors, but it also ties in to my blog name. I've never seen a pastel speckled dog! ha ha!"

This is what Kristi's husband, Charles, had to say about the details:
"We used Adobe Fireworks. The idea was to use something high contrast to make it 'pop' and instead of confining the content to the borders of the image, to allow the circles to play beyond the boundaries, giving a sense of depth. Most buttons seem 'flat and square' so we tried to break that up a bit.  The same idea was applied to the @ symbol but to emphasize 'AT the speckled dog' .. i.e. a web destination."


The Speckled Dog caught my eye because it is a stand out graphic, but this next blog button for Running with Scissors caught my eye because of it's adorable background photo.  I wondered what the significance of the picture was, and my momma always told me that it never hurts to ask a question . . . so I did.  This is what Jessica had to say about her adorable blog button:

1) What do you like best about your button?
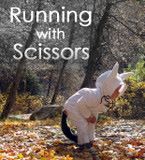
I probably like the photo, it's my son in his Halloween costume for his 2nd Halloween when he was 18months old. He's Max from Where the Wild Things Are. Out of all my photos I've posted on my blog, this one has always been a favorite. I wanted to use a photo from my projects, mainly because I don't have graphic design skills to make an original graphic, but I wanted the button to show something I've made and give you a taste of what you'd see if you chose to click on the button.


2) Did you craft it yourself or did you commission/inspire someone else to craft it for you? If you crafted it, what program/software did you use?
I edited the photo and added the text using the basic Adobe Photoshop Elements. A friend offered to make it a button and emailed me the code to make it available on my sidebar.

3) What do you think is the most important thing about a blog button?
I like blog buttons that give you an idea of what you would find on the blog, and keep things simple as far as adding a lot of text.


And finally, let's take a look at the button for Simple, Sweet Inspiration authored by AJ.  I can't put my finger on it, but something about this button caught my eye.  Words that come to mind are clean . . .organic . . . fresh.   

1) What is your blog about?
My blog is a mix of mommy blog meets crazy woman blog. I write on themes, memes, post pictures and crafts. I also randomly toss in creative writing in the mix too.

Simple Sweet Inspiration
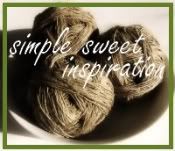
2) How do you think your button reflects your blog?
I chose the hemp in the basket because it reflects my obsession with hemp... and the earthy feeling of my life. I am down-to-earth, simple and peaceful... hemp feels that way to me.

3) Did you craft your own button or did you commission/inspire someone else to craft it? If you crafted it, what program/software did you use?I did make my own button, header, layout and all. I use two free programs. Primarily I use Paint.net, but also enjoy using GIMP. Both are free online.


Thanks to AJ, Kristi and Jessica for sharing a bit about your buttons.  Go take a look at the blogs behind the buttons to be even more inspired and . . .

craft on!

Sunday, May 30, 2010

soda cans + scraps = unique jewelry

Did you know that you can sew through soda cans?  Of course YOU did.  I didn't.  That's no surprise to you if you are a regular reader . . . by now you know that I seem to know very little about crafty things. 

When Fawnda and Jeannine at Fireflies and Jellybeans announced that the very first secret ingredient for the very first Iron Crafter was going to be recycled cans, my brain was full of ideas - impractical and time-consuming ideas.  At the same time, my wandering eye for jewelry reared its ugly head.  You see, I go through these phases of jewelry lust - not diamond-precious stone-expensive jewelry lust . . . just cheap, mass-produced, poorly made jewelry lust.  There is no warning.  Nothing to prepare me against these urges.  I go to bed one night completely normal.  I wake up the next day desiring a bangle, a ring, an anklet - something fun to spice up an old wardrobe.

So . . . I decided to pair the Iron Crafter competition with my sudden jewelry lust.  And this pairing could not be cheaper, easier or cuter.  

Go to your recycle bin, your scrap pile and your button bin and grab:
-a soda can
-coordinating or contrasting scraps
-a button (for bangle and anklet)
-a 3 or 4 inch piece of thin elastic (use 3 inches for bangle and 4 inches for anklet)
-1/4 inch double bias tape (for bangle and anklet)

First, let's work on a bangle or anklet . . . oh . . . just do both.

1)  Cut a strip from the soda can to desired width.  (To cut a soda can, create a slit with a knife.  Then use wiggle scissors in and cut like paper.  This is fairly easy.)

2)  Cut strips of fabric scraps long enough to wrap around the soda can and overlap on the inside.  I used various widths of fabric scraps.

3)  Loop elastic strip and sew it (yes, with a sewing machine) to one end of the soda can.  I went back a forth three or four times to make the elastic loop very secure.  I know it looks super ugly, but we're going to cover that up so don't worry about it. 

4)  Take one strip of fabric.  Place it on the other end and sew on the button going through both the can and the fabric strip.  Put the button far enough away from the end of the can so that a piece of double piece tape will fit over the end.  (Make sure the needle is solid.  Flimsy needles may bend during this process.)

5)  Use Modge Podge and paint brush affix fabric to can.  With each strip added, paint the Modge Podge directly on the can first, wrap fabric strip around can so that fabric overlaps on the inside/underside the fabric first, and cover strip in Modge Podge.  Keep adding strips this way all the way to the other end of the can.  Try to line up the inside overlap seam.  Don't worry about the white, gluey Modge Podge look.  It will dry clear.

6)  The last strip added should cover up the elastic ends.  Make sure it's wide enough to line up almost exactly with the end of the can.

7)  Cut two pieces of double bias tape the same length as each can end.

8)  Line the inside of the double bias tape with fabric glue.  Place over each end.  Cover liberally with Modge Podge.

9)  Let dry.

Well, I was planning on showing off the ring tutorial as well, but I'm tired and there's always more blogging to be done tomorrow . . . so that will have to wait.  For now, enjoy your new, cheap inexpensive and unique anklet and bangle - a cure for any jewelry lust you've had lately.

It's not too late to join the Iron Crafter.  Look at the tins cans you have in your recycle bin, be inspired and . . .

craft on! 


*I also linked this to Make It Wear It.

Thursday, May 27, 2010

fabric mail: put a stamp on it

A few years ago when I sent out birth announcements proclaiming to my 70 closest friends and family members that our second addition had arrived safely into the world, I forgot one very important thing on each super cute announcement . . . stamps.  Yeah, did you know that the post office kind of requires those?    

Have you ever done that?  To be honest, I'm surprised I've only done it once . . . well, 70 times I guess, but I only count it as once.  :)

As you may (or may not) know, I've been working hard on the mail - letters, envelopes, postcards (no-sew & sewing required) - for my eighth craft till Christmas, the pretend and play mail carrier kit.  I finished two fabric mailboxes and an assortment of mail. 

I have also begun work on two mail carrier bags - which I will have a tutorial on soon.  But I could not make any more progress on my two bags until this final detail was taken care of for the mail . . . stamps.

These are easy and hardly require a tutorial, but well, I'm a little obsessed with tutorials so here is a mini tute

Grab stuff:
-scraps that match or contrast with envelopes and postcards
-double-sided fusible interfacing
-Velcro - heat fusing or regular . . . either way, we're going to sew it on
-pinking shears (Did you know these are not all pink?  Did you know that there is a difference between shears and scissor?  Of course you did.  I didn't.  And yes, I am THAT new to sewing.)

1)  Take two scraps.  Sandwich the fusible interfacing in between scraps and fuse using package directions.  (As you can see, I didn't even take the time to square up scraps with interfacing.  Yes, I am THAT lazy!) 

2)  Use pinking shears to cut out little squares or rectangles about the same size as a postage stamp.  Don't do this until fabric is completely cool!  I learned this the hard way.

3)  Cut Velcro into little squares or rectangles that are smaller than the stamps and fuse one side of the pair onto each stamp.  Keep the other side for envelopes and postcards.

4)  After Velcro/stamp has completely cooled, sew around Velcro to secure in place.  This makes the stamp part super secure.  As I was playing around with the Velcro on the envelopes and stamps, I found that the Velcro seemed to pull away from the stamp as I took it on and off.  It didn't pull away from the envelope though, so I only added the extra security of sewing the Velcro on the stamp.  (Wow!  That was a super-long explanation for something you could have figured out on your own.)  I sewed them all in a row and then cut them apart.  A nice tip from a sewing friend that saves time and thread.

5)  Fuse other side of Velcro pair to envelopes and postcards.  After these cooled, I also went around the edges with super amazing fabric glue to give it a little more security.  I let it dry.  It dried clear and upheld against me slapping on and ripping off the stamps over and over again. 

6) Done and done!

Now I can move on to the mail carrier bags, but not right now . . . long weekend begins now.  Woo hoo!  I'll be back here on Sunday.  Have a great weekend and . . . 

craft on!

Wednesday, May 26, 2010

a quick thanks

This week I was humbled to be presented The Beautiful Blog Award by both Felt Like Stitchin' and Papgena Made It.   I'm so thankful to both the gals behind these blogs for passing on some beauty to me. 


There are also some rules that come along with the award. 

1) Post ten interesting things about myself.  (I'm not sure I can think of 10 interesting things.)  :)

2)  Pass on the award to ten other bloggers

I wanted to acknowledge these ladies and their amazing blogs RIGHT AWAY, but I'm going to have to hold off on following the rules for a few days or so.  I have a tight schedule tonight and for the next few days, so blogging is going to be bumped to the bottom of the list. 

Thanks again ladies!!!!!  You have both inspired me to . . .

craft on!

Tuesday, May 25, 2010

tuesday's true confession

Last week it felt so good to confess that I have never seen The Sound of Music that I thought I would add another confession to the list . . .

I'm afraid of my sewing machine.  There . . . I said it.  I'll say it again.  I'm afraid of my sewing machine.

In case you are just joining me, I bought a sewing machine on a whim in an effort to "find myself".  (It went right along with learning to play the drums and getting my nose pierced.  I guess if you are going to find yourself, a nose piercing, drum playing and sewing are three of the tamest ways you can do it.)  I'm not actually a sewer - in the sense of having actual technical skill.  I don't use patterns.  Technical abbreviations like RST and WST send me into a tizzy.  And I don't really do anything too useful with the sewing machine - like mend things, make clothes or assemble school costumes. 

So . . . it seems like any little bump of a dial or flip of a switch sends my sewing machine into a tantrum which results in this:

So you can imagine the terror that filled me when I walked into my dining room - aka crafting/sewing spot - and saw this:


(This is actually a reenactment of the incident.  Try explaining to a five year old that she is never supposed to do that again . . . except for one more time while mommy takes a picture.)  A five year old is all about bumping dials and flipping switches.  But it was hard to be mad when she looked up at me with big eyes and says, "But mommy I just wanted to be like you."  

However, when I turned the machine on a few hours later to work on my journal for Service Boot Camp, my machine was majorly malfunctioning.  Ugh!!!!  In fear and trembling, I turned some dials, flipped some switches and . . . problem not fixed.  I worked on the machine all night, and I could not get it to work right.  Finally, I gave up, went to bed and slept poorly.  Later the next day I sat down, turned a dial, flipped a switch, and . . . wallah, problem solved.  I have no idea what I did or how to do it again.  

I swear my sewing machine is just taunting me, teasing me, terrifying me.  It worked . . . I'm still afraid, but I vow to . . . 

craft on! 

any photo gift ideas?

I took these photos a week ago, and I've been thinking and pondering how I can incorporate them into the twelve crafts till Christmas.  Any ideas?

Craft on!


ShutterLoveTuesdays


Tuesday Tag-Along

Photobucket

Monday, May 24, 2010

monday's buttons - week 1

This is going to be harder AND easier than I thought.  It's going to be harder because there are a ton of buttons out there that inspire me.  It's going to be easier because there are a ton of buttons out there that inspire me.  Hmmm . . . funny how that works. 

Each week I'm going to feature two to four buttons from various blogs.  I don't have any criteria for the buttons I feature.  I just have to like them.  How's that for strict feature requirements?


First, Green Momma's button caught my eye right away.  I even e-mailed Green Momma's creator to ask her a few questions about her button.  Kim, from Green Momma, had this to say about her simple but super little button:

1) What do you like best about your button?
I love that it's a tree! I love trees, and I'm such a tree hugger. I've always been in love with trees, wanting to know what kind of tree they are, and I love the forest, etc. I guess I my favorite thing about it is that it's green, and a tree. :)

2) Did you craft it yourself or did you commission/inspire someone else to craft it for you? If you crafted it, what program/software did you use?
My husband made my button for me, and I believe he used Adobe photoshop.

3) What do you think is the most important thing about a blog button?
I think the most important thing about a blog button is that it should be the right size, and be relative to your site.

 
UndertheTableandDreaming
Second, I'm loving Stephanie Lynn's button over at Under the Table and Dreaming.  Having made my own button recently, I look at this and think, "Wow, that was a lot of work!"  She as a great site, and I'm thankful for all the inspiration I've found located in her posts.  Here's what she had to say:

1) What do you like best about your button?
I like the fact that it incorporates my blogs design. The background is the same as my blog as well as the graphic, just a different color.

2) Did you craft it yourself or did you commission/inspire someone else to craft it for you?
I made it myself to coordinate with my blog.

3) What do you think is the most important thing about a blog button?
Buttons that are simple and a little stylish. I like buttons that are more neutral or low key in color too! (I like a versatile button that looks appealing on any blog that is it placed on.)

 
DillyDallyandFlitter


The last button I'm showing off is one I just happened upon.  I haven't actually read Dilly Dally and Flitter . . . yet, but I have plans too because I love the button.  I do know that this blog's creator is Michelle and that she has one nifty button. 


So those are the buttons this week.  Go take a look at the blogs behind the buttons if you have a moment.  Also, if you happen upon a great button or perhaps you have a button on your blog that you love, please let me know.  I would love to have you help me in my search for buttons that inspire. 

Craft on!
Related Posts with Thumbnails