Saturday, April 24, 2010

saturday spotlight - an "egg"celent artist

Originally, I started this blog to enable my friends and family to hold me accountable in attaining my goal of making all my kids' Christmas presents for Christmas 2010.  However, I've been pleasantly surprised to discover that other people have stumbled upon this little blog . . . people I'm not related to, friends with or vaguely acquainted with on Facebook.  Whenever new people sign up to follow Twelve Crafts or random people leave comments, I typically head on over to their blogs to check out what they are working on.  I'm always inspired and amazed at the creativity of others . . . people who have more creativity in their front right tooth than I have in my entire being. 

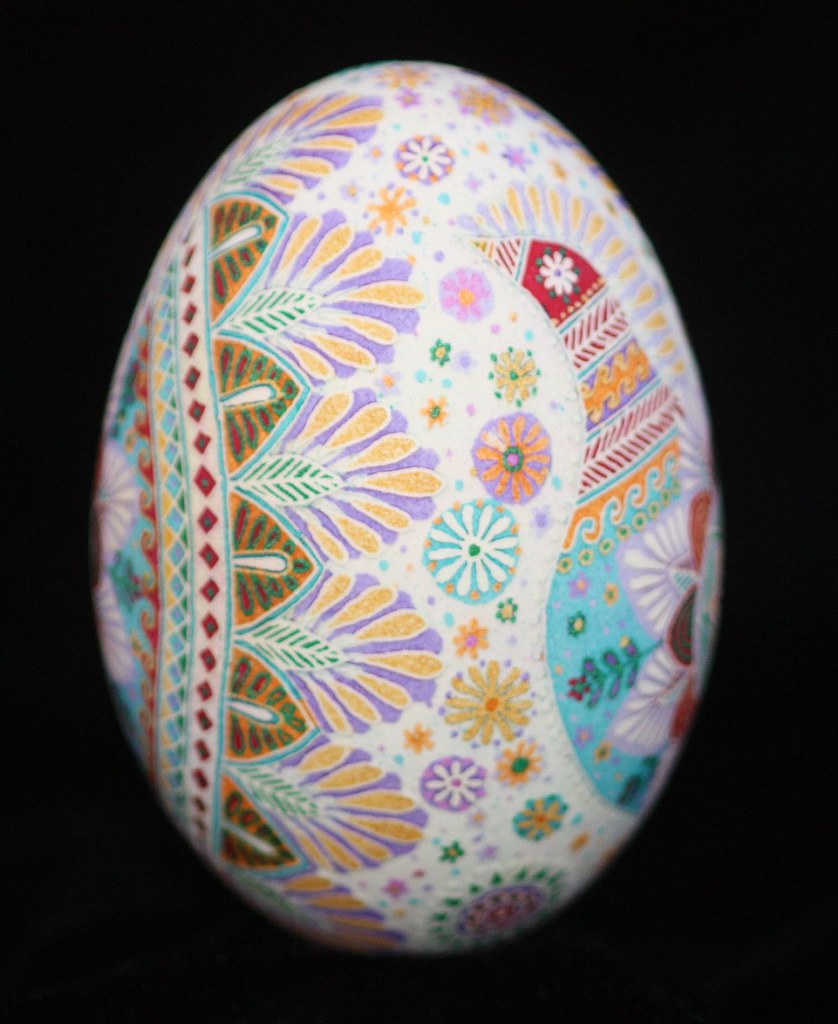
So . . . this week I'm shining my spotlight on Katy of Katy Egg Design.  She is an amazing artist.  This week she posted a subtle and beautiful egg on her blog that I really liked.  I've also included a few of my other favorites.

Check out her blog and website, be inspired and . . .
craft on!

Thursday, April 22, 2010

calling all felt foodies: felt "frozen" treats

I've decided that I love felt . . . not like I love my kids, but felt comes in fun colors, it's easy to work with, and it's possibilities seem endless when it comes to making fake food.  The other great thing about felt is that is doesn't whine, complain or pout when you say "no".  (It was one of those nights at our house.)  

 
I feel like I don't have much to show for three weeks of felt food crafting, but I blame that on the bread.  Oh bread . . . how you almost beat me!  But I persevered.  And while it took me a while to get the hang of those silly slices of bread, tonight I managed to make these sweet treats . . . two frozen fruit popsicles, complete with actual popsicle sticks.  Hopefully, my girls think they are just as delicious looking when they open them next Christmas in the dead of winter.  Hmmm . . . maybe I should have made felt hot chocolate instead!

 
If you are a felt foodie, these are so easy to make that you can definitely figure it out for yourself, but here's my process:

 
1) Grab the following stuff
  • 2 felt pieces in preferred popsicle size - We usually eat Edy's Fruit Bars with giant-sized chunks of fruit in every bar . . . delicious!  So, I took one out of the freezer and traced it for the perfect shape. 
  • long strip of felt about 1/2 inch wide in same color long enough to fit around perimeter of the popsicle pieces plus an extra inch
  • embroidery thread in similar or contrasting color
  • quilt batting - 4 layers cut in similar shape and size of felt popsicle pieces 
  • craft clue
  • popsicle stick
 
2) Using embroidery thread, sew the long strip all the way around one of the popsicle pieces.  Make sure you leave a tale of the felt strip at the beginning and the end because you will need to sew the two together.  I used the blanket stitch . . . frankly, because I used this stitch on the bread and I think it's all my hand knows how to do at this point.  When the end of the long strip meets up with the beginning, fold ends up into body of popsicle and sew these two ends together.


3) Snip a very tiny slit in the bottom of the long strip about right where a popsicle stick would be on a real popsicle. 

 
4) Put craft glue on both sides of the top third of popsicle stick.  Sandwich the stick between batting with two layers of batting on top of stick and two on bottom.

 
5) Gently wiggle popsicle stick through tiny slit.  The slit should be small enough that the stick doesn't slid in too easily.  The bottom two-thirds of stick will jut out of the bottom, and the batting should fit into the felt popsicle piece.  

 
6) Sew second popsicle shape to the 1/2 inch strip using the blanket stitch.  Adding this final piece will cover up the batting.


Just try to resist licking this tasty-looking frozen treat and . . .

 
craft on!

Wednesday, April 21, 2010

website wednesday: always the last to know

In kindergarten, I was supposed to be a tightrope walker in our school circus.  (Don't worry, the tightrope walkers only walked on the black lines on the gym floor.  I didn't go to an elementary school that actually makes five year olds risk their lives as circus performers.)  I didn't know until the afternoon of the circus that I had to be a dancing peanut instead.  (I'm still unclear as to why there were dancing peanuts in our school circus.)  In third grade, I was supposed to run the 50 meter dash in our class track and field day.  About ten minutes before the race, I found out that I was going to be running the 400 meter race instead.  Ugh!  In seventh grade, I didn't know I was "going out" (an odd term used to describe a relationship that mostly consisted of notes exchanged back and forth between classes) with an eighth grader until my best friend told me she heard about it in the bathroom.  (To be fair, he didn't know we broke up until his best friend told him about it in gym class.)

Anyway, the point is that I was always the last to know, and that hasn't changed.  I had never heard of the website craftgossip.com until my little pen holder/book mark was featured on there last week.  (Thanks Anne!)  Apparently, this is a site that everyone knows about. (By everyone, I mean people who are interested in crafts . . . I'm pretty sure my dad doesn't know about it.)  I've been spending evening free time that I should be using to work on my ninth craft till Christmas looking through this site.  I'm hooked . . . big time!  

So . . . if you like me are always the last one to know and have yet to find this site, head on over there.  But block off a few hours of your schedule/calendar for this because you'll be there a while.  

Craft on!

Saturday, April 17, 2010

make it: an aromatherapy heat pack

It seems like I'm always rubbing or rolling my shoulders lately.  I think crafting/sewing is taking its toll on my neck, shoulders and back.  So, I took a brief break from my ninth craft till Christmas - a delicious array of felt foods - to whip up this little aromatherapy heat pack.  I can tie it around my shoulders or neck and keep working on those little felt foods that seem to have me in all the wrong positions when it comes to proper posture.

I love lavender.  The smell is so calming.  And heat is so soothing, so what better pair than lavender and heat to make me feel like I'm getting a spa treatment while poking my fingers with needles as I'm sewing felt bread.  (Maybe I can think of the needle pokes as acupuncture!)  You too can go to the spa right in your own home.  If you are like me "going to the spa right in your own home" is the closest you'll ever get to going to the spa.     

Grab the following materials:
2 - 21 1/2 x 5 1/2 rectangles of flour sack or other very breathable material
1 - 22 x 6 rectangle**
1 - 22 x 6 rectangle of matching or contrasting color**
1 - 2 inch strip of a heat fused velcro (both sides)
2 - 10 inch strips of ribbon
1 1/3 cups of rice
1/2 cup of dried lavender - This makes a great heat pack without the lavender too.  You can also use essential oils found in a health food store or hobby store.  Simply add a couple drops to the rice depending on strength of aroma you want.  

**The super easy way to make this is to just use 2 rectangles that measure 22 x 6 for the outside cover.  Unfortunately for me, I did not go the super easy route because I wanted to use up some fabric scraps on this project.  So I pieced together two panels measuring 22 x 6 with fabric scraps and old jeans before I began this project.  

Let's get started:

1)  Sew three sides (2 long sides and 1 short side) of the flour sack rectangles together leaving a short side open for filling.

2)  Trim excess off edges, cut corners at a diagonal and turn. 

3)  Pour 1/3 cup of rice and 2 tablespoons of dried lavender into flour sack.  Sew off this compartment and repeat until you have four compartments of rice and lavender spread out through the length of the flour sack.  This helps keep the rice and lavender evenly distributed throughout the aromatherapy heat pack.

4) Turn in end, pin and sew shut.  Done with the inner bag.  Put aside.

5) Take one 22 x 6 panel and one ribbon.  Double fold the end that you want to be the opening (this end won't be sewn shut) - folding the ribbon into the fold about 1 inch in from the side edge and iron.  Then sew. 

6) Take other 22 x 6 panel and double fold the end that you want to be the opening (no ribbon this time), iron and sew.

7) Take velcro and place one piece directly below the double-folded edge on each panel. Adhere velcro with iron using package instructions.  (You may sew around this is you want extra secure velcro strips) 

8) Pin panels right sides together with the other ribbon pinned to the opposite end of the other panel 1 inch in from the side edge.  (This ribbon is sandwiched in between the two pieces.  See ribbon end sticking out below.) Sew around three sides, leaving top where velcro is open.  Trim excess off edges, cut corners off and turn.

9) You may want to trim edges of ribbon with pinking shears and/or use Fray Check to prevent fraying. 

10) Insert flour sack bag into cover, heat for 30 - 60 seconds, and enjoy while cooking, sewing, crafting, reading or playing a board game with the kids. Tie down around shoulders for shoulder pain.  Tie up around neck for neck pain.  Take outside cover off and throw in wash for easy cleaning.   

These make great gifts in various sizes.  Below I've included a picture of a smaller one with the starting fabric measurements of 9 x 6 that I made for a friend's birthday.  I made a flap and button closure for that one.  It was meant to cover eyes or forehead. 

Make it and . . .

craft on!

Related Posts with Thumbnails