Showing posts with label seventh craft till christmas. Show all posts

Friday, July 30, 2010

pillow buddy tutorial - part 2

Alright the moment we've all been waiting for . . . well, at least the moment I've been waiting for has finally arrived . . . wait for it . . . part 2 of the pillow buddy tutorial is finally finished! 

I've been either working on a pillow buddy or working on a pillow buddy tutorial for what feels like forever.  Uhm . . . that is apparently my overly-dramatic side kicking in because I went back in my archive and it turns out I've only been working on the pillow buddies since June 20.  Hmmm . . . by my calculations that's only a little over a month . . . not forever.  

Below you will find part 2 (the final part) of the pillow buddy tutorial.  For part 1 which guides you through the body-making process, go here.  Or for a pdf version click here.

**Disclaimer**
     The following tutorial is for the basic construction of the pillow buddy. You will have to adjust depending on the animal that you choose to make. I wish I knew how to attach a PDF pattern, but alas, I'm technically slow so get ready to use your own creativity to create the head of your cuddly pillow buddy.  AND I know I probably don't need to say it but I'm going to anyway . . . this is for personal use only not for resale use.


What you need for the head:
-a brown paper bag cut flat for pattern
-microfleece, regular fleece or chenille
-small felt scraps
-embroidery thread
-stuffing

What you do:
1)  Draw freehand the shape of your animal's face onto the brown paper bag.  If you aren't too fond of freehand drawing, google "coloring pages of dog head" (or whatever animal) and you might find a page you can enlarge and print off for your pattern.   Cut out pattern head.  Draw and cut out ears separately.  Because the pillow buddy body turns out to be a little over 18 inches, I kept the widest part of the head (the cheeks) to about 10 inches. KEEP IN MIND THAT YOU NEED ABOUT 1/4 to 1/3 INCH EXTRA ALL THE WAY AROUND FOR SEWING AND TURNING.

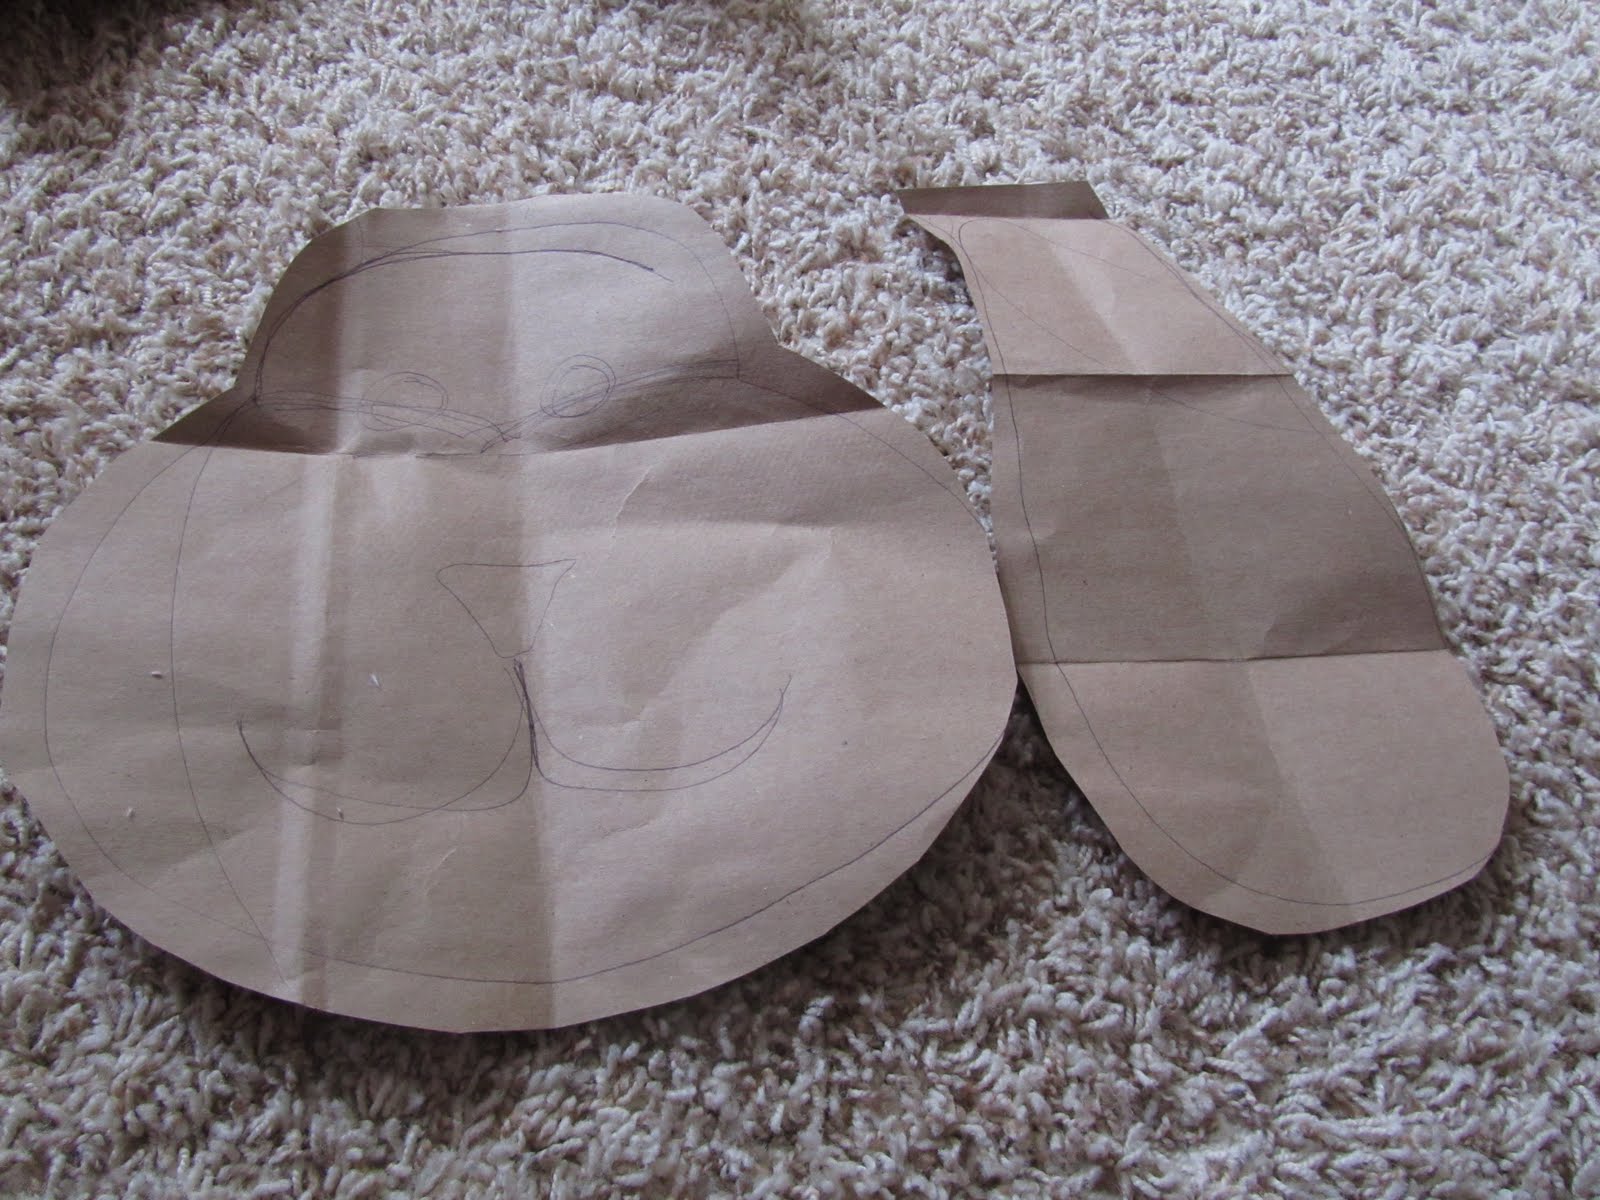
2)  For both the puppy and the kitty I decided to use some contrasting fabric for a part of the face.  You don't have to do this.  If you want to, first take the head pattern and pin it to your fabric.  Cut out ONE piece from this pattern for the back of the head.  Unpin.  Now cut the pattern piece in the way you want the front of the head to look with contrasting fabric.  Pin these pieces to your fabric of choice and cut out adding even more of an edge wherever you will be sewing the two pieces together.  

3)  Put the two contrasting pieces of fabric for the front of the head right side together at the edges and pin.  Sew together.  In the way I did this for the puppy, I made little eyelids which you can see in the second picture below.

4)  You need four pieces cut from the ear pattern.  Put ears right sides together and pin.  Sew around leaving flat ends open for turning.  Turn.  You can top stitch around the ears once they are turned, but I chose not to for the pupply so that the ears would be pretty floppy looking.  I cut four large triangles for the kitty ears and I DID topstitch the kitty ears after turning to make them stiffer and more likely to stand up.  

5)  Baste or pin the ears to the right side of the back of the head.

6)  Layer the front piece of the head over the ears sandwiching the ears in between.  Head pieces are right sides together.  Pin.  Sew around leaving about two inches open for turning.

7)  Turn head right side out. 

8)  Stuff head but don't stuff it too full yet because you are going to sew on the nose. 

9)  Cut out a piece of felt for the nose and start to sew it on with embroidery thread.  I waited to do this until now, so I could see exactly where the nose would be when the head has stuffing in it.  After sewing most of the nose on, I put a bit of stuffing in it to make it stick out and sewed the rest of the nose up. 

10)  Use embroidery thread to stitch the mouth down from the nose.

11)  Stuff the head full now and stitch up the opening of the head.

12)  Use pink thread to sew the head very securely onto the body.  I basically used needle and thread to sew a small circle of stitches connecting head to body.  Then I went around again making a bigger circle.  In the process of sewing the larger circle, I closed the hole on the body that was left from turning and stuffing by stitching up the hole and attaching each stitch to the head as well.  Basically, you just need to sew the head on securely however works best for you. 

13)  Secure eyes on head.  I used felt for eyes on the puppy, but you could use buttons as well.  (I know . . . I know . . . it seems like it's a little late in the game to put the eyes on, but that's how I roll.  I don't even have eyes on the kitty pillow buddy yet.  So basically, put the eyes on whenever you want.) 

14)  Cuddle with your new pillow buddy.  Okay, I know you made this for a kid in your life, but you can still cuddle with it.  Do it . . . you won't regret it.  These pillow buddies are so soft and cuddly you might even want to make one for yourself!  ;)
**The kitty's head was made by cutting a triangle like hole in the front face and cutting contrasting fabric in a slightly larger triangle.  I pinned and used the sewing machine to sew the triangle shape into the triangle hole.  Done!  Not too hard either.

I'm going to go celebrate the completion of this tutorial!  I'm baffled by two things:  1) that I finished it and 2) that it took me this long to finish it!  But I'm done!  Woohoo! 

Please feel free to e-mail me any questions you have or clarifications you need.  I realize that I may not be very clear, so I'm happy to try to help in any way.

Now, go get started on your pillow buddy and don't forget to send me pics when you get done!

Craft on!


I may link this project to these great parties.

Sunday, July 18, 2010

finally! the pillow buddy tutorial - part 1

In 7th grade, I broke up with my first boyfriend via my best girlfriend.  She told him during lunch that I didn't want to "go out" with him anymore.  (I'm not quite sure why we called this "going out" when our relationship primarily consisted of notes passed in the hallway and awkward conversations on the phone.  But that's for another post.)  This was the first sign that I was, and continue to be, bad at closure.  I think that's why I have a hard time closing up each month's craft and moving on to the next month's project.  So, in keeping with being bad at closure, I'm finally wrapping up my June craft - the pillow buddy - as we round out the month of July.  I'm doing this in two part otherwise this would be an extremely long post.  Today's installment is the tutorial for the body.  The next installment will show how to make the head and attach it.

Here are the two pillow buddies that I almost finished for the seventh craft till Christmas.  I still cannot settle on the right eyes for the kitty, so her total completion is in limbo for a while. 

Here's how to make your own pillow buddy body.

Disclaimer:The following tutorial is for the basic construction of the pillow buddy.  You will have to adjust depending on the animal that you choose to make.  I wish I knew how to attach a PDF pattern, but alas, I'm technically slow so get ready to use your own creativity to create your cuddly pillow buddy.

What you need for the body:
1 - 20 x 20 inch piece of microfleece, regular fleece or chenille
1 - 20 x 20 inch piece of microfleece, regular fleece or chenille with corners cut out in an arch shape
4 - arch-shaped pieces of contrasting fabric (These arches should be slightly bigger than the arches that were cut from the body piece.)
2 - 4 x 10 inch pieces of microfleece, regular fleece or chenille for the strap
2 - 3 inch pieces of hook and loop (Velcro)
extra microfleece, regular fleece or chenille for the tail
Stuffing

1)  Pin all four arch-shaped pieces wrong sides together onto body piece in place of the arch pieces you cut off earlier.

2)  Sew arches on.

3)  Take the rougher pieces of Velcro and sew them parallel to the right side of one of the strap pieces.

4)  Pin strap pieces right sides together.  Sew around two long side and the short side closest to the Velcro.  Leave the other short side open for turning.  Turn strap piece right sides out.  Top stitch with your machine around the two long sides and one short side. 

5)  If making an animal with a long tail, use one piece of fleece about 3 inches by 10 inches.  Fold wrong sides together.  Cut a rounded edge on one short end and pin. Sew around long edge and rounded end - leaving other short end open for turning.  Turn right sides out and stuff.  If making a short poofy tail, use two corners that you cut off from one of the 20 x 20 piece.  Draw a big round partial circle like in the picture below on one wrong side.  Pin right sides together and sew along partial circle.  Cut of excess.  Turn.  Stuff.

6) Pin the tail to one edge of one of the 20 x 20 body pieces.  Pin it to the opposite side of where you will eventually want the head. 

7) Pin the strap piece edge to the edge of the same 20 x 20 piece.  The strap piece should be pinned to the side left of the tail. 

8)  Pin the two 20 x 20 body pieces wrong sides together sandwiching the tail and strap piece inside.

9)  Sew around this body piece leaving about three inches open for turning where the head will eventually be sewn on.

10)  Turn body piece right sides out.

11)  Stuff body piece pretty full.

12)  Fold the pillow and pull the strap across the belly to find where the soft Velcro pieces should go.  Hand stitch or use fabric glue to fix the softer side of the Velcro pieces on to the top 20 x 20 piece parallel to one another.  Don't sew up the opening yet.


There you go . . . the body of your pillow buddy is done.  Next time we will find out how to make the head and attach it.  Stay tuned and . . .

craft on!

Wednesday, July 7, 2010

stay tuned . . . pillow buddy update

***
My mom used to sing this little ditty while I was waiting for her to make my mac 'n' cheese which seemed like it took way longer than the 10 minutes the box claims it takes:

Be patient.  Be patient. 
Don't be in such a hurry. 
When you get impatient, you only start to worry.  Remember, remember that God is patient too. 
Just think of all the times when others have to wait for you.

A few of you have been asking me when I will be posting the pillow buddy tutorial.  Maybe there are others out there who are wondering but don't want to ask. So here's the update . . .

I am working on the tutorial.  I promise.  My problem is that I'm impatient . . . maybe even more impatient than when I was at the age of five waiting for my mac 'n' cheese.  I don't want to sit down and type out a tutorial when my brain is swimming with ideas for my recent t-shirt refashion fixation.  I'm working on the tutorial a little bit each night, and I hope to have it up and ready for your viewing pleasure as early as next Monday and as late as next Friday.

Here's the preview of what's to come:

Hmmm . . . what's missing here? 

Obviously, I still have an issue with the kitty pillow buddy.  I have tried six or seven different eye options, and none of them are exactly what I want.  Any ideas?

Craft on!

Wednesday, June 30, 2010

the saga of the pillow buddy


June 8 - I announced (a week late) that June's craft till Christmas would be the animal pillow . . . now renamed the pillow buddy.

June 19 - I fessed up that I had put zero work into the pillow buddies.  Ten days before June was out and I hadn't even purchased fabric and supplies for my pillow buddies.

June 20 - Surprise . . . an impromptu trip to the fabric store . . . the first pillow buddy is started.

June 23 - Another even BIGGER SURPRISE . . . the first pillow buddy is finished! 

June 27 - The second pillow buddy is started.

June 30 - The last step - sewing the head on the body.  I have hope that I'm actually going to get this little gal done before July 1!!!!!  So exciting! 

Tonight I carefully hand stitched the kitty's head onto the body.  I tied in the finishing knot.  Set her down on the floor to attach Velcro and take a picture and another really UNEXPECTED SURPRISE . . .


What is wrong with this picture?  Hmmm . . . you think I would have noticed that I was sewing the head on upside down at some point during the 45 minutes it took me to sew this on.  Yes, you would think that, but you would be wrong.  Forty-five minutes to sew it on . . . four minutes to cut it off. 

Wah wah

So the second pillow buddy will indeed not be done by July 1.  I'm throwing in the towel pillow tonight and tomorrow I will . . .

craft on!
SYS Thurs
Related Posts with Thumbnails