Showing posts with label wood craft week. Show all posts

Sunday, March 14, 2010

wood craft week: a lesson from the wonder pets!

My kid's are watching "The Wonder Pets" for a special pre-bedtime show.  There aren't too many shows they get to watch at our house.  (I know, I know...I'm such a mean mom.  I've already heard these famous words from my four year old, "But mom (insert friend's name here) gets to watch (insert just about every kids' show here).  How come I don't get to?) 

Back to "The Wonder Pets"...I have to admit that I love this show.  There's something inspiring about these two gals, Linny and Ming-ming, and their friend, Tuck.  They are always working together to creatively get the job done.  

This week I've been working with other people to get the job done too.  With the advice of some other crafty friends, I've been experimenting with different ways to paint those little wood bobbins, balls and wheels that brought me so much frustration this week. (Click to catch up on previous post.) 

I'll write more about my mode of success later in case there are a few of you out there who would also like to make these colorful little lacing beads for a tot in your life.  But to top off a great wood crafts week - a much needed break from sewing, I just wanted to show off the success after the failure.  So check it out and

craft on!

Saturday, March 13, 2010

saturday spotlight - a house full of blessings in wood form

It's amazing how much I take for granted the things I see every day.  For a while I had an opportunity to live in London.  I worked in a mental health facility there, and five days a week on my way to work I walked through the courtyard of St. Paul's Cathedral.  Saint Paul's has been an important part of London's landscape since 1697.  On my first day to work, I remember thinking, "Wow, I can't believe I walk through the courtyard of this amazing building on my way to work!"  I gazed longingly at each and every detail - soaking it all in.  By month three of walking through that courtyard two times a day, five days a week, I barely even looked up - as if I was walking past a newspaper stand.  The once-beauty of this amazing cathedral had become commonplace.

That brings me to this week's Saturday Spotlight.  First, let me say I don't dare propose that my house is anything like St. Paul's Cathedral in historical significance and architectural beauty.  However, there are many things that sit inside these walls that - at one time - I gazed longingly at, soaking in each and every detail.  Things that people  made just for me or members of my family...things made out of wood by the careful and creative hand of friends, family, loved ones.  At some point, these beautiful gifts became commonplace.  However, in honor of wood crafts week I've shaken myself out of this commonplace stupor, and looked once again at the beauty inside these walls.

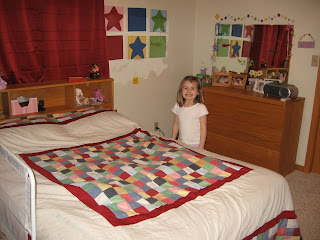
The headboard and dresser were made by my grandpa many many years ago.  This bedroom set has been used by my grandparents, my dad, my uncle, me and now my daughter.  This is a true legacy gift. 
These two bookshelves were made for my girls.  They have unique names with special meanings, and these personalized bookshelves are wonderful gifts and beautiful additions to their rooms.  The women who made these has got major talent and skill. 
This rocking horse is so special to us - it could never be commonplace.  It was made by a special family that plays an important part of our lives on a daily basis.  Each family member played a role - wood working, sanding, painting, staining, etc.  Mark, the man who did the wood work, was incredibly talented.  His hands were inspired.  He passed away, but his memory lives with us in this special gift. 
This wonderful little chair is another one of those gifts that we cherish because of the person it represents and reminds us of - Ray.  We actually have a couple of gifts from Ray - a nativity, a sled, this chair - that help us remember a man who loved to use his creative gifts to bless others.   
Be inspired and craft on!

Friday, March 12, 2010

wood craft week: celebrating failure...again!

If you've been journeying with me for a while, you know that I'm a big fan of failure.  My membership in the failure fan club started at an early age after falling when learning to walk, running into the garage while learning to ride a bike, getting in an accident shortly after learning to drive.  Somewhere along the way, I realized that failure can be a good thing - if you let yourself learn something from it.  

Since starting this crafting gig, I have earned a platinum membership in the failure fan club.  (Hence the reason for starting my flickr page to celebrate failure.)  Wood craft week has not disappointed me...it has left me plenty of room for failure.  You don't know how many times I had to paint over mistakes on my wonderful little painted people.

And then there's these little wooden gems.  (Sorry about the picture quality...just another failure to add to my celebration list.)

If you read my first post for wood craft week about painting people, you will remember that I also purchased wood bobbins and balls in hopes of making them into people.  I abandoned that hope when I realized I would have to glue them all together and my laziness won out.  

So...what's a gal to do with 20 wood bobbins and 36 little wood balls?  Hmmmm...make lacing beads?  Yes!  I picked up some wooden-wheel shaped pieces and decided that I would paint the bobbins, balls and wheels in bright colors, pair them with some new shoelaces and place them in a little container of some sort...voila...fun lacing beads any toddler would enjoy.  A great addition to my twelve crafts till Christmas.  

And that's where failure comes in...

Monday night I sat down to paint - starting with what I thought was going to be a great light green and bright pink.  It took me about two coats of paint and hands covered in green and pink to realize that I would need about ten coats of paint of light green and five coats of paint of bright pink on each little bobbin, ball and wheel.  

If you've come to know me at all, you know I'm not patient enough to go to all this trouble.  So I've ditched the wood beads until I can either a) find thicker darker paints or b) get some primer.  I'm assuming primer would help eliminate the soaking in of color and the need for so many coats.  Can anyone validate that assumption for me?  
Bobbins, ball and wheels are back in the craft box; failure is celebrated because I learned something; and tomorrow I will...

craft on!       

Thursday, March 11, 2010

wood craft week: twinkle, twinkle little star

Starlight, star bright, first star I see tonight . . . Catch a falling star and put it in your pocket . . . Twinkle, twinkle little star, how I wonder what you are . . .

Decorating and adding color to the walls of a house you don't own is a challenge.  This is the challenge I face.  All of the walls in our house are as white as the snow that never seems to go away outside.  It didn't seem to bother me that much until I saw my oldest daughter's little profile shot on my third ultrasound.  All of the sudden I had an urge to add color, design, dimension to the walls of a room in our house that this little bundle could call hers.  

That brings me to my explanation for why nursery rhymes about stars and wood craft week converge into one post.  I used both stars and wood to add much needed color, design and dimension to the walls of a room with white walls.  This is a great way to decorate a nursery or kid's room in a rented apartment or house.

I bought wood star shapes in various sizes, wood letters to spell a variety of words and my daughter's name, painting canvases, super strong sticky tack, paint and sponge brushes all from my beloved Hobby Lobby. 

I chose letters to spell dream, laugh, love, play, hope, believe and painted them with various colors.  Then I used massive amounts of stainless sticky tack to adhere them to the wall.  I also painted stars in various shapes and used them to accent the words, the mirror, a window and the door.


I painted canvas rectangles and tacked the stars on them for wall art.  These also require a massive amount of sticky tack in order to stay on the wall. 


Okay, technically these square canvases painted in solids and stars don't really use any wood, but I really like them.  Each canvas is ten by ten, and it was super easy to draw and paint the stars on them.  Cheap and easy wall art at its finest (okay, maybe "finest" isn't the most accurate descriptor...maybe "mediocre" would be more accurate). 
So . . . if you (like me) live in a house or apartment you don't have the freedom to paint or perhaps you (also like me) are sort of fickle when it comes to decorating, a little visit to the wood craft isle at your local Hobby Lobby, Michael's or other craft store may give you a little decorating inspiration.  Grab some paint, a few brushes, some wood shapes and letters and . . .

craft on!

**I'm linking this to the CSI Project for the week of June 22.  Please click on the button to check out some great ideas for wall art, frames, etc.
Visit thecsiproject.com

Tuesday, March 9, 2010

wood craft week: cravings

A friend dropped off a cheesecake on Sunday.  It's not just any cheesecake it's a cheesecake by Lori.  You really can't get better cheesecake.  In fact, CheeseCake Factory doesn't even compare.  So I've been on a cheesecake diet for the last three days.  You should try it.  One thing you should know about me is that I'm typically a little bit of a health-food junkie.  I don't eat meat.  I love my fruits and veggies.  I like locally grown food.  But all of these healthy habits are rendered powerless in the presence of Lori's cheesecake.  So . . . I've eaten cheesecake for lunch, for dinner, for snack . . . I've somehow been able to keep myself from eating cheesecake for breakfast.  (Maybe eating cheesecake for breakfast is something akin to having a drink before noon.)  I crave Lori's cheesecake.

As you know, I've also been craving something crafty that doesn't involve sewing.  My crafty version of cheesecake this week is wood.  So I've been looking for wood-related crafts that I can actually do in all my crafty laziness.  I'm not going to be like my friend Luke, and I'm not trying to be.

Tonight I came across this great idea (click for link) from Serving Pink Lemonade.  I am definitely going to be trying this.  You could use this idea for anything - a message board, a recipe card holder backsplash, a picture holder on your wall, or the obvious art gallery.  I love it.  And for tonight, just looking at it somehow satifies my wood craft cravings.  If only the same could be said about cheesecake.

Craft on!

Monday, March 8, 2010

wood crafts week - painting people

Welcome to Wood Crafts Week!

Okay, I decided that I couldn't wait until next month to do something besides sewing.  So this week I welcome you to a whole week of wood crafts . . . wowzers!  (Check out the excessive use of the letter "w" in that sentence.) 

Since January I've been blogging about crafts I've been working on that I will be giving my kids for Christmas 2010.  However, I've also been working on some other crafts on the side.  I'm in the process of making two fabric doll houses that I will be giving them for Easter.  Check out some of the details on the houses I'm working on.  

These two doll houses have been a crazy amount of work.  Right about now you're saying to yourself, "What does this have to do with wood crafts?"  I'm getting there.  

As I was in the process of making the doll houses, I was inspired to make some dolls to live in these cute little bungalows.  I wandered aimlessly around Hobby Lobby - on one of my super rare trips there - hoping to be inspired by something.  Lo and behold . . . I found little wooden people.  I also found wood bobbins and little wood balls.  I figured I could paint the wooden people and/or glue the bobbins and balls together to make people.  However, after working so hard on the little houses, I decided to go the incredibly easy peasy route that did not involve using glue and waiting for it to dry.

First, let me say that I realize I'm not the first person in the history of crafting to do this.  I don't claim to be original.  Obviously, if someone makes these little wooden people, they expect people to paint them.  So take this little tutorial as a starting point to create your own unique masterpieces, but there are probably a plethora of other great ideas and tutorials in blogs across the web.  

What you need to get your hands on before you begin:
  • acrylic paint in a variety of colors
  • paint brushes in different sizes and stiffness
  • paint markers in medium and fine point
  • wood people in various sizes
  • toothpicks (not pictured)
  • modge podge (not pictured)- if you don't have modge podge on hand, another nontoxic paint sealer would work
1)  Choose skin color and paint two or three coats on head and neck. (I recommend doing a variety of skin colors - dark, light, in between.  That way your little dolls reflect the beauty of all sorts of people.)  The number of coats will depend on the skin color you choose.  Let each coat dry before painting the next.

2)  Paint main body.  Again, count on doing at least two coats - possibly three depending on the color you choose.  Let each coat dry thoroughly before adding the next otherwise you will be dealing with yucky clumping of paint.  I learned this the hard way.  I'm impatient, so it's REALLY hard for me to wait for anything - especially paint drying.  But in this case, waiting is totally worth it.  

3)  Add hair.  I kept the hair pretty simple as you can see from these pictures, but you could experiment with painting ponytails or curls using different colored swirls of paint.  I'm sounding like a broken record here, but you will need at least two coats for the hair as well.  And yes, let the first coat dry before adding the second.  

4) Add body details.  There are endless options here.  Probably the three most useful tools for this stage in the wood-person-painting process are the following:
  • toothpicks - Use these to add the fine dots you see in the floral pattern on my people or the details on the pants.  Toothpicks would also be great for adding facial features - which I didn't do.  I was planning too, but when I looked at my little people, I liked the idea of leaving the facial features open to the imagination of my girls.  If it freaks them out too much to have faceless people, I'll paint on some facial features later.    
  • fine-tipped/medium-tipped paint markers and permanent markers - Also, great for adding details, but gives the option of wider lines and larger details.  If you wanted to paint on arms, paint markers would be a great tool for that.  The medium-tipped paint markers draw on a pretty thick line, so don't plan on using these for little dots, fine lines or other intricate details.  Permanent markers, like Sharpies, are wonderful for drawing designs on clothes.  
  • q-tips - These weren't included on my list of supplies; however, I brought them in mid-project to wipe away little, or more accurately in my case - huge mistakes.  Do it quickly though; acrylic paint dries fast.  And obviously the permanent marker route leaves no room for mistakes. I ended up having to paint about three more coats of body paint over a major permanent marker mistake, so use with caution.
5)  Seal the entire doll with modge podge or another nontoxic paint sealer.  I actually did two coats of this as well.
Wa la!  Delightful little dolls done and ready to be played with by any little hands in your house.

Enjoy and craft on!


toolsareforwomentoo


Related Posts with Thumbnails