Showing posts with label sunday kids' craft. Show all posts

Sunday, December 19, 2010

sunday kids' craft and grandparent gift

Today's Sunday kids' craft also doubles as a Christmas gift.  And the best part is that you can still pull this off before the big day!  

All bapas and nanas . . . or whatever you call the grandmas and grandpas in your life . . . cherish memories with their grandchildren. When my girls were three years old and ten months old, we started working together with my brother's children to begin a memory book for grandma and grandpa. This is a simple book that kids – no matter what their age – can help with year after year.


This gift encourages your children to remember special moments with their grandparents and allows them to creatively express those memories on a special scrapbook page each year. They get to make their very own page.  Wrap it.  And give it . . . all by themselves.

Here's what you need:
• a scrapbook (You just need this for the first year you begin this gift-giving tradition.)
• various scrapbook supplies
• pictures from the year of special times with grandmas and grandpas

Here's what you do:
1) Print off pictures of your children and their grandparent from the current calendar year.

2) Allow them to pick out a few of their favorites.

3) Spread the scrapbook supplies out on the table and let the kids create their own memory page . . . just one per kid . . . for that year. Obviously, you will need to help cut or glue depending on your children’s ages and skill development, but try to allow them to do most of the work on their own. The beauty of this gift is not in perfection it’s in children making their own gifts for grandma and grandpa . . . gifts that will be cherished for years to come.

For the first year, give grandma and grandpa the wrapped book. And let children wrap their own pages and present them to grandma and grandpa when opening gifts.

Craft on!


**Have you checked out the DIY Life eZine yet?  Do it!  The DIY gals were kind enough to include these ideas of mine in this season's issue, and it is chocked full of other holiday ideas from other great bloggers.

Check out the great parties I may link to by clicking on the blog name below or visiting my "I like to party" page that shows off all the party buttons.  These gals go to a lot of work to host these parties.  If you participate in parties please take time to look through a variety of the projects linked up.  They are a great source of inspiration!


Weekend - Somewhat Simple Holiday Party, a little lovely, Craft Envy, Under the Table and DreamingBe Different Act Normal, A Vision to Remember, 504 Main - Tickled Pink, Funky Junk Interiors, Tatertots and Jello, I heart naptime


Monday - Keeping it Simple, Craft-O-Maniac, The Girl Creative, The Trendy Treehouse, CRAFT, Making the World Cuter, Mad in Crafts, Sumo's Sweet Stuff, Between Naps on the Porch, Tools Are For WomenIt's So Very Cheri, Skip to My Lou, Sew Can Do, Polly Want a Crafter


Tuesday - All Thingz Related, Sugar Bee, New Nostalgia, Creative Itch, Lucky Star Lane, Hope Studios, These Creative Juices, My Delicious Ambiguity, Today's Creative Blog-Get Your Craft On!,


Wednesday - It's So Very Cheri, Beyond the Picket Fence, Blue Cricket DesignTrendy Treehouse, Tea Rose HomeSomeday Crafts, My Backyard Eden, Sew Much Ado, Night Owl Crafting


Thursday -  Fireflies and Jellybeans, Life As Lori, House of Hepworths, Somewhat Simple, Seven Thirty Three, The Train to Crazy, PonyTails and FishScales


Friday - The Sabby Nest, A Little Knick Knack, Fingerprints on the Fridge, It's Fun to Craft!, It's a Hodgepodge Life, Kojo Designs, Simply Sweet Home, Frou Frou Decor, Remodelaholic, Momma's Kinda Crafty

Sunday, December 12, 2010

sunday kids' craft and classroom party audition: jingle bells


Welcome to classroom party craft audition THREE and Sunday Kids' Craft!  Two for one!  (Go here for audition ONE and here for audition TWO.)

By now you are seriously wonderful about my ability to make decisions.  I mean, who spends THIS MUCH TIME trying to pick a craft for a bunch of kindergartners? 

Me!  That's who!

Yesterday, we were stuck inside all day, and we spend about two hours of that at the table trying out crafts!  Most of the pics below are of me doing this particular craft because it's REALLY hard to get kids to pause in the middle of the steps for pictures.  But not only did my 5 year old make these bells, but my 2 year old did too.  So rest assured that these party crafts have been kid-tested and mother approved!  (I secretly LOVED every minute of our snowy day.  Snowed-in days are the best excuse to take a break from the world for a day!  And yes, we stayed in our pajamas ALL DAY LONG!  You can read a recap of our day here.) 
And here's number three:
Jingle Bells
Audition #3

Here’s what you need:
~an egg carton cut a part . . . each child will need two of those little egg cups
~one pipe cleaner per kid
~two bells per kid
~decorations - glitter glue, sequins, stickers, markers, etc.

Here’s what you do:
1) Poke small holes in the top of each egg cup.  I recommend that an adult does this part.  I used wooden skewers for this.  Someone gave us these as a wedding gift, and I'm pretty sure I've never actually used them for food.  I've used them for crayon ornaments, egg blowing and egg dying, and various other projects, but never as actual skewers.  You've got to get a set of these!

2)  Push the pipe cleaner down through one of the holes.

3)  Push the pipe cleaner through the opening at the top of the bell and pull it out about 1/4 of an inch or so.  Then twist this tail around the rest of the pipe cleaner to secure.   

4) Repeat with the other egg cup and bell.
5)  Decorate!

Done!

Hang these over a tree branch for a one-of-a-kind jingle bell ornament.  I made one of these in preschool 30ish years ago, and my mom still hangs it on their tree every year. 

I love these.  They aren't "perfect" or "polished" looking, but they are easy, allow for creativity and individuality.  (My girls picked mostly pink and blue decorations as much as I tried to influence them to pick the more traditional Christmas colors.  They like to put a their personality into every craft we do.)  And my 5 year old LOVED this one too.  She's been jingling her bells all day!

What do you think?  What's your first choice so far?  I have at least two more to audition before I make a final decision.  Weigh in!

Craft on!

This post is sponsored by Arise Shine Design!  Check this shop out for unique jewelry gifts.
Photobucket

Sunday, October 17, 2010

sunday kids' craft: pumpkins, squash and gourds . . . oh my!

We live a few miles from the most glorious fall distraction ever . . . Pumpkinland.  Pumpkinland is our version of Disneyland.  (My kids don't know YET that Disneyland even exists.  Beware to anyone who tells them . . . I'm joking . . . sort of.) 

Pumpkinland has what you might expect . . . pumpkins, gourds, ornamental corn, etc.  But it has so much more:
  ~a huge corn maze
  ~a little kids' corn maze
  ~play structures . . . every Little Tikes playset and playhouse created
  ~a petting zoo with goats and mountain goats, lambs, llamas, geese, ducks, chickens, baby chicks, roosters, rabbits, puppies, kitties 
  ~pony rides for kids
  ~campfire area 
  ~hay bale playground . . . Who knew that hay bales could be so fun?!
  ~a ton of those picture-taking cutouts that you put your head into and you are suddenly a pumpkin, scarecrow, cat, etc.  
  -candy, cookies, hot chocolate, etc

We try to go there a few times every fall, and my two year old spends the entire time playing on the Little Tikes stuff . . . the same stuff she plays on at home or our friends' houses.  She could care less about the pony rides and the rabbits.  In fact, yesterday she took up residence in the little fireplace cottage and started refusing entrance to any other child who tried to get in.  It wasn't pretty!

Anyway . . . I got horribly off track . . . the point is that we also bring home pumpkins (and a few other odds and ends) when we go to Pumpkinland.  
  
And then we transform them (along with the squash) into faces or other works of art using permanent makers (we like to live on the edge. 


MummySquash is clearly my favorite.  She started out with a cute pink hat, However, with a few strips of white muslin, we transformed her into a cute mummy. 

Grandma and the girls also used stickers and glitter glue to work on these.

Craft on!

Saturday, July 17, 2010

sunday kids' craft: paintin' with puddin'

It's hot!  Not warm . . . HOT!  This isn't a new flash for most of the country, but I'm a heat wimp!  We live in a high-humidity area, so when the temp outside is 93 degrees, it feels more like 103 degrees.  It's the kind of hot that makes it hard to breath.  It's the kind of hot that makes me not want to put even a toe outside the door.  It's the kind of hot that's hot!  My kids, of course, are not heat wimps.  To them hot weather is an excuse to run in the sprinkler, go to the pool, splash in water buckets on the back porch.  

As I watched the weather report on Friday evening, I began formulating my plan to avoid going outside all weekend.  I knew I would have to bring out my best and brightest ideas to distract my children.  So . . . while they were snug in their beds, I began plotting at 10:15 on Friday evening.  Yes, I'm a devious mother! 

Unfortunately, the first full coherent sentence out of my oldest daughter's mouth on Saturday morning was, "Can we go to the pool today?"  She didn't even give me a chance.  She's THAT good!  Thankfully, it was only 7:30 AM, so I could easily deflect the question with, "The pool isn't open yet."  Then I quickly distracted her with the lure of breakfast.  At 9 AM while we were making forts out of the couch cushions, the dreaded question surfaced again, "Mommy, can we go to the pool today?" 

"The pool isn't open yet, but let's put on our swimsuits, lay out these fort blankets on the floor and pretend we are in the pool," I said in a really high-pitched voice hoping they would think that was exciting. 

Guess what?  They did!  We played in the "pool" - floaties, pool toys, life vests and all - for almost two hours.  Incredible! 

And when I could tell that their interest in our very dry blanket pool was growing thin, I had this little activity up my sleeve . . . paintin' with puddin' . . . and we did it in swimsuits to make it seem even more fun!  (Why does everything seem more fun to kids if they are wearing the swimsuits?)

The next time you are either avoiding the heat outside in the middle of summer or the cold outside in the middle of winter, pull out your almost-past-due-pudding that you know you won't use before it expires and start painting!

What you need:
-pudding in various colors
-milk
-leak-proof container, bowl and whisk
-wax paper
-tape
-paint brushes

What you do:
1) Make each color of pudding separately according to package directions but use 1/4 cup less milk than directed.  We only had two different colors.  We made one color with the quick-shake method in a leak-proof container.  My oldest daughter LOVED shaking that pudding.  We made the other color with the stir method because my youngest wanted to stir not shake.

2)  Let pudding set for about 5 minutes.

3)  While it's setting, put large sheets of wax paper on work surface and tape them down.

4)  Pour pudding into little bowls and begin finger painting or painting with a brush.  We finger painted first on one sheet and then put down a new sheet for painting with brushes.  Starting with finger painting helps them get the need to touch, squish and taste the pudding out of the way.

5)  When the paintings dry, the colors become even brighter and more vibrant.  (A word of advice . . . don't keep these around for more than a day in the summer unless you want to host an ant party in your house.)

Enjoy a wonderfully fun and messy (what else would you expect from me) activity that will keep you out of the sun on a day hot enough to fry eggs on the sidewalk . . .literally. 

Craft on!

Saturday, July 10, 2010

a SWEET giveaway & sunday kids' craft

It's Sunday and you know what that means.  Oh, you don't know what that means?  Sunday is kids' craft day!  I'll pretend I'm not offended that you didn't know that. 

Rather than posting a new craft for kids today, I'm pointing you back to a craft from the recent past.  (KEEP READING FOR THE CHEWILICIOUS GIVEAWAY!)

GUM MAKING


That's right you can make your own chewing gum!  (Go check out that post here which includes a gum recipe for you to try.)  We had so much fun with this Sunday craftipe (my new word for a cross between a recipe and a craft) and it was a super popular post.  Apparently, everyone loves gum and making a mess in the kitchen as much as we do!  I even heard from my bloggy friend Jocelyn who experimented with my recipe by adding some fun gum colors.

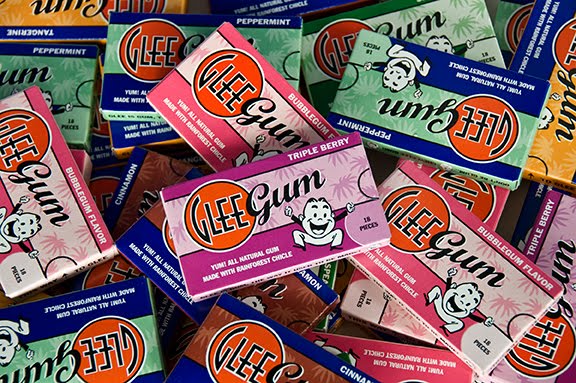
A representative from Glee Gum randomly found my post and sent me an e-mail thanking me for linking to their gum pellet base product.  Isn't that sweet?  

And it gets better . . . 

Glee Gum is offering two wonderful prizes to two lucky twelve crafts till Christmas readers.  I'm so excited to offer you these two prizes:
**GIVEAWAY IS OVER**
Prize 1: (Chosen from the entry comments for this post.)
- 1 candy kit of winners choice (These kits come with everything you need to make chocolate, chewing gum or gummy candy.)
- 6 mini Glee Gum packs
- 1 coupon

Prize 2: (Chosen from the fans of twelve crafts new Facebook page.)
- a sampling of Glee Gum (3 full-size pack and 3 mini packs)
- 1 coupon

Wow!  What a generous prize pack from Glee Gum! 

Their candy kits are amazing!  They are available in Make Your Own Chocolate, Make Your Own Chewing Gum, and Make Your Own Gummies.  What a GREAT SUMMER ACTIVITY!  These activity kits are all-natural, educational, and eco-friendly. With pre-packaged ingredients and easy-to-follow instructions, kids (and adults) gets a real kick out of making candy from scratch. Focusing on the history behind and the origin of these candies, each kit is designed to captivate your interest, connect you to the global community, and create something yummy to eat in the process!

There are a variety of ways to enter and win Prize 1 from these chewlicious (hmm . . . I'm on a roll in the making up words department) prize packs.

Each thing you do is one entry for Prize 1.  Please leave a comment below for each entry method along with the contact info that applies to that method - i.e. twitter account and Facebook page so I can follow up on your entry.  (Click bold red fonts to go directly to links.)
  1. be (or become) a follower on Google Friend Connect of twelve crafts till Christmas
  2. check out the candy kits on the Glee Gum product site and comment about which one you would choose if you won
  3. "like" Glee Gum on Facebook
  4. "like" my new Facebook page for twelve crafts till Christmas
  5. follow twelve crafts on twitter
  6. tweet about this Glee Gum giveaway (Glee Gum is on twitter too!)
  7. post about this Glee Gum giveaway on your Facebook page
SEVEN CHANCES TO WIN Prize 1!  Wow!**

This giveaway will be open until 11:59 PM on Saturday, July 17.  My advice is enter a different way each day so that your entries are spread out rather than all lumped together, but that's just how I roll when I enter a great giveaway multiple times. ;)  The winner for Prize 1 will be chosen randomly first from the comment entries on this post. 

Then the winner of Prize 2 will be randomly chosen only from the fans of twelve crafts till Christmas Facebook page as of Saturday, July 17 at 11:59 PM.

And one last thing . . . there is probably a Glee Gum retailer near you.  Check it out at the store locator here and then use the coupon on their recent newsletter to go score a deal on some Glee Gum.

If you have questions, feel free to shoot me an e-mail and ask. 

Otherwise, check out my recipe for making gum,
enter to win two great prize packs
and . . .

craft on!

**While I'm so thankful for the international readers of this blog, Glee Gum prize products can only be shipped within the United States.  Unfortunately, this excludes international readers.  I do appreciate each international reader - some of whom I've gotten to know through wonderful comments and e-mails) bunches and bunches.  However, international readers can still purchase Glee Gum on the online store. Click here and scroll down to the bottom of the page for international shipping info.
Glee Gum is all-natural, gluten-free chewing gum with no artificial coloring, flavoring, sweeteners nor preservatives. Glee Gum is the only gum in North America made the old-fashioned way, with chicle! Chicle is a natural tree sap harvested sustainably from the rainforests of Central America. Once all chewing gum was made with chicle, but today most gum is made entirely from synthetic stuff. Not Glee Gum! Glee Gum uses chicle because it is an eco-friendly way to help conserve the rainforest. Chicle is also what gives the gum such great, long-lasting chewing texture! Glee Gum is a “green” gum right down to the packaging, which is made from biodegradable, recycled cardboard.

Sunday, July 4, 2010

sunday kids' craft: fresh fruit freats

My oldest daughter has been asking me for weeks to make fresh fruit freats (that's my made up name for frozen treats).  We experimented with these last summer because they fit my criteria for cooking with kids.  What are my criteria for cooking with kids?  Well, I'm glad you asked!  Anything I do with my children in the kitchen must be:

1) Messy
2) Stain clothing
3) Messy
4) Fun
Oh and . . .
5) Messy

Not the criteria you were expecting . . . right?

Well, I guess these aren't my cooking-with-kids criteria so much as they are the four things that seem to happen anytime I try to cook with my kids.  We make a crazy mess - i.e. when we made our own chewing gum.  We stain our clothing.  And we have a ton of fun! 

Now, I'm going to be honest, it's not in my nature to like making messes or stains on clothing.  But when I hear the giggles and see the smiles that result from these messy stains, I can't help but feel as happy as they do.  

So . . . I promised my oldest daughter that on the 4th of July we would make our first batch of fresh fruit freats.  We made four popsicles and two dozen ice cubes.  

Grab the following crafty ingredients or a variation and make your own freats:
-3 to 4 cups of fresh fruit (washed and cut up)
-2 cups of orange juice or white grape juice (White grape juice will make sweeter freats and OJ freats are a little tart.)

 
1)  Frist things first . . . scrub those hands.  This craftipe (ooo . . . I just invented a new word for recipe and craft!) is hands-on - literally.

2)  Divide your bowl of cut up fruit putting 3/4 of the fruit in one bowl and leaving 1/4 of the fruit in the other bowl. 

3)  This is the fun part . . . start squashing.  That's right . . . smash, squeeze, pound - whatever it takes to make smashed fruit.

4) Mix juice and smashed fruit.

5) Pour juice/fruit mixture into popsicle molds and/or ice cube tray.  (We used a mini-muffin tin because, oddly, I could not find our ice cube trays anywhere.  I also couldn't find one of the popsicle tops.  Where is everything going in our house?)

6) Put a few pieces of the unmashed cut-up fruit into each popsicle mold and/or ice cube mold.

7) Cover molds and ice cube tray (or mini-muffin tin) with plastic wrap and freeze.

**To easily remove ice cubes from tray dip the bottom of the tray in a sink of warm water for a few seconds.

My girls drink plain old fashioned water pretty well, but they drink it even better with a few of these ice cubes plopped into the glass.  Or use these ice cubes in a pitcher of lemonade, sangria or punch for a party or shower. 

Delicious and pretty!

Craft on!  
Related Posts with Thumbnails