Uhm . . . hello tangent . . . back to the actual point of this post.
I can certainly make taggies, but I'm tired of making them. Cut squares. Cut ribbon. Pin. Sew. Turn. Done. With the arrival of a friend's new baby, I decided I needed to put a new spin on my old standby. Thus the monogram taggie was born. (Did I just use the word "thus"? Yikes!)
If you've made a taggie, you don't need this tutorial because you can obviously print your letter out, cut and go. So this is for those of you out there who have yet to venture into the taggie world. Next time a friend or relative finds themselves with a new baby in the house, try this little tutorial out for a sweet handmade gift.
Monogram Taggie

Here's what you need:
-fleece, soft fabric or flannel in contrasting or matching patterns/colors
-a variety of ribbons
-a baby link or toy hook
Here's what you do:
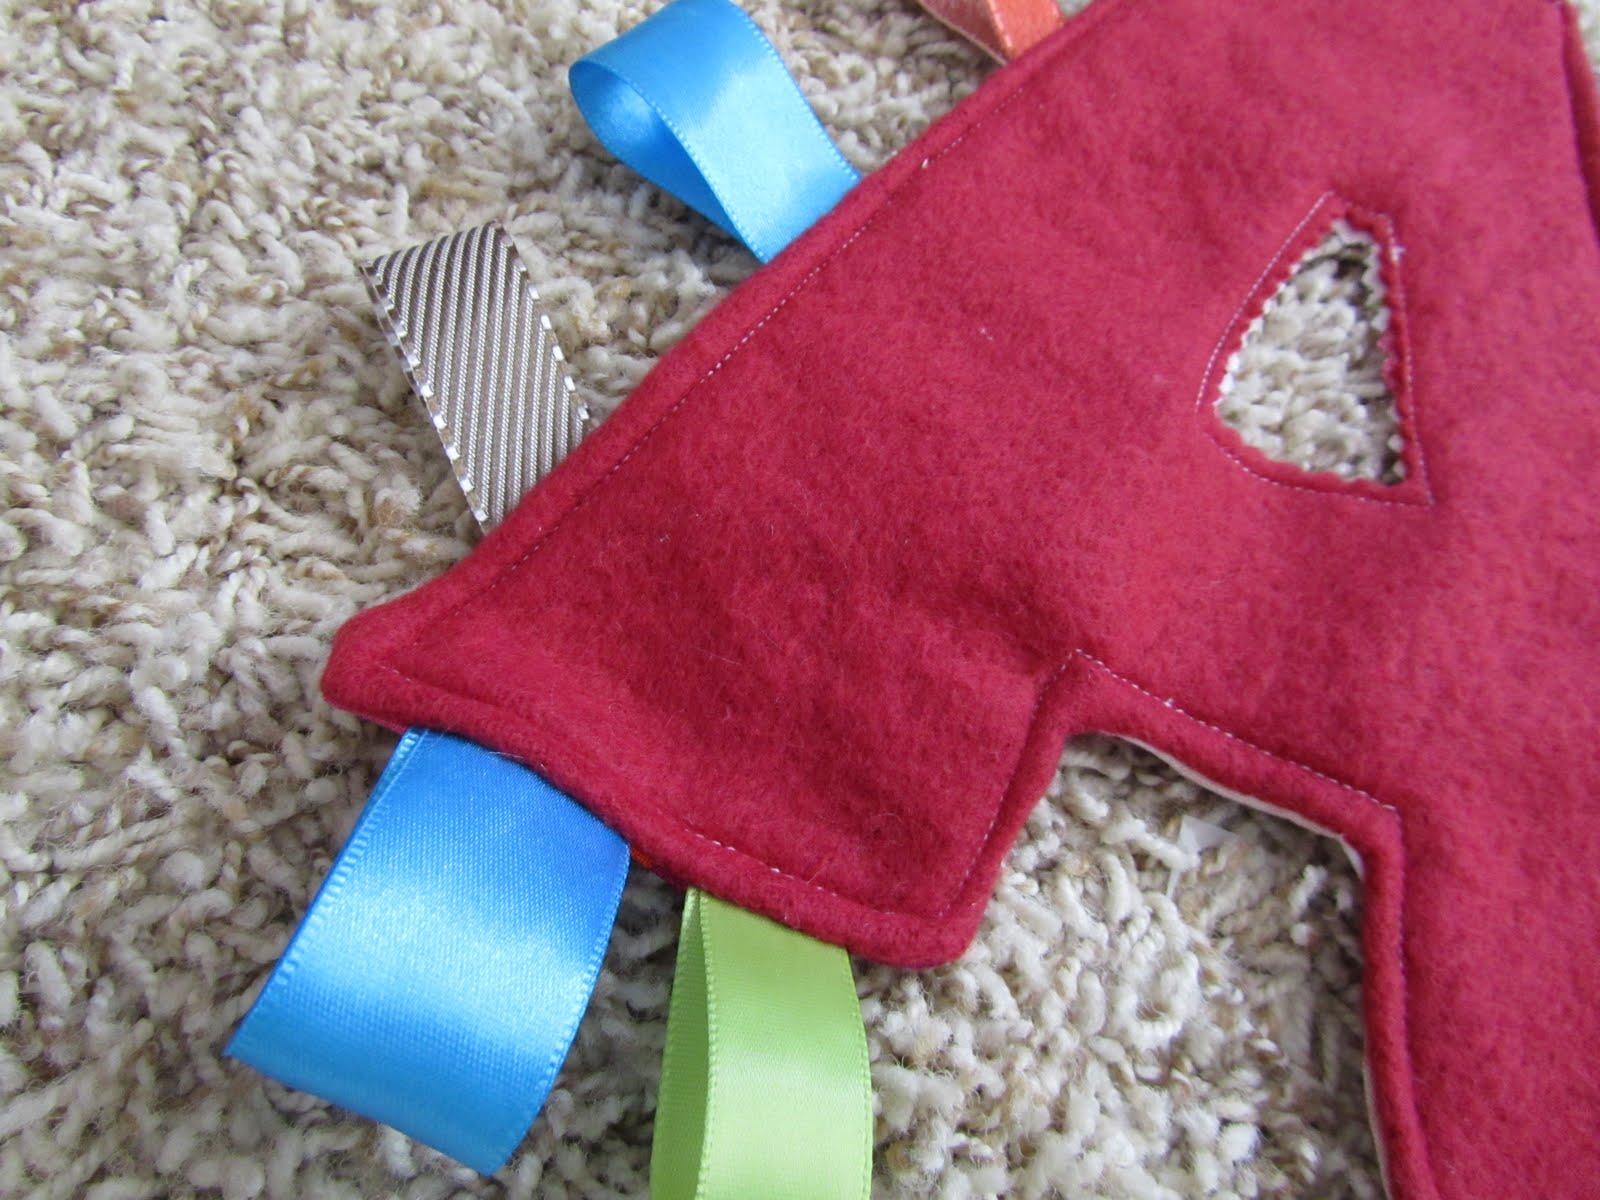
1) Use Word, Publisher or whatever to pick a font, make a very large letter using the first letter of the baby's name (first or last name) print out and cut adding about 1/4 inch edge all the way around when cutting.
2) Place fabric wrongs sides together. Pin printed letter to fabric and cut out.


3) Cut strips of ribbon about four inches long. I used 14 ribbons total.

4) Fold ribbons in half and pin around the right side of the thicker of the two fabrics.


5) Place letters right sides together and pin.

6) Sew around outside of letter. If you are doing a letter with an opening in the center of the letter - like A, B, D, etc., don't sew the center openings and sew all around the outside leaving no opening for turning. If you are doing a letter like C, S, N, etc., leave a two inch whole for turning when sewing around the outside of the letter.

7) Unpin, clip corners and turn. I used the opening in the center of the A for turning.

8) Topstitch around outside of letter. If you are doing a C, S, N, etc without a center opening, fold in the turning hole which will be sewn shut in topstitching. If you are doing another letter with a center opening or two, continue to the next step.
9) Trim opening(s) with pinking shears. You could do this earlier, but I waited until this point because the fabric could shift in topstitching the outer edge. I wanted to make sure that the edges were fairly evenly matched in the center. After cutting with pinking shears, topstitch around opening(s).

10) Add a baby link and little toy. Personalized gift . . . done!


Craft on!
I may be linking to these fabulous parties!


64 comments:
I ADORE this, absolutely ADORE this. Great job and great photos too.
babies do love the tags, sometimes even better than the toy itself. Very original!
I've seen these all around the net, but the initial is new to me, and it pushed me over the edge, now I have GOT to make one of these or I'll never be happy ever again. ;o) I blame you! P.s. Thanks for this precious idea/tuturial!
what a cute idea! i love the colors you used in this particular one- so fun and cheerful!
this is so cute...i love it
I love the monogram! I am going to feature this on my blog tomorrow!
Great idea!
I have been buying lots of baby gifts in the past year...think I might try and make one of these...it's soooo CUTE!
Blessings,
Linda
So cute! Now that I have my sewing machine I might have to try this!
What a clever idea!! So hand to hang from the bag...
Love it! I make the taggie blankets for gifts too and will definitely make the monogram for the next one!
You are so smart!! I love this idea. This is going on my list for my little cousin. He'll love it. :) Thanks Elizabeth!!
I LOVE your "spin" - this is a great idea!
Fabulous!
Yet another great idea! I just love stopping by and seeing your creations. I'm really going to try this. Just got the sewing machine out after too many years to count. It's like riding a bike, right? Hope so.
Love it! This is going into my Crafts I Like tab for the next baby gift I make. I just made boocoos of baby gifts for my neighbor including a taggie blanket so I'll have to save this letter one. You are so creative!
Link it up Thursday!
terelauritsen.blogspot.com
ahhhhh I'm in LOVE with this. My kids love tags and I've made a few of the square ones for gifts. Great idea!!!!!!
Also, it adds another element if you put something crinkly in the middle like a cereal bag or baby wipes plastic. =)
Oooh, original, clever and easy! My kinda craft! I'll be making one of these for my little grand nephew, Patrick, for Christmas!
So cute! I just finished up two personalized baby gifts {featured on my blog} - Monogramed Taggies would have been a great addition to the presents! :) Thanks for sharing!
-Bea
4daydreambelievers.blogspot.com
I just love this idea! I will have to make one for my niece!! Thanks for the wonderful idea.
What a great idea to make a taggie blanket letter. Love it. DEFINITELY doing this. THANKS so much for sharing!
What a great idea!
This is WONDERFUL! What a great idea!
I love the monogram idea!
wow, you make it look so easy to make this gift for a baby!
I just LOVE this idea Elizabeth!! So clever and darling!
Come by and check out another fun giveaway this week!!
http://justsewsassy.com/2010/08/10/tuesday-tutorial-anthro-inspired-headband/
Sew CUTE!!! This is a great twist on a taggie blanket. Thanks for sharing! Visiting from the Tuesday link party at Creative Itch!
What a GREAT idea!!
I never in a million years would have thought of something like this, you took something that was already great and made it so much better!!
Hi! Visiting from Creative Itch. Absolutely adorable! What a great baby gift.
Super cute. Great ideas, as always!
What a fun idea!! Thanks for linking @Creative Itch's "Sew Cute Tuesday"!
I featured you today! Come by Sassy Sites and say hi... and grab a featured button!! Love your blog! :)
This is a perfect gift for a new baby!! Thanks for the idea!! :)
Very cute! What a great gift idea!
I'd love for you to check out my blog for a fun giveaway! Have a wonderful night!
http://alittleknickknack.blogspot.com/2010/08/another-csn-store-giveaway.html
This is a genius idea--one that needs to be shared with others, so thanks!! From all of us slightly un-crafty bloggers.
I love this!!!
I'd love to have you link up to my Christmas All Year Link here:
http://shewearsflowers.blogspot.com/2010/03/christmas-all-year-planning-party.html
My link is like the incredibly scaled down version of your blog. I wish I had discovered your blog first--I would have just repeatedly linked to your site! ;)
I'd also like to feature this for me August Christmas post--would that be okay?
Thanks for the great idea!
You've done it again! What a great gift Idea! I will be featuring your project on BCD Aug. 21 in the afternoon! Thanks for linking!
Becca
Daaaaang. Dang. Well done. I need to try this.
Well hello there stranger! As you already know I love your taggie A! Thanks for sharing at It's Party Time Thursday at PonyTails&FishScales!
Great idea....the blankets are everywhere....but, monogrammed taggies??? I LOVE it.
love this! My niece's baby shower is this weekend, I'm doing this!
The monogram is cute! And what a nice tutorial.
Thanks for linking up to the “Cheap Thrills Thursday” party at Black Kats Design. I hope you had fun and will join in again next Thursday!
Kat
www.BlackKatsDesign.blogspot.com
LOVE THIS idea! Going to add it to the Must Try project list!
This is terrific!! I'm loving your blog and I'm so excited to be your newest follower! I would also like to invite you to my link party/giveaway every Friday at FrouFrouDecor! I love new friends and hope to see you there!
~Terrell @ FFD~
As soon as I saw this, I had to blog about it! So you've been featured on SSB! Check it out:
http://superstinkyboys.blogspot.com/2010/08/12-crafts-till-christmas.html
Great blog you got here...I'll be snooping around a bit more and I hope you'll visit me soon! Feel free to snag my feature button!
Ooh! I love the idea of the monogram. This would make an awesome shower gift. Thanks for sharing! Found u on black kat.
Jami
Your darling taggie monogram blanket has been feature dat CraftOManiac.blogspot.com thanks jen
What a super cute idea! I am a new follower, would love to have you stop over!
What a super cute idea! I am a new follower, would love to have you stop over!
I love this--it is so personal with the monogram.
too cute, and looks like a beginner's projedt. right up my alley ;)
Christy, Home-Mom.com
I love this!!!! too cute!
I had a ribbon tag baby and this is so cute, easy & a perfect personalized gift! Thanks for the great tutorial! :>:>
Check you out crafty lady! This is an adorable idea. I love how cute and fun this turned out! Thanks for linking up to Hoo's got talent!
Not sure why I have only JUST started following your blog, as I always find myself here throughout my blog-stalking:) Anyway, I love this taggie idea. Taggies are what I make all the new babies in my life...but using their initial?? Too cute:)
Oh, and thanks for the pillow love today!
Very cute! I love monogram stuff!
Thanks for linking up for Friday Favorites!
SO cute! And what a perfect thing for a baby shower gift! Thanks for linking up to Topsy Turvy Tuesday's!
Brilliant!! I've been making taggie blankie/lovies for my kids and for gifts for a few years now, but never thought of this! I've yet to make my newborn a taggie, so he'll definitely be getting a monogram loopie lovie - thank you so much for this fantastic idea! :)
This is sooooo adorable, thanks for the tutorial! Imma make one for my cousin, or if I find out the name of some coming baby then I could make monograms for future baby presents... OOOR you could also make different shapes, like circles, triangles and stuff.. OK, that was it :)
-The Creative Muslimah
Thank you so much for this tutorial. I loved this idea! I made one last month and I put it on my brand new blog
just today. My Monogram Taggie was the 2nd thing I made on my new sewing machine, so it is kind of wonky - there are many more to be made because I know several people who are expecting :)
I linked to your blog, I hope that's okay!
Monogram Taggie
~Helen, DIY Pinner
I just learned how to make taggie blankets, but I LOVE the monogram idea. Thank you for this!
Thanks so much for this tutorial! I can't wait to get started on this for my little one for Christmas!
Thanksa lot .Please tell me how to do alphabets like H thanks I made A and D which was fine but H is not giving us the total look.
Cheers
Shambavi
Post a Comment