Showing posts with label pretend and play diaper bag. Show all posts

Sunday, September 26, 2010

pretend and play changing pad

I feel like this project is getting a little bit hugely out of hand.  However, I'm starting on a few custom orders and also hoping to put a few pieces of this set into my super lame Etsy store, so I'm in deep . . . maybe too deep with the pretend and play mommy set.  

Here's a little recap of what we've covered so far in the pretend and play set.


Now, on to the pretend and play changing pad.  Thankfully, this particular changing pad doesn't actually need to be water resistant, so you probably already have the supplies on hand.

Here's what you need:
-contrasting fabric
-fusible fleece or quilt batting or fusible interfacing
-ribbon

Here's what you do . . . so easy:
1)  Measure the doll or dolls who will most likely be using the changing pad.  Cut your fabric and fusible fleece or batting to these measurements adding about two inches.

2)  I wanted to add a few details to my plain fabric on this particular changing pad.  I only had a few scraps left of the pattern/color that I used for the bassinet and diaper bag, so I used fusible interfacing to secure the scraps and also used the sewing machine to add a little stitch detail.  With the other changing pad I used quilt batting so I quilted one side with straight parallel lines for added detail.

3)  Fuse interfacing or fleece according to package directions. (Or quilt batting to one piece of fabric.  You can see the detail of that in the second picture.)

 4)  Cut ribbon 15 to 20 inches - depending on the length of your changing pad.  Remember the ribbon will be folded in half, and it needs to be long enough to wrap around the rolled up changing pad and tied.  Fold it in half right sides together.

5)  Sandwich folded up ribbon in between fabric rectangles right sides together.  Pin.  Sew around leaving two inches for turning.

6)  Turn.  Fold in turning opening and top stitch all the way around the changing pad to close up opening. 

7)  Roll up, tie, stick in diaper bag along with diaper wipes and doll diapers!  So cute!  Hours of fun for your little one!

Craft on!
   
Click on the links below for some of the great parties I may link to, or check out my "I like to party" page.
Weekend - a little lovely, Craft Envy, Under the Table and DreamingBe Different Act Normal, A Vision to Remember, 504 Main - Tickled Pink, Funky Junk Interiors, Tatertots and Jello, I heart naptime

Monday - Keeping it Simple, Craft-O-Maniac, The Girl Creative, The Trendy Treehouse, CRAFT, Making the World Cuter, Mad in Crafts, Sumo's Sweet Stuff, Between Naps on the Porch, Tools Are For WomenIt's So Very Cheri, Skip to My Lou, Sew Can Do

Tuesday - All Thingz Related, Sugar Bee, New Nostalgia, Creative Itch, Lucky Star Lane, Hope Studios, These Creative Juices, My Delicious Ambiguity, Today's Creative Blog-Get Your Craft On!, Tasty Tuesdays at Housewife Eclectic


Friday - The Sabby Nest, A Little Knick Knack, Fingerprints on the Fridge, It's Fun to Craft!, It's a Hodgepodge Life, Kojo Designs, Amy Lou Who, A Few of My Favorite Things, Simply Sweet Home, Frou Frou Decor, Remodelaholic, Foodie Friday at The Speckled Dog

Sunday, September 19, 2010

pretend and play dolly diapers

Here's a little recap of what we've covered so far in the pretend and play set.


And little wipes need little diapers, so in an effort to complete the pair . . .

Pretend and Play Diapers

Here's what you need:
-fleece
-narrow elastic
-pinking shears, sewing machine, etc.

These diapers fit our sweet little 11 to 13 inch dolls.  Adjust measurements for your dollies. 

Here's what you do:
1) Cut a 5 1/2 by 5 1/2 inch square with pinking shears (again, don't forget to adjust diaper size for doll size).

2) Fold bottom of square up to almost to top of square leaving about 1/4 inch from top edge.  At this point, I also cut a bit of a dip in the front of the diaper.

3)  Cut a triangle off each of the bottom corners that measures about two inches on the diagonal.

4) Using a long stitch on your sewing machine, sew a straight line at the top of the backside of the diaper.  Do not back stitch on either end.

5) Pull one of the threads to make a slight gather in the diaper back.  Tie ends off on both sides.

6) Place elastic over the gathered thread and sew onto diaper.

7)  Sew on small strips of hook and loop as as the diaper tabs, and put on doll or tuck away in pretend and play diaper bag.


Craft on!

Thursday, September 16, 2010

super easy pretend and play diaper wipes

I was thinking that I would just flash you the pics of my pretend and play diaper bag accessories and that would be that. 

Uhm . . . I was wrong. 

After my post yesterday, I received a semi-surprising number of very kind e-mails demanding requesting that I post a how-to for each of the accessories. ;)  (Have I mentioned how much I continue to grow in fondness for all of you who read this blog?  Your e-mails were all so sweet.  Truth is that even if just one of you had asked, I would have done it.  You know I can't resist a request for a tutorial!)  

You are going to love how seriously easy this is.  You could probably make it much fancier, but considering how much time I have already put into this obsession . . . well, I had to make at least one thing quick and simple. 


Here's what you need:
-felt or fleece (I used felt for one and fleece for the other.  Both worked great!)
-flannel
-straight pins, pinking shears, sewing machine

Here's what you do:
1)  Use pinking shears to cut a 7 x 9 inch (or whatever size) rectangle out of the felt or fleece you've chosen. 

2)  Tri-fold fleece so that the two ends meet up with a slight overlap in the center.  Pin along both ends.

3)  Sew both ends shut.

4)  Use pinking shears to cut 6 to 8 rectangles from the flannel.  I made my rectangle wipes 5 x 7 inches in size.

5)  Now, here's the deal . . . your wipes will probably never get like this again because once your child starts playing with these, she or he will just shove them in and out of the wipe case.  However, I did take the time to fold these wipes overlapping one another so that one pops up when the top wipe is pulled out.  Or you can simply fold them individually and stack them on top of each other with the top wipe sticking out.

Yep, it's that easy!!  Cute and easy . . . what could be better?  Other pretend and play diaper bag accessories will be done in the next few days . . . so stay tuned! 

Craft on!
   
Click on the links below for some of the great parties I may link to, or check out my "I like to party" page.
Weekend - a little lovely, Craft Envy, Under the Table and DreamingBe Different Act Normal, A Vision to Remember, 504 Main - Tickled Pink, Funky Junk Interiors, Tatertots and Jello, I heart naptime

Monday - Keeping it Simple, Craft-O-Maniac, The Girl Creative, The Trendy Treehouse, CRAFT, Making the World Cuter, Mad in Crafts, Sumo's Sweet Stuff, Between Naps on the Porch, Tools Are For WomenIt's So Very Cheri, Skip to My Lou, Sew Can Do

Tuesday - All Thingz Related, Sugar Bee, New Nostalgia, Creative Itch, Lucky Star Lane, Hope Studios, These Creative Juices, My Delicious Ambiguity, Today's Creative Blog-Get Your Craft On!, Tasty Tuesdays at Housewife Eclectic

Wednesday - It's So Very Cheri, Beyond the Picket Fence, Blue Cricket DesignTrendy Treehouse, Tea Rose HomeSomeday Crafts, My Backyard Eden, Sew Much Ado, Night Owl Crafting

Thursday -  Fireflies and Jellybeans, Life As Lori, House of Hepworths, Somewhat Simple, Seven Thirty Three, The Train to Crazy, PonyTails and FishScales, Black Kat's Design

Friday - The Sabby Nest, A Little Knick Knack, Fingerprints on the Fridge, It's Fun to Craft!, It's a Hodgepodge Life, Kojo Designs, Amy Lou Who, A Few of My Favorite Things, Simply Sweet Home, Frou Frou Decor, Remodelaholic, Foodie Friday at The Speckled Dog

Wednesday, September 15, 2010

pretend and play diaper bag accessories

Did you notice my sad little Etsy shop over on my sidebar.  It's not much to look at right now, and I'm okay with that for the time being. 

However, I've been fielding this question via e-mail, "When are you going to add a few pretend and play mail carrier sets and/or pretend and play doll bassinet/diaper bag sets to your Etsy shop?" 

On the off chance that there are more of you wondering that here's my response:

First, I'm flattered by the question.  I appreciate that some of you would be interested in purchasing these sets as handmade gifts for your little ones. 

Second, I'm not sure that I will be adding those sets to my Etsy shop.  I am willing to consider making these sets or the individual pieces in these sets on a custom basis for those who are interested.  However, I don't expect to add sets to the shop any time soon.  

So . . . if you are interested, feel free to e-mail me and we can discuss the possibilities.

Now, on to my latest obsession . . . at the risk of stating the obvious, I get carried away with things.  If you are a new reader of twelve crafts, you might be under the impression that I announce my craft of the month and then proceed to immediately get started on it.  Uhm . . . that is not even close to what happens here.  

What happens here is that I typically put off my craft of the month until the very last minute and get completely off track by obsessing about past crafts or completely unrelated projects.

And that brings me to the obsession . . . accessories for my pretend and play diaper bag and bassinet.  Of course, I started with just a doll bassinet in August.  Now, I am in the middle of September and what was supposed to be just a doll bassinet has turned into a bassinet and a diaper bag and . . .

. . . yep, little dolly diapers, diaper wipes, roll-up changing pads, and miniature taggies.

Here's a closer look:

Yikes . . . somebody stop me before I start creating an entire closet full of dolly clothes!


Craft on!        

Monday, September 6, 2010

pretend and play diaper bag tutorial

I couldn't leave well enough alone!  I had to add a little something more to the doll bassinets that I made for my girls.  And I'm so glad I did.  I am loving this pretend a play diaper bag.  It's easy to make . . . even for someone like me.  It's cute and it can be used for other things besides playing mommy.  (I'll let you in on a little secret . . . I came across the method for making this by totally messing up my second doll bassinet.  I ended up throwing part of that bassinet aside and starting over.  Today, I pulled the part I tossed aside and decided to make it into something . . . this is what I came up with.) 

Pretend and Play Diaper Bag
**Goes with matching doll bassinet carrier**


Here's what you need:
1 - 30 x 9 inch piece of fabric for the outside of the diaper bag
1 - 30 x 9 inch pieces of fabric for the inside lining of the diaper bag
1 - 30 x 9 inch pieces of quilt batting for the diaper bag
1 - 16 x 11 1/2 inch piece of fabric for the flap
1 - 8 x 11 1/2 inch piece of interfacing
1 - 28 x 4 1/2 inch piece of fabric for the strap
**I also used two extra squares for a pocket

Here's what you do:
1) Pin batting to wrong side of outside of the bag.

2) Sew long straight lines every inch down the 9 inch side.  In other words, you will be sewing eight long straight lines all the way down the 30 inches of the fabric piece.  (I must confess that I'm THE WORST at sewing straight lines, so I used an fade-away fabric pen that disappears after a few hours to draw straight lines on the fabric . . . LOVE IT!)

3) Fold in half right sides together so that you have a 15 x 9 inch piece.  Pin.  Sew along three sides leaving one long side open. 

4)  At one corner seam, fold piece inward so that the right sides of one of the short-sided seams and the long-sided seam touch.  Pin.  Measure from corner about 1 1/2 inches.  Sew.  Cut off corner end.

5)  Do the same thing with the other corner.

6)  Now, pin and sew a seam seams on each side of the bottom of the bag to create a boxy bottom.

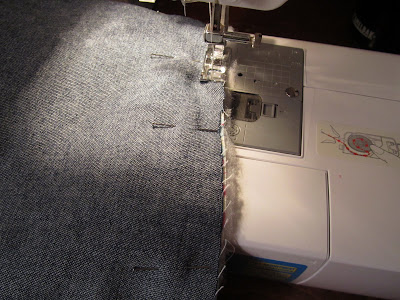
7) Do steps 3 through 6 with the lining piece.  Except when sewing around the three sides in step 3, leave a three inch opening for turning later.  (See second picture down.)
 
8)  Take 4 1/2 x 28 inch piece for strap and fold in half length-wise right sides together.  Sew down to form a tube.  Turn and top stitch on both long sides.

9) Pin strap to inside of quilted part of the bag.

10) Take interfacing and fuse to wrong side of one half of the flap piece of fabric.  (I also added a pocket after adding interfacing.)

11)  Fold flap piece in half right sides together.  Sew around leaving two inch opening for turning.  Trim corners, turn and top stitch around closing up opening to turn as you go.

12)  Pin flap to inside of quilted part of bag.

13)  Insert lining so that right sides are together.  Pin.  Sew around edge.

14)  Turn using turning hole in lining.  Sew up opening.  Stuff lining into bag.

15)  Pin around top edge.  Top stitch around edge.

Done!

Coming soon . . . diapers and other fun accessories.

Craft on!

I may link to these great parties.  Check them out by clicking on the blog name below or visit my "I like to party" page.
Weekend - a little lovely, Craft Envy, Under the Table and DreamingBe Different Act Normal, A Vision to Remember, 504 Main - Tickled Pink, Funky Junk Interiors, Tatertots and Jello, I heart naptime

Monday - Keeping it Simple, Craft-O-Maniac, The Girl Creative, The Trendy Treehouse, CRAFT, Making the World Cuter, Mad in Crafts, Sumo's Sweet Stuff, Between Naps on the Porch, Tools Are For WomenIt's So Very Cheri, Skip to My Lou, Sew Can Do

Tuesday - All Thingz Related, Sugar Bee, New Nostalgia, Creative Itch, Lucky Star Lane, Hope Studios, These Creative Juices, My Delicious Ambiguity, Today's Creative Blog-Get Your Craft On!

Wednesday - It's So Very Cheri, Beyond the Picket Fence, Blue Cricket DesignTrendy Treehouse, Tea Rose HomeSomeday Crafts, My Backyard Eden, Sew Much Ado, Night Owl Crafting

Thursday -  Fireflies and Jellybeans, Life As Lori, House of Hepworths, Somewhat Simple, Seven Thirty Three, The Train to Crazy, PonyTails and FishScales, Black Kat's Design

Friday - The Sabby Nest, A Little Knick Knack, Fingerprints on the Fridge, It's Fun to Craft!, It's a Hodgepodge Life, Kojo Designs, Amy Lou Who, A Few of My Favorite Things, Simply Sweet Home, Frou Frou Decor, Remodelaholic
Related Posts with Thumbnails