Showing posts with label baby gift ideas. Show all posts

Sunday, December 19, 2010

sunday kids' craft and grandparent gift

Today's Sunday kids' craft also doubles as a Christmas gift.  And the best part is that you can still pull this off before the big day!  

All bapas and nanas . . . or whatever you call the grandmas and grandpas in your life . . . cherish memories with their grandchildren. When my girls were three years old and ten months old, we started working together with my brother's children to begin a memory book for grandma and grandpa. This is a simple book that kids – no matter what their age – can help with year after year.


This gift encourages your children to remember special moments with their grandparents and allows them to creatively express those memories on a special scrapbook page each year. They get to make their very own page.  Wrap it.  And give it . . . all by themselves.

Here's what you need:
• a scrapbook (You just need this for the first year you begin this gift-giving tradition.)
• various scrapbook supplies
• pictures from the year of special times with grandmas and grandpas

Here's what you do:
1) Print off pictures of your children and their grandparent from the current calendar year.

2) Allow them to pick out a few of their favorites.

3) Spread the scrapbook supplies out on the table and let the kids create their own memory page . . . just one per kid . . . for that year. Obviously, you will need to help cut or glue depending on your children’s ages and skill development, but try to allow them to do most of the work on their own. The beauty of this gift is not in perfection it’s in children making their own gifts for grandma and grandpa . . . gifts that will be cherished for years to come.

For the first year, give grandma and grandpa the wrapped book. And let children wrap their own pages and present them to grandma and grandpa when opening gifts.

Craft on!


**Have you checked out the DIY Life eZine yet?  Do it!  The DIY gals were kind enough to include these ideas of mine in this season's issue, and it is chocked full of other holiday ideas from other great bloggers.

Check out the great parties I may link to by clicking on the blog name below or visiting my "I like to party" page that shows off all the party buttons.  These gals go to a lot of work to host these parties.  If you participate in parties please take time to look through a variety of the projects linked up.  They are a great source of inspiration!


Weekend - Somewhat Simple Holiday Party, a little lovely, Craft Envy, Under the Table and DreamingBe Different Act Normal, A Vision to Remember, 504 Main - Tickled Pink, Funky Junk Interiors, Tatertots and Jello, I heart naptime


Monday - Keeping it Simple, Craft-O-Maniac, The Girl Creative, The Trendy Treehouse, CRAFT, Making the World Cuter, Mad in Crafts, Sumo's Sweet Stuff, Between Naps on the Porch, Tools Are For WomenIt's So Very Cheri, Skip to My Lou, Sew Can Do, Polly Want a Crafter


Tuesday - All Thingz Related, Sugar Bee, New Nostalgia, Creative Itch, Lucky Star Lane, Hope Studios, These Creative Juices, My Delicious Ambiguity, Today's Creative Blog-Get Your Craft On!,


Wednesday - It's So Very Cheri, Beyond the Picket Fence, Blue Cricket DesignTrendy Treehouse, Tea Rose HomeSomeday Crafts, My Backyard Eden, Sew Much Ado, Night Owl Crafting


Thursday -  Fireflies and Jellybeans, Life As Lori, House of Hepworths, Somewhat Simple, Seven Thirty Three, The Train to Crazy, PonyTails and FishScales


Friday - The Sabby Nest, A Little Knick Knack, Fingerprints on the Fridge, It's Fun to Craft!, It's a Hodgepodge Life, Kojo Designs, Simply Sweet Home, Frou Frou Decor, Remodelaholic, Momma's Kinda Crafty

Saturday, November 6, 2010

winter's coming: ear warmer tutorial

Welcome visitors who are hopping over from The Train to Crazy! (That is possibly the best blog name ever!) I hope you will poke around a little and be inspired to make at least one handmade gift this holiday season.  If you are a twelve crafts' reader, check out The Train to Crazy because Andrea is hosting Make it for Winter this entire month.


Winter's coming . . . I'm hoping it's not coming soon though!  Of course, you know that I've been preparing for winter for a while now with this:


With the help of some old sweaters, I'm adding a few ear warmers to our winter stash.  Add a little hook and loop to these and all the girls in our family (including this big girl) can wear the exact same ear warmers.  Woo hoo!  More options for all of us!

Adjustable Ear warmers

Here's what you need for the ear warmer:
~an old sweater or some fleece
~2 pieces of 2 to 3 inches of hook and loop

Here's what you need for the removable flower:
~various sizes of circles cut out from the sweater, fleece of other fabric
~follow this tutorial

Here's what you do for the adjustable ear warmer:
1)  Measure around the head of the largest head you want these to fit and cut that length by 6 inches wide from the sweater.

2)  Pin on one side of the two strips of hook and loop to the right side of the ear warmer about an inch from the long edge and the short edge.  Pin the other side of the hook and loop strips to the diagonal corner.  Sew strips on.  

3)  Fold sweater strip in half right sides together and pin.  Sew along long edge.  Turn.  Fold in ends and pin around entire perimeter.  Top stitch all the way around the strip.

5)  Make flower using circles and this tutorial.

Done!  The top picture is of my five year old wearing the ear warmer.  The bottom picture is of me wearing it.  It fits my two year old as well.  However, I couldn't get her to sit still long enough to take a picture.  She's an elusive little Monkey!

Go check out other ideas in Make it for Winter, and come back here later tonight for Stuff Your Stockings.

Craft on!

This post is sponsored by Arise Shine Designs.  Visit Arise Shine Designs for beautiful Scripture-inspired jewelry:
Photobucket


Check out the great parties I may link to by clicking on the blog name below or visiting my "I like to party" page that shows off all the party buttons.  These gals go to a lot of work to host these parties.  If you participate in parties please take time to look through a variety of the projects linked up.  They are a great source of inspiration!


Weekend - a little lovely, Craft Envy, Under the Table and DreamingBe Different Act Normal, A Vision to Remember, 504 Main - Tickled Pink, Funky Junk Interiors, Tatertots and Jello, I heart naptime


Monday - Keeping it Simple, Craft-O-Maniac, The Girl Creative, The Trendy Treehouse, CRAFT, Making the World Cuter, Mad in Crafts, Sumo's Sweet Stuff, Between Naps on the Porch, Tools Are For WomenIt's So Very Cheri, Skip to My Lou, Sew Can Do, Polly Want a Crafter


Tuesday - All Thingz Related, Sugar Bee, New Nostalgia, Creative Itch, Lucky Star Lane, Hope Studios, These Creative Juices, My Delicious Ambiguity, Today's Creative Blog-Get Your Craft On!,


Wednesday - It's So Very Cheri, Beyond the Picket Fence, Blue Cricket DesignTrendy Treehouse, Tea Rose HomeSomeday Crafts, My Backyard Eden, Sew Much Ado, Night Owl Crafting


Thursday -  Fireflies and Jellybeans, Life As Lori, House of Hepworths, Somewhat Simple, Seven Thirty Three, The Train to Crazy, PonyTails and FishScales


Friday - The Sabby Nest, A Little Knick Knack, Fingerprints on the Fridge, It's Fun to Craft!, It's a Hodgepodge Life, Kojo Designs, Simply Sweet Home, Frou Frou Decor, Remodelaholic, Momma's Kinda Crafty

Wednesday, November 3, 2010

pretend and play restaurant set: personalized ordering pad

Are you sick of me yet?  Do you roll your eyes every time I add something to one of my pretend and play sets?  I know . . . sometimes I roll my eyes at myself.  ;)

So far we've done the chef's hat, apron, oven mitts/pot holders, waitress/waiter apron.

I'm love making these pretend and play sets.  Once I start I just can't stop, and I love thinking of little details to make the sets unique and complete.  

This little ordering pad is one of those details.

This pad is so simple to make . . . here's what you need:
~a little flip notebook* (So cheap . . . I got four of these for $1.00.)
~fabric matching the rest of you set
~cardstock or poster board
~Mod Podge
~a print out of what you want for your restaurant logo (If I only had a Silhouette!)
~pencil and permanent marker

*I was planning on painting or covering the front of my notebooks with fabric, but I found the perfect color.  I love saving steps and making a project easier!

Here's what you do:
1)  Place the print out on the front of the pad.  Pushing very hard, trace the letters onto the pad with a pencil.  Use a permanent marker to trace the lines on the pad and color in the logo.  The restaurant sign I'm making says Sweet Sisters' Cafe, so the logo on the pad represents that name.

2)  Mod Podge the fabric cutouts onto poster board or cardstock.  Cut out.  Then paste onto a larger square of poster board or cardstock.

3)  Paste onto front of flip book.

Done!  Wow!  That was easy!

Craft on!

This post is sponsored by Arise Shine Designs.  Visit Arise Shine Designs for beautiful Scripture-inspired jewelry:
Photobucket


Check out the great parties I may link to by clicking on the blog name below or visiting my "I like to party" page that shows off all the party buttons.  These gals go to a lot of work to host these parties.  If you participate in parties please take time to look through a variety of the projects linked up.  They are a great source of inspiration!


Weekend - a little lovely, Craft Envy, Under the Table and DreamingBe Different Act Normal, A Vision to Remember, 504 Main - Tickled Pink, Funky Junk Interiors, Tatertots and Jello, I heart naptime


Monday - Keeping it Simple, Craft-O-Maniac, The Girl Creative, The Trendy Treehouse, CRAFT, Making the World Cuter, Mad in Crafts, Sumo's Sweet Stuff, Between Naps on the Porch, Tools Are For WomenIt's So Very Cheri, Skip to My Lou, Sew Can Do, Polly Want a Crafter


Tuesday - All Thingz Related, Sugar Bee, New Nostalgia, Creative Itch, Lucky Star Lane, Hope Studios, These Creative Juices, My Delicious Ambiguity, Today's Creative Blog-Get Your Craft On!,


Wednesday - It's So Very Cheri, Beyond the Picket Fence, Blue Cricket DesignTrendy Treehouse, Tea Rose HomeSomeday Crafts, My Backyard Eden, Sew Much Ado, Night Owl Crafting


Thursday -  Fireflies and Jellybeans, Life As Lori, House of Hepworths, Somewhat Simple, Seven Thirty Three, The Train to Crazy, PonyTails and FishScales


Friday - The Sabby Nest, A Little Knick Knack, Fingerprints on the Fridge, It's Fun to Craft!, It's a Hodgepodge Life, Kojo Designs, Simply Sweet Home, Frou Frou Decor, Remodelaholic, Momma's Kinda Crafty

Friday, October 1, 2010

stuff your stockings saturday: mini play mat

Sisters Jeanine and Amy are the co-creators of everything crafty over at Serving Pink Lemonade.  Today for this edition of Stuff Your Stockings, we are welcoming Amy from the crafty duo.  Welcome Amy!

How exciting to be over here at twelve crafts till Christmas!  Thanks for having me Elizabeth. I've loved seeing all the other stocking stuffer crafts so far.  So many great ideas out there.  And Christmas is just months away.  Can you believe it?

Over at Serving Pink Lemonade my sister and I share the fun things we do with our kids.  You can find crafts, homemade toys, activities to keep your kids entertained while traveling, learning games, songs and stories, book recommendations, free templates and more.  We would love for you to stop by sometime.

Today I'm going to share with you a mini play mat that I made for my kids.  They're 8 1/2" x 11"--which makes them the perfect size to roll up and stick in a stocking and they're also great to bring along in the car or when traveling.


First I drew up a template. I made it the mirror image of what I wanted the end result to be.
(Click to enlarge)


Once I was satisfied with my template I placed it right under my Wonder Under and traced the different parts onto it.

I then cut around each piece. I purposely didn't cut on the line at this point. It makes it easier when cutting out the felt.

I then placed each piece on the color felt I wanted . . .

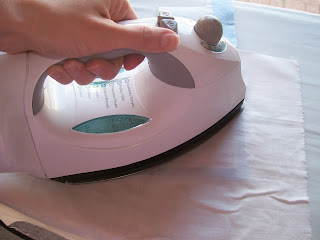
and ironed it on. I always use a press cloth when doing this. It keeps my iron from getting ruined and protects my project from melting from too much heat. Always spray a little water on your press cloth before you iron.

I then cut each piece out on the line. I find it's best to wait about an hour after I've applied the Wonder Under before I peel the backing off. If I try to do it right away it's hard to peel, but after I've given it some time to cool it come right off.

After you have all your pieces lined with Wonder Under and cut out . . .

You're ready to assemble your picture on the blue felt. Once everything is lined up and where you want it cover your project with your press cloth, spray a little water and get those pieces ironed on.

I did mine is phases, ironing and securing on the bottom layer first and then ironing the others after that.

I then trimmed the excess blue felt off, added a backing, and did a zig-zag stitch all the way around to bind them together.

All Done . . .

And ready for some serious dinosaur play!
Hope that makes sense. It really is an easy-peasy project. All you have to know how to do is trace, cut, and iron.

And for those of you who don't have dinosaur lovers in your home, here are some mini car mats that you can also find over at Serving Pink Lemonade.  They can be made using the same concept as the dinosaur mat.  When you make all four of them they can be arranged together to make one big mat.
Hope these help inspire you to make a homemade Christmas. 
Thanks Amy!

I was so inspired by Amy's felt project that I added this to the list of things to make for my nephew's busy bag.  And just for fun I made an extra mini-car mat for your chance to make it or win it. 

Here's how you can win your own 8 1/2 x 11 inch mini-car mat:
**Leave one comment for each entry.**

1)  Be or become a follower of twelve crafts.

2)  Be or become a follower of Serving Pink Lemonade.

3)  Link up an idea/stocking stuffer to the stocking stuffer idea page

4)  Help promote Stuff Your Stockings Saturday by posting the button (code on sidebar) on your blog or on the stocking stuffer idea that you linked up.

5)  Leave a comment with your favorite item to put in a stocking. 

Giveaway will be open for entries until Friday, October 8, 2010 @ 11:59 PM (CST).

Craft on!
Related Posts with Thumbnails