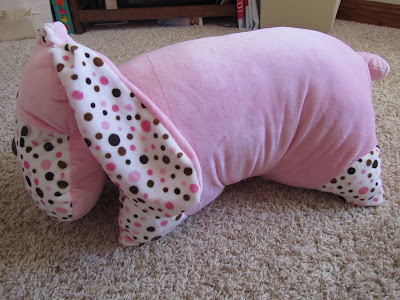
I've been either working on a pillow buddy or working on a pillow buddy tutorial for what feels like forever. Uhm . . . that is apparently my overly-dramatic side kicking in because I went back in my archive and it turns out I've only been working on the pillow buddies since June 20. Hmmm . . . by my calculations that's only a little over a month . . . not forever.
Below you will find part 2 (the final part) of the pillow buddy tutorial. For part 1 which guides you through the body-making process, go here. Or for a pdf version click here.
**Disclaimer**
The following tutorial is for the basic construction of the pillow buddy. You will have to adjust depending on the animal that you choose to make. I wish I knew how to attach a PDF pattern, but alas, I'm technically slow so get ready to use your own creativity to create the head of your cuddly pillow buddy. AND I know I probably don't need to say it but I'm going to anyway . . . this is for personal use only not for resale use.
What you need for the head:
-a brown paper bag cut flat for pattern
-microfleece, regular fleece or chenille
-small felt scraps
-embroidery thread
-stuffing
What you do:
1) Draw freehand the shape of your animal's face onto the brown paper bag. If you aren't too fond of freehand drawing, google "coloring pages of dog head" (or whatever animal) and you might find a page you can enlarge and print off for your pattern. Cut out pattern head. Draw and cut out ears separately. Because the pillow buddy body turns out to be a little over 18 inches, I kept the widest part of the head (the cheeks) to about 10 inches. KEEP IN MIND THAT YOU NEED ABOUT 1/4 to 1/3 INCH EXTRA ALL THE WAY AROUND FOR SEWING AND TURNING.
2) For both the puppy and the kitty I decided to use some contrasting fabric for a part of the face. You don't have to do this. If you want to, first take the head pattern and pin it to your fabric. Cut out ONE piece from this pattern for the back of the head. Unpin. Now cut the pattern piece in the way you want the front of the head to look with contrasting fabric. Pin these pieces to your fabric of choice and cut out adding even more of an edge wherever you will be sewing the two pieces together.
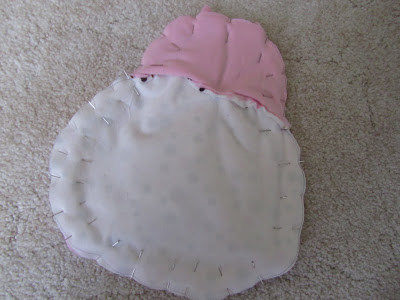
3) Put the two contrasting pieces of fabric for the front of the head right side together at the edges and pin. Sew together. In the way I did this for the puppy, I made little eyelids which you can see in the second picture below.
4) You need four pieces cut from the ear pattern. Put ears right sides together and pin. Sew around leaving flat ends open for turning. Turn. You can top stitch around the ears once they are turned, but I chose not to for the pupply so that the ears would be pretty floppy looking. I cut four large triangles for the kitty ears and I DID topstitch the kitty ears after turning to make them stiffer and more likely to stand up.
5) Baste or pin the ears to the right side of the back of the head.
6) Layer the front piece of the head over the ears sandwiching the ears in between. Head pieces are right sides together. Pin. Sew around leaving about two inches open for turning.
7) Turn head right side out.
8) Stuff head but don't stuff it too full yet because you are going to sew on the nose.
9) Cut out a piece of felt for the nose and start to sew it on with embroidery thread. I waited to do this until now, so I could see exactly where the nose would be when the head has stuffing in it. After sewing most of the nose on, I put a bit of stuffing in it to make it stick out and sewed the rest of the nose up.
11) Stuff the head full now and stitch up the opening of the head.
12) Use pink thread to sew the head very securely onto the body. I basically used needle and thread to sew a small circle of stitches connecting head to body. Then I went around again making a bigger circle. In the process of sewing the larger circle, I closed the hole on the body that was left from turning and stuffing by stitching up the hole and attaching each stitch to the head as well. Basically, you just need to sew the head on securely however works best for you.
13) Secure eyes on head. I used felt for eyes on the puppy, but you could use buttons as well. (I know . . . I know . . . it seems like it's a little late in the game to put the eyes on, but that's how I roll. I don't even have eyes on the kitty pillow buddy yet. So basically, put the eyes on whenever you want.)
**The kitty's head was made by cutting a triangle like hole in the front face and cutting contrasting fabric in a slightly larger triangle. I pinned and used the sewing machine to sew the triangle shape into the triangle hole. Done! Not too hard either.
I'm going to go celebrate the completion of this tutorial! I'm baffled by two things: 1) that I finished it and 2) that it took me this long to finish it! But I'm done! Woohoo!
Please feel free to e-mail me any questions you have or clarifications you need. I realize that I may not be very clear, so I'm happy to try to help in any way.
Now, go get started on your pillow buddy and don't forget to send me pics when you get done!
Craft on!
I may link this project to these great parties.


