**I'm starting to sound like a broken record, but go here to enter a super sweet giveaway.
You won't be disappointed!**
You won't be disappointed!**
Right now you are thinking, "ENOUGH ALREADY WITH THE SODA CAN JEWELRY!" I know . . . I know . . . It's getting to be a bit much - even for me. Pretty soon I'm going to have to start a twelve step program for people who are addicted to making various types of jewelry out of soda cans . . . I have a feeling it's going to be a pretty small group. Weekly attendance = 1.
Here's the rundown of my addiction:
1) Fabric Scraps + Soda Can + Modge Podge + Sewing Machine = Bracelet/Anklet
2) Fabric Scraps + Soda Can + Hot Glue Gun/Jewelry Glue = Ring
3) Ribbon + Soda Can + Sewing Machine = Accordion-esque Bracelet/Anklet
This next (and hopefully last) version is by request.
See that bangle on the right-hand side of the picture that is blue and silver. It was in a picture on my last soda can tutorial, and the only explanation I gave for making it was apparently unclear, "If you don't know how to sew, use Modge Podge and sandwich soda can strips in between ribbon."
Thanks Katie for pointing out the complete inadequacy of that sentence! After I reread it, I didn't even know what I was talking about, so don't feel bad. Katie wrote me asking for clearer directions for those in the crafting world who are not on friendly terms with a sewing machine or don't want to use their sewing machines to sew through aluminum cans.
So here's a super easy, quick and much clearer description of how to do that.
By now you know what you need:
-soda cans
-ribbon
-Modge Podge
-jewelry glue or metal glue or super glue or . . . Well, you get the point.
Now, here's what you do:
1) Cut two strips from you soda can that are equal in width but also smaller in width than the ribbon you are using.
2) Fuse these together (one on top of the other) with your choice of glue. Let dry while you move onto the next step.
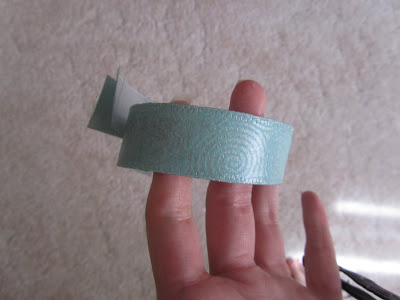
3) Wrap ribbon around remaining part of can for measurement. You will want to wrap it around the can and cut ribbon about 1/2 inch longer. You need two ribbons cut to the exact same size.
5) Cover the inside of the can strip with Modge Podge and place other ribbon inside can to cover Modge Podge. Now, let this dry. (I held the whole thing together with clothes pins so I could actually have a life while this was drying.)
6) Now, slather (oooo . . . I love that word!) on the Modge Podge over ribbons - both on outer and inner ribbon. Let dry. I hung it over a thin metal hanger and carefully repositioned it every so often so the metal hanger wouldn't end up glued to the bangle. (Not a good idea to use clothes pins for this part unless you want to end up with a bracelet that has clothes pins attached to it.) It dries clear.
7) You could leave it just like this if you want . . . if that's how you roll, skip down to the next step. If you would rather add something to it, take thinner ribbon, use Modge Podge or fabric glue to glue it around the center of the bigger ribbon. (Or get creative and do whatever you want.) Then Modge Podge over the new ribbon and let dry.
9) I also used Modge Podge to attach two other ribbon details - one of them covers the place where the can was joined together.
Done!
**The one with lime green/brown striped ribbon is made in a similar way. The one with the orange ruffle is also made in a similar way except I did do some sewing to make and attach the orange ruffle before I Modge Podged the ribbon on to the can.
Please don't hate me for my addiction to soda can jewelry. I will try my best to make this the last soda can jewelry tutorial!
Craft on!












27 comments:
Oh my gosh! I LOVE LOVE LOVE these bracelets! I would have never thought of that, but now that you should us how... I AM SO MAKING SOME :)
BTW, I'm a new follower of TTA :)
These are great! Another awesome idea. I wanted to stop by and let you know I nominated your blog for an award. I love what you do, and thought you should know! Come see.
Great stuff! Very cute, and would make fun gifts, indeed!
(i tried to see if I was a no-reply blogger, and couldn't see... am I?!?!?)
:)
happy tuesday!
Sylvia
I love the ruffle one! I am bookmarking this page as an idea to teach in my junior high crafts class!
Keep up the soda can crafts. They are so creative and so unexpected. Thats my favorite kind of crafting. Love it!
creationsbyladeeda.blogspot.com
I love this idea, especially the ruffled ones! I can't wait to explore your whole blog. I have some young crafters comming for a visit...We can have some cool crafting sessions together...Thank you! Karen
I love them! So cute and creative. I love that orange ruffly one. :)
I love your soda can crafts, they are so creative!!
Great idea! I will feature these at somedaycrafts.blogspot.com. Grab my "featured' button.
Really cute idea! You could make these really simple or go totally out of control w/the embellishments. (I luv the ruffles!)
LOL- you spelled Mod Podge the way I pronounce it- Modge Podge! I never knew I was saying it wrong until someone(a SIL, wouldn't you know it) held up the bottle and told me to sound out the words. What was I- back in school again?!
I STILL say Modge Podge, and phooey on anybody who corrects me!
:-) Sue
Loving all the soda can crafts! You could also make a countdown chain using a bunch of your bracelets...fun for kids and leave a side open to put on/take off the chain links...I may be having my kids help me with one of these as Christmas gets closer! It would make a cute garland over our mantle! ModPodge christmasy paper/fabric on and glitter....#...oh what fun!!!Thanks for linking up to It's Party Time Thursday @PonyTails&FishScales!!!
terelauritsen.blogspot.com
hi! I love the bracelets, but in Canada the pop cans are smaller and won't fit over my hand! :(
You are so creative! I've looked over some of your other projects, and I have been inspired to try my hand at a few of them. Keep up the great work! I'm visiting with It's fun to craft, hope you visit me too! You can find me at
http://www.amaskellantics.com/
Love these!! I drink enough soda I should do something clever with the cans. I will probably be joining your addiction group!!!
Very cute idea! These would be great for my daughter to make too!
Really creative idea!
That looks awesome! Thank you for sharing, your bracelet turned out nice.
YOU ARE A FAVORITE THIS WEEK @It's Party Time Thursday@PonyTails&FishScales!
Now that's recycling! :) Really cute project!
Wow, it sure doesn't look like a can anymore!
Super great recycling project. Might attempt this in the future.
Love these Elizabeth! Super cute! Thanks so much for joining The Sunday Showcase - I greatly apprecite it! Hope you have a great week! ~ Stephanie Lynn
How very neat! Thanks for linking up with me for Friday Favorites!
I'm your newest follower! Love this tutorial! I hope to try it soon :) If you get a chance, drop by crossmyheartartdesigns.com :)
Thank you SO MUCH for sharing this awesome tutorial! I love the idea of making bracelets from aluminum cans :0) I just finished soda can crafts round-up and just couldn't help but feature your gorgeous bracelets!! You can see it here:
http://jamiebrock.hubpages.com/hub/aluminum-can-crafts-round-up
Thank you again for sharing!
Hi! I apologize if this is redundant but I just left a comment and I'm not sure it posted..
I just wanted to let you know that I LOVE your soda can bracelets... I just finished a soda can crafts round-up and I hope that its okay that I featured your pretty bracelets.. You can see it here:
http://jamiebrock.hubpages.com/hub/aluminum-can-crafts-round-up
Thank you again for sharing!
DITTO - exactly what she said! I am doing it, and a new dedicated follower!
Post a Comment