Sunday, October 31, 2010

i'm baaaack!

And thanks to the post scheduler you didn't even know I was gone.  I love that it's possible to schedule posts for a few days.

Last week was CRAZY!  The first part of the week began with a major internet access problem . . . I was without internet access for a few days.  I thought I was going to lose my mind without access to all the lovely blogs that I read.  ;)  But then I received a call from my dad that my grandma had been rushed to the hospital in the middle of the night with what they thought was a stroke.  We were able to pack up and head out of town to visit her and spend some time with family.  Tests revealed heart issues instead.  She had a pacemaker put in and was able to return to their retirement home a few days later.  Look at how well she's doing:

It's so amazingly meaningful to see my children with my grandparents.  After a little pep talk, my super active girls did so well playing quietly, coloring pictures, behaving their absolute best during our entire visit.  I was so proud of them!

We stayed with my parents during our visit.  My parents did a great job of filling the girls up with cupcakes and tootsie rolls . . . notice the orange frosting circling their mouths.

While I was away, I had limited time and access to attend to blog-related e-mails and questions.  So . . . I'm asking for your grace and patience as I get back into my blogging routine and wade through my e-mails.  Basically, if you left a question in the comment section or e-mailed me anytime after Tuesday morning, I will respond . . . it just might take a few days.  

Don't forget to enter the giveaway from The Felted Pear on Saturday's Stuff Your Stockings.

Tomorrow, I have partnered with one of my super sponsors for a great giveaway, so keep your eyes open for ways to enter here and on facebook throughout the week.

Craft on!

pretend and play restaurant set: waitress/waiter apron

We are in deep with the pretend and play restaurant set.  So far we've done the chef's set - including chef's hat, apron and oven mitts/pot holders.

In our house, my girls don't just love to make my meal made-to-order they love to take my order.  So I definitely needed to include a different apron for my little waitresses.  Unlike the chef's apron this apron is not a bib-apron.  It wraps around the waist and includes pockets for an ordering pad, pen and straw/money, etc.  Like the chef's apron it is designed for the child to be able to put it on herself/himself by wrapping strap around the waist and fastening hook and loop or by just leaving hook and loop always fastened so that the child can pull up the apron like a pair of pants. 

Waitress/Waiter Apron

Here's what you need:
~fabric for the apron (see first step for measurement info)
~fabric for the divided pocket (see second step for measurement info)
~1/2 inch of the 5/8 inch width elastic for the waist strap - the same length as the top of the apron
~fabric for the waist strap - width = 2 inches; length = double the length of the elastic
-1 - 2 inch piece of hook and loop

Here's what you do:
1)  Measure child from waist to knee or mid-thigh - depending on how long you want the apron.  Add 1 inch to this measurement.  Measure from hip to hip. This measurement is the top of your apron . . . the narrowest part.  Add about two inches to the measurement for the bottom of the apron. (My apron was 12 inches on the top and 14 inches on the bottom and 11 1/2 inches from top to bottom.) Use these measurements to map out your apron on fabric.  Cut out two pieces - front and back of apron.

2)  Measure out pocket pieces according to width of apron.  (Mine was 9 x 4 inches.)  You need two of these pieces.  

3)  Pin the pocket pieces right sides together.  Sew around leaving 2 inch hole for turning.  Turn.  Top stitch one long edge of pocket (this will be the top opening.  Then pin pocket to top fabric piece of apron and sew around the remaining three side.  Add pocket dividers where desired.  

4)  Fold waist strap fabric in half length wise wrong sides together.  It will be about 1 inch wide now.  Fold under raw edges.  Iron and sew down edge to create a tube.  Insert elastic by pinning safety pin on one end making it easier to push through.  Pull the elastic and bunch the fabric up around the elastic as you go.  The elastic should be pulled through until end of the elastic without the safety pin is about two to three inches inside the tube.  Stop.  Sew this end in place and then keep pulling the safety pin end through to the other end.  Sew in place on this end.

5)  Sew one side of the hook and loop onto the non-elastic end of the strap.

6)  Sew the other side of the hook and loop about 1 inch in from the top edge of the fabric that you will be using on the inner layer.

7)  Pin strap to the opposite side so that the hook and loop pieces match up.  The hook and loop piece on the strap should fold into the hook and loop on the inside of the apron.  Here's an example of what it looks like finished.
  
8)  Sandwich strap between the two apron pieces facing right sides together.  Sew around leaving a hole for turning.  Clip corners.  Turn.  Top stitch all the way around closing turning hole up in the process.

Done!

Next up . . . personalized ordering pad.

Craft on!   


Check out the great parties I may link to by clicking on the blog name below or visiting my "I like to party" page that shows off all the party buttons.  These gals go to a lot of work to host these parties.  If you participate in parties please take time to look through a variety of the projects linked up.  They are a great source of inspiration!


Weekend - a little lovely, Craft Envy, Under the Table and DreamingBe Different Act Normal, A Vision to Remember, 504 Main - Tickled Pink, Funky Junk Interiors, Tatertots and Jello, I heart naptime


Monday - Keeping it Simple, Craft-O-Maniac, The Girl Creative, The Trendy Treehouse, CRAFT, Making the World Cuter, Mad in Crafts, Sumo's Sweet Stuff, Between Naps on the Porch, Tools Are For WomenIt's So Very Cheri, Skip to My Lou, Sew Can Do, Polly Want a Crafter


Tuesday - All Thingz Related, Sugar Bee, New Nostalgia, Creative Itch, Lucky Star Lane, Hope Studios, These Creative Juices, My Delicious Ambiguity, Today's Creative Blog-Get Your Craft On!,


Wednesday - It's So Very Cheri, Beyond the Picket Fence, Blue Cricket DesignTrendy Treehouse, Tea Rose HomeSomeday Crafts, My Backyard Eden, Sew Much Ado, Night Owl Crafting


Thursday -  Fireflies and Jellybeans, Life As Lori, House of Hepworths, Somewhat Simple, Seven Thirty Three, The Train to Crazy, PonyTails and FishScales


Friday - The Sabby Nest, A Little Knick Knack, Fingerprints on the Fridge, It's Fun to Craft!, It's a Hodgepodge Life, Kojo Designs, Simply Sweet Home, Frou Frou Decor, Remodelaholic, Momma's Kinda Crafty

Friday, October 29, 2010

stuff your stockings: i love felt food!

I'm so excited to have Susan here today.  Susan is a felt food artist.  You've just got to check out her skills at her Etsy shop.  She makes felt look so good I could eat it!  Felt food would make a super fun stocking stuffer.  I had to chuckle when Susan sent me her tutorial for felt bacon.  I've been a vegetarian for 21 years, so the last time I had actual bacon was around the age of 11.  BUT I eat vegetarian bacon (yes, there is actually such a thing), and it is yummy.  So I can't wait to make my own felt vegetarian bacon!

Susan is offering the best giveaway so that you can make it or win it . . . or your choice of "it" from who Etsy shop, so don't forget to enter at the bottom of the post! 

Hi! I am Susan from Chasing Marcus and owner of the Etsy shop, The Felted Pear. On Chasing Marcus, I blog about the day to day activities with 2.5 year old daughter and our crafting adventures. In my Etsy shop, The Felted Pear, you will find handcrafted felt food made from Eco-fi felt and stuffed with bamboo fiber stuffing.

Recently, I have been combining the two, for a blog series So, You Think You Can Felt Food, where I have been posting different tips, tricks and tutorials for making your own felt food.

My husband and I have commited to a handmade Christmas, and our daughters stocking will be filled with felt food. I was so excited when I saw that Elizabeth was doing a Saturday Series on Stocking Stuffers and am honored to be a part of it. Today I will be sharing with you how to make posable felt bacon strips. Combine these with the fried egg tutorial on Chasing Marcus and the Strawberry and Bread tutorials here on 12 Crafts and you have a complete breakfast meal!

So, here are the details:

1. Gather your materials. You need:

  • Printed Pattern (found here)
  • 1 sheet Ruby Red Felt
  • 1 sheet Cashmere Felt
  • Embroidery Floss to match Cashmere Felt (I use DMC 437)
  • DMC Wired Color Infusions Embroidery Thread (I used the brown)
  • Needles-Regular sewing and a VERY large eye needle
  • Scissors
  • Disappearing Ink Marker
2. Trace Pattern onto double thickness of Ruby Red Felt and then cut them out. Be sure to cut out two identical pieces for each slice of bacon.

3. Trace pattern onto a single thickness of Cashmere felt and cut out.

4. Cut the cashmere felt vertically into 4-5 equal sections. Be sure to follow the natural curves of the bacon.

5. Lay 2 strips on the Ruby Red Felt, and trim excess felt.

6. Stitch down cashmere felt with a running stitch.


7. Thread Large Eye Needle with Color Infusion Wire wrapped Embroidery Thread. I had to use a yarn needle. Tie a knot in the end as small as you can. This thread is pretty bulky so you will want to make your knot as small as possible to avoid bulk in your bacon slice. I needed about 18 inches of thread per bacon slice.

8. Stitch a running stitch along the outer edges of the bacon. Don't be afraid to pull--you will have to pull quite hard in order for the thread to go in and out. My felt did not stretch out even though I thought it would torn to shreds, because I was pulling so hard =)


9. Once all four sides are stitched together, tie off the thread and hide the knot and you are done!

Your bacon slices will be posable and look like just cooked crisp bacon. "Tasty!" as my daughter would say.


You have got to check out The Felted Pear

Susan is giveaway a felt grocery bag AND a $10.00 credit to her Etsy store! 

I so wish I could enter my own giveaway! 

Now, here's how you can win:
*Leave one comment for each entry.*

1)  Be or become a follower of twelve crafts.

2)  Head on over to The Felted Pear and leave a comment here telling me what you would pick if you won.

3)  Be or become a follower of Chasing Marcus.

4)  Leave any ole comment you want.  ;)

Giveaway will be open for entries until Friday, November 5, 2010 @ 11:59 PM (CST).

**Also, I've started announcing winners of these Saturday giveaways up at the top of the blog rather than in a separate post.  I also contact winners, so the winners do not have to contact me to claim their prizes.**

Craft on!

Thursday, October 28, 2010

feed-me friday: smorelicious brownies

Truth?  Truth!  I call these brownies because in my mind brownies are way easier to make and less time intensive than cake.  However, these delightfully yummy little bars can't be eaten with fingers . . . well, they could be eaten with fingers, but you will have a sticky sweet mess on your hands . .  . literally!

So grab a fork and get ready to dig in!!!!

Smorelicious Brownies

There are two different ways to make these:
1) Use the recipe below for dairy-free, egg-free cake brownies.
2) Buy a box of fudge brownie mix throw in a 1/2 cup of mini semi-sweet chocolate chips while mixing the ingredients together and jump down to step

Here's what you need for the brownies:
~3/4 cup all-purpose flour
~3/4 cup whole wheat flour
~1/2 teaspoon salt
~1 cup white sugar
~1/4 cup unsweetened cocoa powder
~1 teaspoon baking soda
~1/4 cup of vegetable oil
~1/4 cup of applesauce
~1 tablespoon white vinegar
~1 teaspoon vanilla extract
~1/2 cup water
~1/2 cup mini semi-sweet chocolate chips


Here's what you need for topping:
~2 cups of marshmallows
~1 cup of chocolate chips
~caramel ice cream topping as desired
~2 cups crushed graham crackers
~1 cup of peanuts (optional . . . I love peanuts and put them on everything I can . . . but leave them off if you want.)


Here's what you do:
1)  Preheat oven to 350 degrees. Grease an 8 x 8 inch baking pan.  (I usually double the recipe above and bake in a 9 x 13 pan when we have company or a party to make this for.)


2)  In a large bowl, combine both flours, salt, sugar, cocoa powder, and baking soda. Mix well with a fork, then stir in oil, applesauce, vinegar, and vanilla extract. When dry ingredients are thoroughly moistened, pour in water and stir until batter is smooth. Stir in chocolate chips and pour batter into prepared pan.


3)  Bake in preheated oven. Bake the recipe above for about 25 minutes or until knife inserted into middle comes out almost clean but not completely clean.  Bake the brownie mix according to package directions but pull out five minutes early or when knife inserted into middle comes out almost clean.
 
4)  Sprinkle marshmallows, chocolate chips, peanuts, broken graham crackers over brownies.  Drizzle with caramel topping.  Bake an additional 5 minutes.
 
5)  Cool for a few minutes.  Cut.  Enjoy!
 
Cook on!

Wednesday, October 27, 2010

pretend and play restaurant set: oven mitts and pot holders

**Two days left to enter to win the rock and roll earrings.  Click here to find out how to enter.**

Pot holders and oven mitts don't really need a tutorial . . . and yet, I'm doing one anyway.  It's a disease! 

The pretend and play restaurant set is well underway! 

We've seen:


Now we have coordinating oven mitts and pot holders.

Here's what you need:
-fleece
-coordinating fabric

Here's what you do for the oven mitt:
1)  Trace child's hand and use the traced hand to make sure the oven mitt will be larger than the hand.  Or trace around a child's mitten adding a few inches all the way around perimeter for the oven mitt pattern.  Leave an extra 1/2 inch on the bottom of the non-fleece mitt shape.  Cut out two mitt shapes for each oven mitt. 

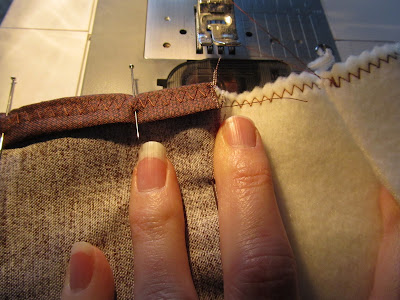
2)  Cut the bottom of the fleece mitt shape with pinking shears.

3)  Pin the two mitt shapes right sides together just at one side.  

4)  Double fold the end of the non-fleece mitt shape and pin.  With a zigzag stitch sew a hem down the bottom of the mitts pinned together.

5)  Pin the mitt shapes right sides together all the way around.  Sew.  Clip rounded corners and turn.

Oven mitts done! 

The pot holders are pretty self-explanatory . . . so let me explain them ;).  Cut out two squares.  Pin them right sides together.  Sew around leaving a turning hole.  Clip corners.  Turn.  Top stitch around edge closing up turning hole in the process. 


Craft on!


Check out the great parties I may link to by clicking on the blog name below or visiting my "I like to party" page that shows off all the party buttons.  These gals go to a lot of work to host these parties.  If you particpate in parties please take time to look through a variety of the projects linked up.  They are a great source of inspiration!


Weekend - a little lovely, Craft Envy, Under the Table and DreamingBe Different Act Normal, A Vision to Remember, 504 Main - Tickled Pink, Funky Junk Interiors, Tatertots and Jello, I heart naptime


Monday - Keeping it Simple, Craft-O-Maniac, The Girl Creative, The Trendy Treehouse, CRAFT, Making the World Cuter, Mad in Crafts, Sumo's Sweet Stuff, Between Naps on the Porch, Tools Are For WomenIt's So Very Cheri, Skip to My Lou, Sew Can Do, Polly Want a Crafter


Tuesday - All Thingz Related, Sugar Bee, New Nostalgia, Creative Itch, Lucky Star Lane, Hope Studios, These Creative Juices, My Delicious Ambiguity, Today's Creative Blog-Get Your Craft On!,


Wednesday - It's So Very Cheri, Beyond the Picket Fence, Blue Cricket DesignTrendy Treehouse, Tea Rose HomeSomeday Crafts, My Backyard Eden, Sew Much Ado, Night Owl Crafting


Thursday -  Fireflies and Jellybeans, Life As Lori, House of Hepworths, Somewhat Simple, Seven Thirty Three, The Train to Crazy, PonyTails and FishScales


Friday - The Sabby Nest, A Little Knick Knack, Fingerprints on the Fridge, It's Fun to Craft!, It's a Hodgepodge Life, Kojo Designs, Simply Sweet Home, Frou Frou Decor, Remodelaholic, Momma's Kinda Crafty

Tuesday, October 26, 2010

tuesday's true confession: will i ever hang those pictures?

Alright . . . here's the deal . . . this week I've seen this:


and this:

and this:


And every time I see amazing creations like these, I think to myself:

I want to make something like that.

or

What cool photo wall collage can I come up with?

or

I need to do some decor crafts.

Here's the deal . . . I won't and I can't. 

As we established last Friday, I confess that I do not have an eye for pretty when it comes to decorating. 

I've tried . . . I've tried very hard to take my quirky, eclectic style and showcase it in a room, but it usually turns out hideous and clown-like.  (I really don't want to raise my children in a circus-like atmosphere because personally I think clowns are kind of freaky . . . not funny!)

I read some great bloggers who have some amazingly decorated homes, and the only way I will ever get a home to look like that is if Stephanie Lynn herself comes and lives with me . . . hmm . . . now that's I good idea.  I wonder if she would do that . . . maybe if I asked really nice and said "pretty please."   
   
So I confess that my creating and crafting skills are pretty much limited to stuff for my kids.  I can't think of cool things like world map balls, painted family trees and recycled sunburst mirrors.  I want to . . . I totally envy those that can, but it's not going to happen.  I don't know what colors look good together or what furniture to put where.  In fact . . . wait for it . . . I still have pictures leaning up against the wall where I THINK I MIGHT hang them some day . . . and we've lived in our house for SEVEN years.  Now, that's embarrassing!

The sooner I learn to accept that and embrace the fact that I'm a one-trick pony when it comes to the crafting world, the better off I'll be. 

So . . . I'm over it (I'm not really) . . . I give up (I don't really) . . . I'm sticking with kids' stuff (I probably won't). 

How about you . . . what's your crafting niche?  Kid's stuff? Decor? Sewing?Quilting? Scrapbooking?  Do you find yourself looking at the crafting skills of others and wishing you had those skills?

Confess on!

This post is sponsored by an inspirational new sponsor, Arise Shine Designs.  Look for a spotlight post on Arise Shine Designs including a great giveaway in the weeks to come, and visit Arise Shine Designs for beautiful Scripture-inspired jewelry:
Photobucket

Related Posts with Thumbnails