I'm so excited to welcome my friend Lorene for this Saturday's stocking stuffer idea. AND she's giving two of you the opportunity to win these super cool rock and roll washer earrings. Check out ways to enter at the end of the post.
Happy Saturday! I am so happy to be here with you today. I idolize Elizabeth and love all of her twelve (plus some) crafts, so I feel like a celebrity today!
Happy Saturday! I am so happy to be here with you today. I idolize Elizabeth and love all of her twelve (plus some) crafts, so I feel like a celebrity today!
And just who am I?

I'm Lu of just Lu. My given name is Lorene (sounds like chlorine), but my husband (that's him with the gaping mouth in the photo) calls me Lu... so I answer to both. I also answer to Mama, but only if you're the cutest little man on the planet. :)

just Lu is my place to be just who I am: a wife, mommy, and technical writer who is also slightly addicted to creating. I share mostly crafts with a few recipes and other tidbits, and on Wednesdays I post web savvy tips and tricks over at my real-life best friend Debra's blog, Housewife Eclectic. I'd love to have you stop by sometime!
Today I am so thrilled to share with you one of my favorite and easiest projects: rock and roll earrings.

I got in on the stamped washer craze at the beginning of summer, just like every other craft blogger. I was inspired by Polly's stamped washer earrings at Helping Little Hands, but after I made mine, I felt they they were just needing a little something extra. For me, that little something was a cheap piece of plastic otherwise known as a guitar pick.
The little lovelies are perfect for the moms, sisters, girlfriends, daughters, grandmas and all the other women on your Christmas list. For the die-hard (or wannabe, like me) rock and roll fans, the original classic rock and roll set fit the bill:
The little lovelies are perfect for the moms, sisters, girlfriends, daughters, grandmas and all the other women on your Christmas list. For the die-hard (or wannabe, like me) rock and roll fans, the original classic rock and roll set fit the bill:

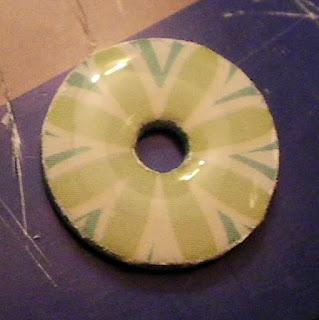
For those outside the rock and roll set, you can glam up the washer with some pretty paper and glaze to elevate the guitar pick from classic rock to haute couture:


So, let's get started...This looks like a bunch of supplies and an overload of instructions, but I promise that it isn't difficult and really won't take long (except for the glaze drying). I'm showing you both the classic rock and the haute couture versions today, and my technical-writer heart just loves lists. :)
Rock and Roll Earrings
tutorial by Lorene of just Lu
for personal, non-commercial use only
Gather your supplies

Each pair of earrings ends up costing under $2, but it's practically impossible to find most of these supplies in small quantities (less than 36), so get a group of friends together or mass produce to make the most of your supplies. I bought my jewelry supplies at the local craft store as part of a kit, but you can buy them separately, too.

- 2 earring backs -- anything but posts will work. I use either fishhook (lower) or kidney wire (upper) backs, both pictured.
- about 8 jump rings (you may want more just in case) in three different sizes -- I use 4 large (about 8 mm), 2 medium (about 6 mm) and two small (about 4 mm). I prefer the rings that look like little keyrings instead of the single-loop ones, but they both work great.
- 2 eye pins -- optional, but can replace four of the jump rings. I prefer using eye pins instead of jump rings, especially with the thicker fender washers (explained below).
- 2 guitar picks -- I buy mine three for a buck at my local music shop (and I do pay for them even though they say "Stolen from..."), but you can also find some awesome and inexpensive multipacks online if you don't have a local store near you. Don't worry about the thickness (such as .8 mm) too much -- just find a color/pattern that you love.
- 2 flat washers -- I use 1/4 inch washers, and they are just the right size and weight. The washers pictured are regular washers (larger hole, on the right) and fender washers (smaller hole, on the left).
- *A permanent marker -- black if available, or a dark color (brown, blue)
- *Wet wipes -- just one or two (not pictured). Any kind of wet wipe will work -- baby wipes, disinfectant wipes, or even a paper towel with a bit of rubbing alcohol or vinegar on it (just barely damp).
- *A steel stamp kit -- I use this 36 piece 1/8" set from Harbor Freight. If you're only going haute couture, you won't need this, the permanent marker, wet wipes, or heavy hammer.
- *A heavy hammer -- The heavier the better. Heavier hammer = fewer
hits to the steel stamp = less chance of the stamp sliding = more
accurate stamping. That's a lot of =ing :) (also not pictured) - Needle-nosed pliers/wire cutters -- I used regular ones straight from my tool kit before finally breaking down and spending the $5 to get a 3-in-1 jewelry tool. The jewelry tool has a smaller tip and doesn't leave grooves on the wire after I bend it, and I've made a lot of these earrings (plus a few other jewelry items) so they were definitely worth the purchase.
- An awl or other hole-creating device -- An awl is just a small pointed piece of metal with a handle. You could probably use a drill, but I was afraid that the drill would crack the pick, so I borrowed (possibly permanently) my dad's ancient awl. The ancientness is optional; you can pick a new one up for a couple bucks at your local hardware store.
- An emery board or fine grit sand paper (not pictured, but I'm sure you know what I'm talking about :)
If you are making your earrings à la haute couture instead of à la classic rock, you'll omit the *ed supplies above and instead round up...


- Scrapbook paper (scraps are perfect!)
- Original ModPodge (matte or glossy)
- A clear glaze, like Glossy Accents, Diamond Glaze or Dimensional ModPodge -- you can use your regular Mod Podge, but it doesn't seal as well or look as snazzy. Your glaze needs to be clear (of course), dry to a hard finish, and have an easy-apply fine tip bottle (trust me, you'll want that!).
- Scissors and an Xacto knife (again, not pictured)
And if you are also making bead charms, you'll also need...

- 2 head pins (unless you are using the eye pins instead of the jump rings as noted above and explained in the Washer Charms section)
- 2 small beads
Prepare the Washers {stamp & cover}
STAMPED WASHERS À LA CLASSIC ROCK
1. Find a hard flat surface. I used my concrete front step with my thin plastic cutting board (actually a $1 store placemat) to protect the back of the washer. You could also use a self-healing mat from a rotary cutter if you want.

2. Place your washer on your covered surface and place your stamp on top of it. Be sure that your stamp is FLAT -- rock it up and down (away from you and then back towards you and then left and right) until you've got a good feeling for where "flat" is. If your stamp isn't flat, you'll get an uneven stamp and possibly miss part of a letter, resulting in an R that looks like a P. And who wants to pock and poll? Nope, everyone wants to rock and roll.

3. With your heavy hammer, give the stamp 6-10 good whacks. Be sure that the stamp doesn't move between swings or you'll have a blurred letter. Deeper impressions are easier to read, so stamp more times rather than fewer. Stamping is also a good stress-relief technique. :)

4. Stamp each letter until your washers say what you want them to say. Rock and Roll are only suggestions and the namesake of the earrings. I'd love to see what you choose to stamp!

5. Trace each letter with your permanent marker. You'll want to get the ink down in the stamp impression because you'll...

6. Wipe off the permanent marker with your wet wipes. This will leave behind just the ink that is down in the stamp impression and make the stamped letters easier to read.
Your finished washer will look something like this:

PAPER-COVERED WASHERS À LA HAUTE COUTURE


or one eye pin (with the option of a single bead) like this:


1.Trace your washers on the scrapbook paper and cut out your two circles. I trace on the right side so that I can see the design that will be on the washer, but you don't have to trace the center hole. I just wanted to make sure my design was centered. :)

2. Apply a thin layer of ModPodge to the front of the washers and firmly press your washer on to the back side of your paper circles.

3. When the ModPodge has dried completely, use your Xacto knife to trim away the excess paper and cut out the center hole of each washer.
4. Lightly sand the outer edges with your emery board and smooth the center edges with your Xacto knife so all the edges are nice and trim.

5. Brush away any paper scraps or sandy residue and apply a thin layer of glaze over the paper on each washer. Use the fine-tipped applicator to be sure that the glaze covers the entire surface of the paper and resist the urge to shake the bottle. Shaking the bottle will put yucky bubbles in your glaze. You can also just use a couple more coats of ModPodge, but it won't seal out moisture quite as well or look as glazey and polished.
6. Allow the glaze to dry completely. You want that glaze dry and chisel-hard. My glaze recommended an hour, but after an hour, it was dry to touch but still too soft so my washer ended up with some yucky marks on it. I'd recommend at least 4 hours, overnight if possible.
For a look somewhere in between haute couture and classic rock, you could also use nail polish to decorate your washers like Michelle from A Little Tipsy shows here on UCreate.
Make the Washer Charms
Once your washers are prettyfied (and completely dried if you glazed them), you'll make them into charms so they're ready to attach to the main earring body when you make it here in a bit.
You can either use two jump rings (with the option of a separate bead charm, made following the instructions in the next section) like this:

or one eye pin (with the option of a single bead) like this:

For this tutorial, I used two jump rings on the traditional washers and the eye pin on the fender washers, since my jump rings aren't big enough to wrap around the fender washers. When all is said and done, I prefer using a single eye pin because I find it simpler, both for attaching the washer to the earring and for adding a bead. I'll show you both ways so you can decide for yourself.
WASHER CHARM USING TWO JUMP RINGS
1. Attach a single large jump ring to your washer. If you're using a keychain-esque ring, you'll thread it on like this:

and if you're using a single-loop ring, you'll open it like pictured (by twisting the ring to separate the ends, not by pulling the ring to make an oval shape), thread it on, and then use your pliers to bring the ends closed again.

2. Attach a single medium jump ring to your large jump ring.
3. Thread your bead charm (if applicable) on to the large jump ring.
*Once I've threaded on the medium jump ring and/or bead charm, I flatten the large jump ring using my pliers for the stamped washers so that the words will (mostly) remain right-side up and centered on the earring. The resulting washer charm looks like this (without a bead charm):

WASHER CHARM USING A SINGLE EYE PIN

1. Compare your eye pin to your washer to determine how far above the top of the washer you want the loop (the "eye")

2. Grip the pin with your pliers at the distance that you determined you wanted between the eye and the center of the washer and bend the straight end of the pin around your pliers to make a U shape. (If you're adding a bead, grip the pin a little bit farther down than the distance you determined)
3. If you're adding a bead, slide the bead on the straight end of the pin.

4. Thread the pin through the hole in your washer so that the eye part of the pin is behind the washer and the bead (if applicable) and straight part of the eye pin are in front of the washer.

5. Bend the straight end of the pin around the washer so it is perpendicular(ish) to the eye end of the pin.

6. Trim the pin using your wire cutters and bend and flatten the wire tail.
Be careful about using your pliers to flatten the wire tail with your glazed washers -- depending on how hard the glaze sets up, you might leave marks like this (like I did):

Make the Bead Charms
If you are using only jump rings (no eye pins -- explanation above in the Make the Washer Charms section), you'll need to make your charms separately. If you're using eye pins, the section above explains how to attach your bead as you create your washer charms.
To make the bead charms...

1. String one bead on one head pin.
2. With your pliers, grip the pin just above the bead and twist the pin around the tip of the pliers until you've made at least a full circle. I make a circle and a half to be safe.
3. Using the wire cutters, trim the pin and then bend the wire tail so that it continues the circle and makes a nice little charm.
Build the earrings
Now that you've done your prep work, you're ready to build the earrings! Before you start, though, decide what side of the guitar pick you want to be the front of the earring. Most picks have writing on at least one side of the washer, so you can choose to let that show more on the front, or hide it on the back (and you can even cover it up with your pretty paper like you covered your haute couture washers if you want).
Once you've decided front/back, continue on (you're almost done!):
1. Place pick front-side up on a firm but disposable surface, like a phone book, and place the tip of the awl in the middle of the thinner end of the pick. (You'll be pushing the awl all the way through so be sure the surface underneath is soft and hole-able.)

2. Press straight down and twist the awl carefully until you've pushed the awl completely through the pick and formed a nice hole. Then carefully remove the awl and admire the hole. :) Be sure that the hole is big enough to thread your jump ring through easily, especially if you are using the keyring-esque jump rings.

3. Grab your emery board and file off the little rim of extra plastic on the back side of the pick. You want that to be as flat as possible to make it easy for you to thread your jump rings through.
4. Repeat the hole-making process for the other pick.
5. Thread one large jump ring through the hole in each pick. If you are using the keyring-esque rings, you'll slip the ring on like this:

splitting the ring to slide it on, and then angling it so that the tip goes through the hole and continuing to slide it around until it is attached.
If you are using the single-loop rings, open the ring like shown (by twisting the ring to separate the ends, not by pulling the ring to make an oval shape), slide it through the hole, and clamp the ring back together.

6. Attach a small jump ring to the large jump ring on each pick.
7. Attach the small jump ring on each pick to your earring backs, making sure that the front of your pick is facing forwards.
If you have a fishhook earring back, you'll just attach the small jump ring to the loop at the bottom of the earring:

If you have a kidney wire earring back, slide the small jump ring on the wire and down to the little dip section, and then clamp that section closed with your pliers, like this:

Now you've got a basic earring body... you could stop here if you wanted. But what's the fun in that? :) Just one more step...
8. Attach your washer charm to the earring body -- make sure the charm face forwards!-- either by threading the medium washers from your washer charms on to the large jump rings of the earring bodies:

or by attaching the eyes of the washer charms' eye pins to the earring bodies' large jump rings:

Voila! You are now the proud owner of a custom pair of hand-made rock and roll earrings. At least until you stuff them in someone's stocking. :)

To make the nice earring display card, cut a 2.5x3 inch cardstock rectangle. Using a pin, poke two holes, each about half an inch from the top of the rectangle, one 3/4 inch (or so) from each side. (For kidney wire earrings, poke two extra holes about half an inch below those holes for the little hook part.) Load your earrings on your card and gift away!
Want the earrings but don't want to make them? Two lucky readers will win their choice of one of these three pairs of earrings:
 |
| classic black, haute red, or classic blue |
You've got four possible entries, and don't forget to leave a separate comment for each entry:
- Another entry: Give me a suggestion of what to stamp on the washers for earrings, and let me know which pair of earrings your like best. I stick with rock and roll because I'm fresh out of ideas, so I need your help!
- Another entry: Spread the word on Facebook, Twitter, or your blog.
Thanks again, Elizabeth, for having me over to visit! I hope you all have a wonderful Saturday... and did you know we're only two days away from the two-month-till-Christmas mark? :)
**Giveaway ends Friday, October 29, 2010 at 11:59 (CST).**
Thanks Lu! I love these earrings . . . almost enough to go get my ears pierced again!
Craft on!


25 comments:
Roll with the punches is too long....You could personalize it with initials if the people in your family....which is somewhat symbolic, sorda like the wedding band.
I am already a follower of your blog.
I love the hot pink ones.. cute!!
I truly can't decide between the black rock and roll and the red haut couture ones. They're both awesome! Thanks for the great tutorial. I'm very tempted to go out and buy some washers today.
Some other word pairs that come to my mind would be odds and ends, bits and pieces, heart and soul, safe and sound. Apparently, there's a whole wikipedia article that might get you started. You could also have some fun with scrapbooking papers on the guitar picks and then match the sayings. For example, glue a british flag on the guitar picks and then stamp "fish" and "chips" on the washers, or do a pirate flag and stamp yo ho or drink up. You could also stamp some band names like Guns N' Roses or Take That. ;)
I was going to say "Heart & Soul" like Isabel did. :o) Thanks for sharing. Happy Saturday!
http://withcherriesontopbows.blogspot.com/2010/10/tutorial-from-twelve-crafts-until.html
Loved it so much I had to post a link to the tutorial on my blog! (one of them that is;-))
Thanks,
Sarah
www.potsnplans.blogspot.com
www.iwannabakeyoubirthdaycake.blogspot.com
Great Gatsby, those are awesome!
I am a follower of both blogs. I like the red ones.
I'm a follower. Love the earrings...and it was a very good tutorial. thanks
Cute for Christmas would be "ho ho ho" or to stick with a holiday them you could do "boo" on each of them. I love the classic black. and the haute red...oh I love them all.
I follow Lu.
Great tutorial, Lorene! Already a big fan/follower of yours!
And now I follow twelve crafts till Christmas, too!
Love, love, love these! I follow twelve crafts till Christmas.
These earrings are toooooo cute. I love them. I am a follower of your blog. (I did the flowers today, the hole in the center made it so easy)
This is great! My son plays in a christian youth band and the girls would go wild over these! I think I may be wild myself... :) How neat! I am a new follower!!!
Anna @ Moon River
http://moonriver74.blogspot.com/
asamsiam@yahoo.com
I am now a follower of Lu! Love the blog!!
Anna @ Moon River
asamsiam@yahoo.com
Some suggestions for them: Rock Jesus , Pick Jesus
Anna @ Moon River
I am a follower of your blog!
Terri@Foggitt.org
I am a just Lu Follower!
Terri@Foggitt.org
I love the haute red earings the best!! Another stamp idea? Maybe musical notes.
These are so incredibly creative! They would make a great Christmas present for my niece who is learning to play guitar. Another stamp idea might be Praise & Worship.
drschuller at msn dot com
Wooohooo! I know just who to make these for! Sweet. :) I'd love to win a set though for ME. haha. I'm a follower!
I kind of like pock and poll but I think I'll stick with rock and roll for my friend. Maybe for me I'd stamp right and left. Just for kicks. ;) I think I like the classic black set best - though the haute red are pretty yummy.
Post a Comment